This quick tutorials should explain how to add a new declarative action (DA) to your workspace action bar that opens a page in a new tab.
Step 1: Create a new page that then will get opened in a new tab, if you press the button
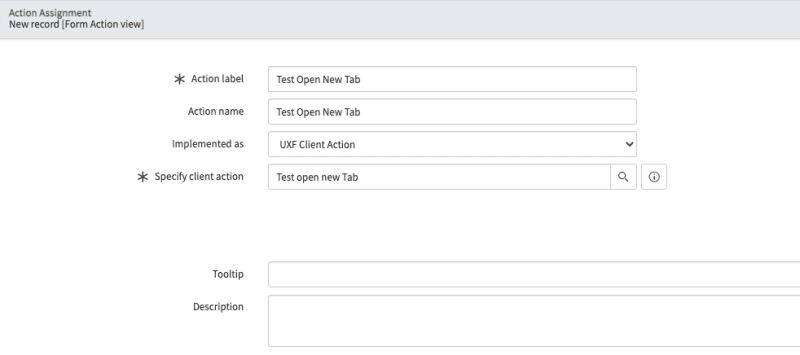
Step 2: Go to Now Experience Framework -> Actions and Events -> Action bar Declarative Actions and create a new record
Select on 'implemented as' = UXF Client Action

And for Specify client action you create a new record as shown in the screenshot. The Key and the label must be unique and in the 'Applicable to' select 'Form'.

and you can use following payload. The route points to the page you want to load in the new tab.
{"route": "YOURPAGE"}
You could also add fields, if you have them as url parameters in the source page like:
{"route": "YOURPAGE","fields":{"table":"{{table}}","sysId":"{{sysId}}"}}
Step 3: Create or update the UX Action Configurations
If the UX Action Configuration record exists for the workspace you can update it or else create create a new one. For our example I created a new one:

The SysId of the UX Actions Configuration (if you created a new one) you need to add the sysId to your UX page properties (actionConfigId).
Add your DA to the Declarative Action Assignments in the first related list. in the second related list create a new UX Form Actions Layout.
Step 4: In the UX Form Action Layout you need to add a UX Form Action Layout Item

Step 5: Configure the UX Form Action Layout Item

Now you can validate if the button shows up on your workspace. If you click the button, there is nothing happening. Now we need to first create the page that we want to open and then hook up the events in the "sys_ux_addon_event_mapping" table.
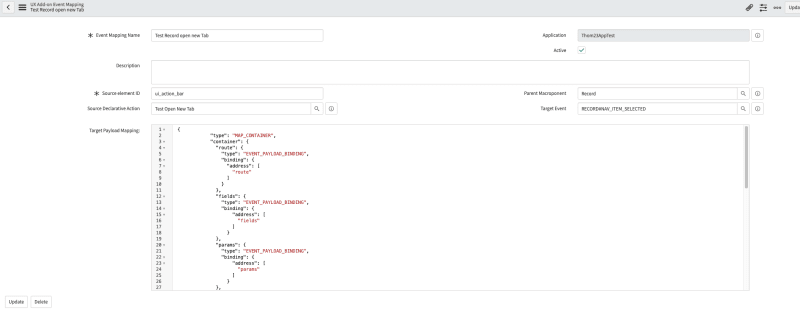
Step 6: Adding a UX Add-on Event Mapping

In the source element Id field you need to add the id of the action bar (normally "ui_action_bar"). The parent record is the record page, best practice is to link it to the original parent macroponent. Add the DA to the source and the target event is the "RECORD#NAV_ITEM_SELECTED".
In the target payload mapping you can add following payload:
{
            "type": "MAP_CONTAINER",
            "container": {
              "route": {
                "type": "EVENT_PAYLOAD_BINDING",
                "binding": {
                  "address": [
                    "route"
                  ]
                }
              },
              "fields": {
                "type": "EVENT_PAYLOAD_BINDING",
                "binding": {
                    "address": [
                      "fields"
                    ]
                  }
              },
              "params": {
                "type": "EVENT_PAYLOAD_BINDING",
                "binding": {
                    "address": [
                      "params"
                    ]
                  }
              },
              "redirect": {
                "type": "EVENT_PAYLOAD_BINDING",
                "binding": {
                    "address": [
                      "redirect"
                    ]
                  }
              },
              "passiveNavigation": {
                "type": "EVENT_PAYLOAD_BINDING",
                "binding": {
                    "address": [
                      "passiveNavigation"
                    ]
                  }
              },
              "title": {
                "type": "EVENT_PAYLOAD_BINDING",
                "binding": {
                    "address": [
                      "title"
                    ]
                  }
              },
              "multiInstField": {
                "type": "EVENT_PAYLOAD_BINDING",
                "binding": {
                    "address": [
                      "multiInstField"
                    ]
                  }
              },
              "external": {
                "type": "EVENT_PAYLOAD_BINDING",
                "binding": {
                    "address": [
                      "external"
                    ]
                  }
              }
            }
          }
Thats all, have fun! :)


Top comments (1)
I had some trouble around Step 4. You can only link "UX Form Actions" to UX Form Action Layout Item records. The article is missing a step for this.
After Step 2, you need to create a new UX Form Action record and link your Declarative Action to it. You will then be able to use this Form Action when creating the Layout Action Item in Step 4