The aim of this tutorial is to demonstrate the creation of a ERC20-compliant token. The code is not audited and should not be used in production.
Requirements:
- Basic knowledge of solidity.
- An internet browser.
If you are completely new to solidity, you may wish to check out these resources: ethereum.org or if you prefer videos like me, you can check out Solidity Programmer on youtube.
Let's begin coding, navigate to from your browser to https://remix.ethereum.org.
Remix IDE allows developing, deploying and administering smart contracts for Ethereum like blockchains.
In remix, we'll create a new file in our workspace, let's call it RawToken.sol
Explanation:
1- We started by specifying the license and version of solidity we want to write in.[1].
2- We defined the events that will be emitted to the chain when some actions are performed on our token contract.
Approval- is emitted when an account changes the amount that another account can spend from its balance. e.g when you a smart contract should automatically transfer an amount from your account to itself.Transfer- is emitted when token transfer is successful.
3- These values are not expected to change throughout the lifetime of our contract. (This requirement is specific to our example contract).
-
NAME- token name. In this example, token name is "ERC20 Token". -
SYMBOL- token symbol. In this example, token symbol is "T-O-K-E-N". -
_decimals- token decimals. -
_totalSupply- total supply of token. We won't be minting more tokens after our token is deployed.
4- We track some of the variables that relate to transfers and balance
-
_balances- tracks the balance of token(s) owned by an account -
_allowances- tracks the amount of tokens another account has approved for it to spend on its behalf.
5- Constructor
During our contract construction, we supplied two arguments and also mint all the tokens we want to the deployer's account.
-
supply- The exact amount of tokens we want to mint. e.g if we want 1,000,000 tokens, we will specify "1000000" -
_decimal- The decimals we want our token to have. Each token will be calculated usingn * 10 ^ _decimal.
6- A set of functions that return the read-only variables and/or constants.
-
totalSupply- Returns the total supply of the token in existence. -
decimals- Returns the decimals of the token. -
symbol- Returns the token symbol. -
name- Returns the token's name. -
balanceOf- Tracks the amount of tokens owned by an account. -
allowance- Tracks the allowance approved by an account for another account.
7- A set of functions that mutates the state of our token contract.
-
approve- Used by an account to increase or decrease theamountof tokens thespenderaccount can spend on its behalf. Very useful when interacting with dApps. -
transfer- Lets an account transfer anamountof tokens from its balance or allowancetoanother account. -
transferFrom- Enables an account make a transfer to a beneficiary from the balance of another account. Relies on the allowance provided by thefromaccount. -
_transferFrom- Handles the transfer logic while updating the balances of the sender and receiver.
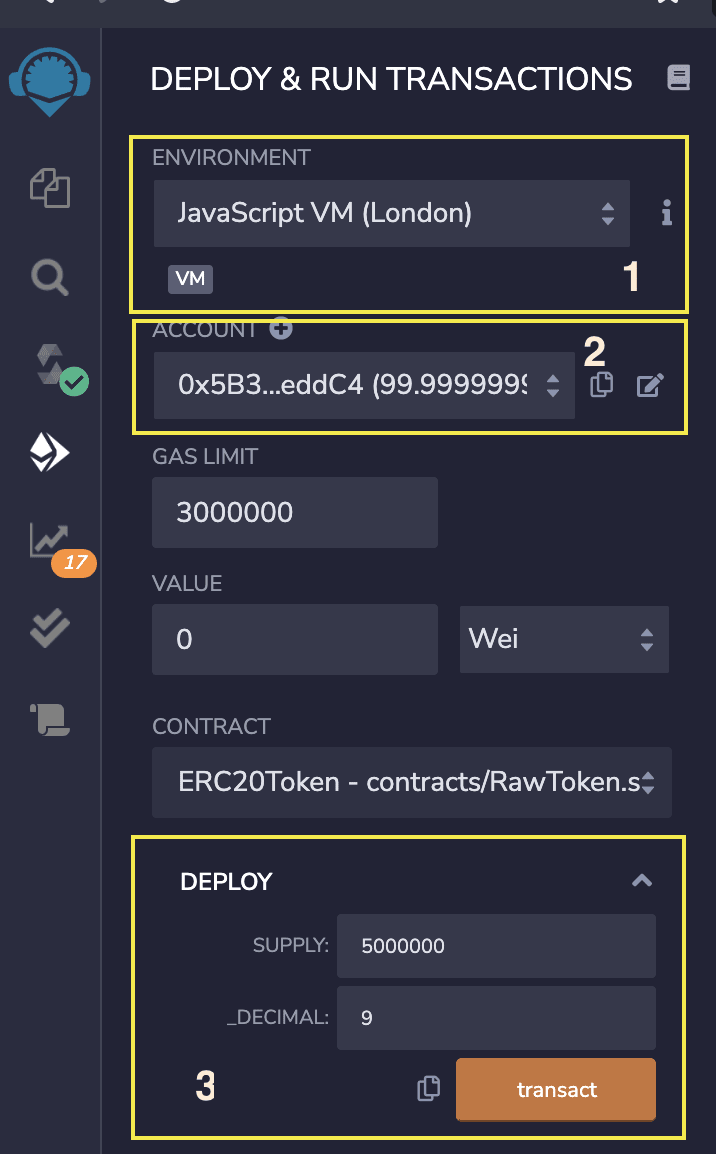
1- The token is being deployed in the local virtual environment provided by remix IDE.
2- An account also provided by remix starts with 0x5B3 and ends with eddC4 will be used to deploy the contract.
3- The constructor arguments are provided during contract construction. Here, we are minting exactly 5 million tokens and we have requested that the contract uses 9 decimals.
4- balanceOf function returns the balance of the deployer which in our case, is the total supply of the token since we "minted" this amount to the deployer inside the contract's constructor.
5- decimals returns correct value of 9.
6- name returns correct value ERC20 Token.
7- symbol returns the correct value of "T-O-K-E-N".
8- totalSupply returns the total supply of the tokens which is equal to the amount minted to the deployer explained earlier.
Conclusion:
This tutorial demonstrates how to create an ERC20-compliant token. This is not advised to be used in production as existing implementation such as openzeppelin is battle-tested and audited by various projects.
In the subsequent article to this, I will be moving the code to VSCode and use hardhat environment to compile, test and deploy
References:


Top comments (1)
Nice article and thank you for sharing!