Understanding Phoenix LiveView
- Setup
- The Primitives (this article)
- Building a Gallery app
Subscribe to get FREE Tutorials by email. Start learning Elixir and Phoenix to build features and apps!
In the previous article we saw how to setup Phoenix LiveView in order to have everything we need to build a simple LiveView gallery app.
Now, before creating our app, I'd like to explore the Phoenix LiveView primitives, understanding the magic behind LiveView while learning how we can build a simple counter.
Once built some confidence and understood how LiveView and its life-cycle work, we'll see in the next article that the gallery app is just an easy evolution of this counter.
New CounterLive module and static HTML
So, let's now put temporarily aside the GalleryWeb.GalleryLive module we've defined during the setup, and create a new live view module GalleryWeb.CounterLive in lib/gallery_web/live/counter_live.ex, which we'll use in this article mainly as a playground.
# lib/gallery_web/live/counter_live.ex

defmodule GalleryWeb.CounterLive do
  use Phoenix.LiveView

  def mount(_session, socket) do
    {:ok, socket}
  end

  def render(assigns) do
    ~L"""
    <label>Counter: 0</label>
    <button>+</button>
    """
  end
end
and add the live route in the router in lib/gallery_web/router.ex
# lib/gallery_web/router.ex

defmodule GalleryWeb.Router do
  use GalleryWeb, :router
  ...
  scope "/", GalleryWeb do
    ...
    live "/counter", CounterLive
  end
end
By starting the Phoenix server and visiting the /counter page, we should see on the browser just a label and a button.
When a client connects to the CounterLive view, mount/2 is the first callback to be invoked. It's used to setup the view and prepare the data needed for the first render.
Then, the render/1 callback is invoked. In this function we use the ~L sigil to define an inline LiveView template. For small templates I find really convenient to have everything in the same module, but in case of larger templates we can move it to a separate html.leex file.
LiveView templates (LiveEEx) are similar to Phoenix EEx templates, except that they track the changes of the dynamic parts minimizing the data sent to the client.
Great, we have a working live view... but at the moment there are no dynamic parts. The counter <label> has just a static 0 and the <button> does nothing when clicked.
Page request and WebSocket connection
Before going ahead making the view dynamic, let's take a moment to see in detail the first part of the LiveView's life-cycle.
Let's log a string, along with the process id, whenever mount/2 or render/1 are invoked.
# CounterLive
# lib/gallery_web/live/counter_live.ex

require Logger

def mount(_session, socket) do
    Logger.info("MOUNT #{inspect(self())}")
    {:ok, socket}
end

def render(assings) do
    Logger.info("RENDER #{inspect(self())}")
  ~L"""
    ...
  """
end
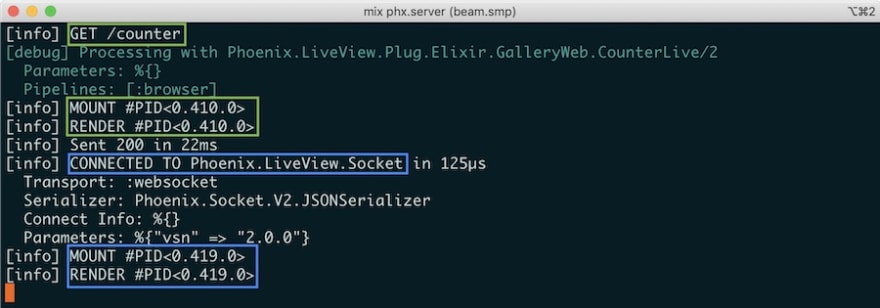
After refreshing the page just one time, we see in the logs that the mount/2 and render/1 are called two times with different *pid*s.
What's happening here?
The browser, to get the http://localhost:4000/counter page, sends an HTTP GET request to the server. The server invokes then mount/2 and render/1 to render the view, sending back the full HTML page.
Inside the HTML, we can see our view which is embedded in a <div> container that has some special data attributes (like data-phx-session, data-phx-view...). These attributes will then be used by the LiveView JavaScript library to start a stateful view.
<div data-phx-session="..." data-phx-view="CounterLive" id="phx--1wl284P">
  <label>Counter: 0</label>
  <button>+</button>
</div>
By answering to a HTTP GET request with a fully rendered page, we can support clients that do not necessarily run JavaScript, which makes LiveView also great for SEO.
When the browser receives and loads the page, it also loads the JavaScript we wrote during the setup in assets/js/app.js
...
let liveSocket = new LiveSocket("/live", Socket)
liveSocket.connect()
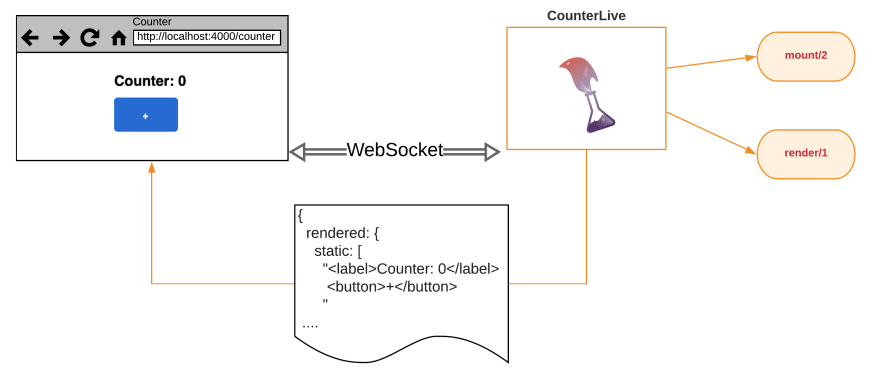
and connects to the server with a websocket. The Counter LiveView process will then track the changes, pushing the updated dynamic values to the client.
Once the browser and the server are connected via websocket, mount/2 is invoked again to setup the data, and render/1 to re-render the view.
This second time, only the view's HTML is sent back to the browser
Make it dynamic with assign/3
Let's now make the counter value, in the <label> tag, dynamic. In the mount/2 callback, we assign/3 a counter value to the socket
def mount(_session, socket) do
    socket = assign(socket, :counter, 0)
    {:ok, socket}
end
and in the template, in render/1, we change the fixed number with <%= @counter %>.
def render(assigns) do
    ~L"""
    <label>Counter: <%= @counter %></label>
    <button>+</button>
    """
end
After refreshing the page we get obviously the same result, but by changing the :counter value we should see that this change is reflected on the browser as well
Phoenix bindings, handle_event/3 and update/3
The easiest way to add some user interaction is with the help of Phoenix Bindings which are special attributes to add to HTML elements in the LiveView template. In this example, we use the click event binding, adding phx-click="event name" attribute to the button element.
<button phx-click="incr">+</button>
When we click the + button, the browser sends via the websocket a "incr" event to the CounterLive view process running on the server.
Let's try it on the browser, by refreshing and clicking the + button.
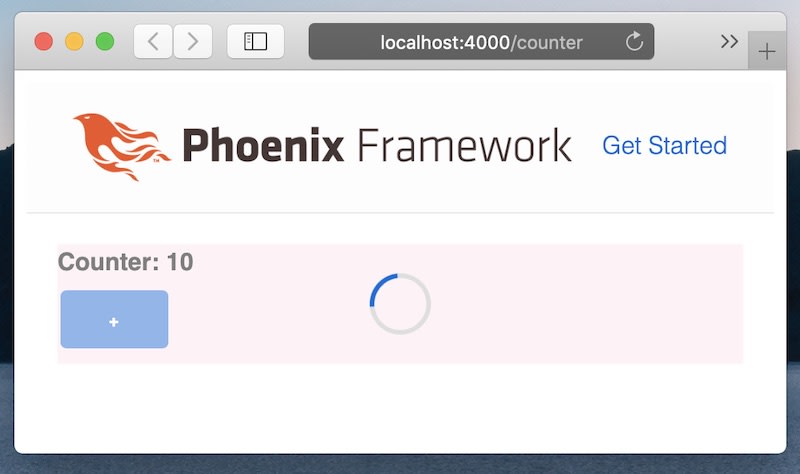
We see a red background because the CounterLive process is crashed. Looking at the logs on the terminal, is clear that we need to implement the handle_event/3 callback.
defmodule CounterLive do
    def handle_event("incr", _event, socket) do
        ...
    end
end
The first argument matches the "incr" string in phx-click, the second gives details about the event and the third is the socket.
In handle_event/3 we want to increment the counter, but how can we access to the current counter value?
Let's inspect the socket when the mount/2 callback is invoked
def mount(_session, socket) do
    socket =
      socket
      |> assign(:counter, 0)
      |> IO.inspect()
    {:ok, socket}
end
Refreshing the page, we see on the terminal the Phoenix.LiveView.Socket struct.
#Phoenix.LiveView.Socket<

  assigns: %{counter: 0},
  changed: %{counter: true},

  endpoint: GalleryWeb.Endpoint,
  id: "phx-rf-5Qdcj",
  parent_pid: nil,
  view: GalleryWeb.CounterLive,
  ...
>
The assign/3 function sets the :counter value in the assigns map and flags the value as changed in the changed map.
So, to increment the counter, we could assign a new value socket.assigns.counter + 1
socket = assign(socket, :counter, socket.assigns.counter + 1)
and it would work. But when updating a value, I prefer to use the update/3 where we pass a function &(&1 + 1) that increments the counter by 1.
def handle_event("incr", _event, socket) do
    socket = update(socket, :counter, &(&1 + 1))
    {:noreply, socket}
end
The handle_event/3 callback then returns the new socket in the tuple {:noreply, socket}.
This is everything we need to do - we don't need to update the front-end elements our self - all this is taken over by LiveView!
Let's refresh and try the counter! By clicking + we now see on the browser that the counter value increases 🎉
How LiveView updates the counter on the browser
It really feels like magic: just incrementing the counter in handle_event/3, LiveView takes care of all the rest, from propagating the changes to updating the <label> tag.
How does LiveView manage these updates under the hood?
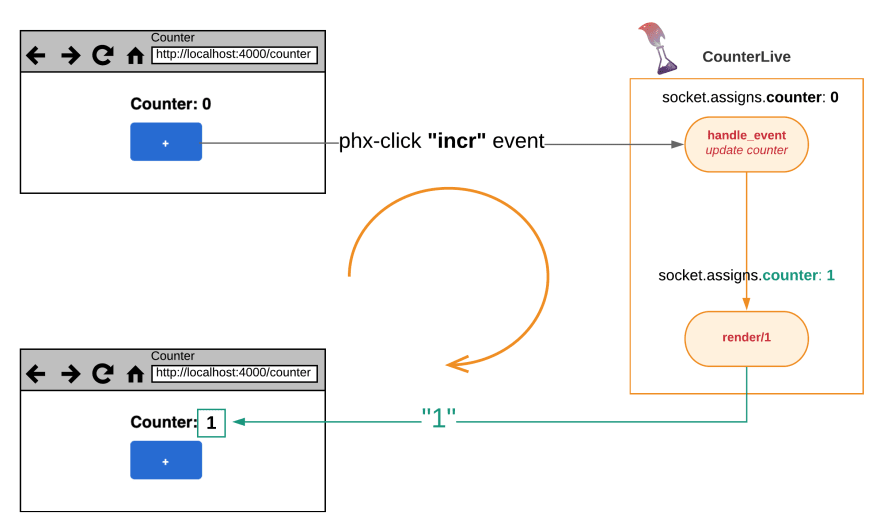
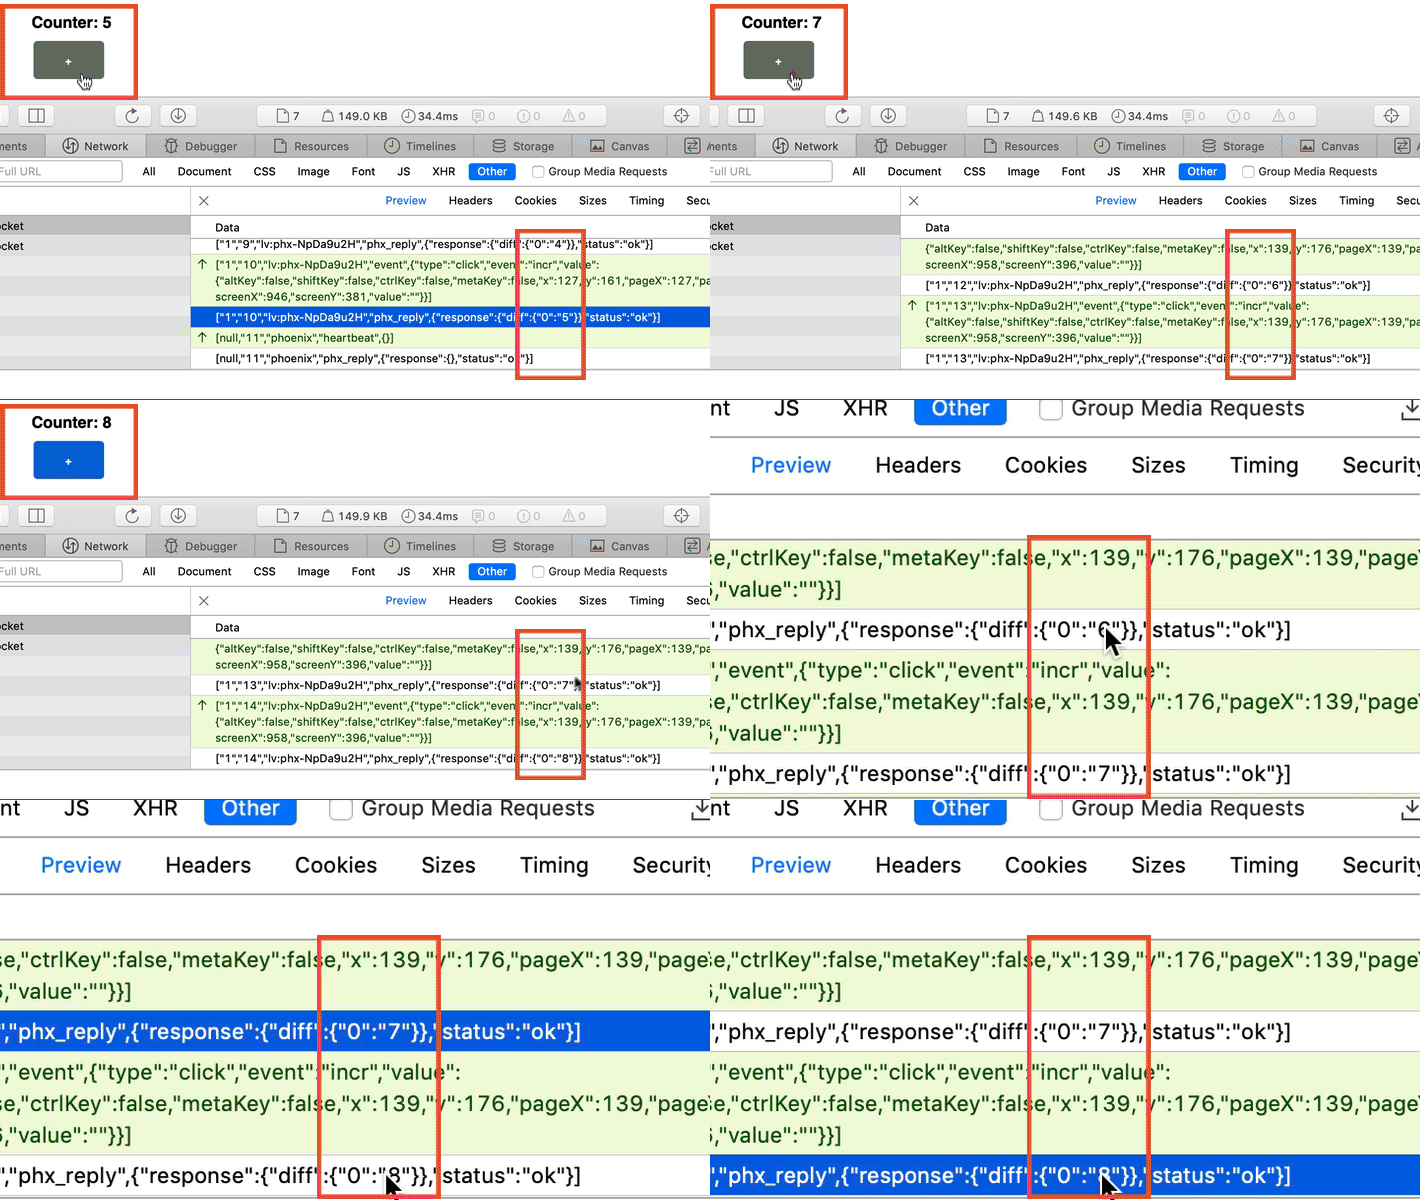
Browser and server are connected via a websocket connection. When we click the + button an "incr" event is sent to the CounterLive process.
We can see, using the browser inspector under network, the websocket connections and the messages exchanged with the server.
The LiveView process receives the "incr" event and it invokes our handle_event/3 implementation, updating the counter.
Every time we update or assign a value, LiveView re-renders the view, sending back only the updated dynamic values.
What the server pushes down to the client is just the updated counter value, with some metadata. It means that if we have a much larger template, LiveView (thanks to LiveEEx) tracks the changes happened to the template's dynamic parts and sends just the updated values to the browser.
When the browser receives updates from the server, it uses the patrick-steele-idem/morphdom JavaScript library to patch the DOM.
Using the inspector we see that only the content in the <label> tag is updated.
What's next
In this article we've seen the mount/2, render/1, handle_event/3 callbacks and LiveView's life-cycle, inspecting the messages and understanding a bit of the magic behind LiveView.
We have now all the elements we need to build, in the next article, our gallery app! 👩💻👨💻
Subscribe to get FREE Tutorials by email. Start learning Elixir and Phoenix to build features and apps!









Top comments (0)