After formatting my Mac, I set it up for my personal use and development workflow. I enjoy using various apps to enhance my productivity, so this time I decided to create a tutorial and share it with everyone.
Table of contents
Before starting I install three essential apps that help me with everything else:
- Brave (browser) - Tks to my coworker Fig for the recommendation!
- Notion (notes)
- Raycast (launcher)
Raycast is my favorite one, as it has features that help me a lot with productivity and organization. I particularly enjoy the Window Manager, Quicklinks and Clipboard History built-in functionalities, and there are many extensions you can install on it. Here are some of the ones I use:
- CPF/CNPJ Generator (Brazilian documents)
- Google Search
- Image Modification
- Color Picker
- Visual Studio Code - Project Manager
Dependencies
After that, I start setting up the development environment installing some dependencies:
- Node.js
For install Node.js, I like to use the n node version manager.
To install n run:
curl -L https://raw.githubusercontent.com/tj/n/master/bin/n -o n
bash n lts
npm install -g n
To verify if the installation succeeds run:
node -v
npm -v
n --version
- Homebrew
To install Homebrew run:
/bin/bash -c "$(curl -fsSL https://raw.githubusercontent.com/Homebrew/install/HEAD/install.sh)"
- Git and GitHub CLI
To install Git run:
brew install git
To install the GitHub CLI run:
brew install gh
- Watchman
To install Watchman run:
brew install watchman
- Yarn
To install Yarn run:
npm install --global yarn
Terminal
After this, I like to configure my terminal.
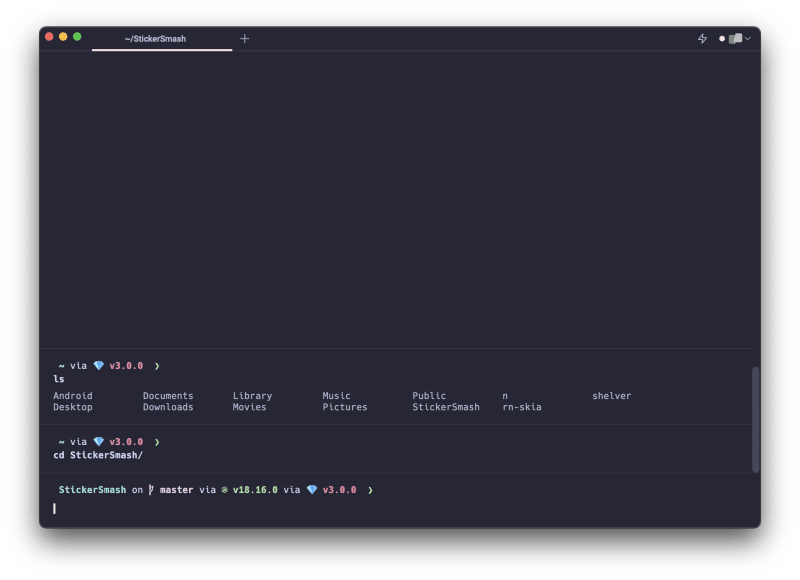
For a long time, I used the Hyper terminal, but this time, I decided to give a chance for Warp. So far, I've really liked it. If you want to try it too, download it from their website, and install it like any other app.
One "disadvantage” of Warp is that you still can't use the Fig.io command line helper with it. However, Warp already has many of Fig.io features built-in.
In my terminal, I like to use the Hack Nerd Font and Starship custom prompt. If you want to use them too, download the font on this website:
Extract the files, select all .ttf files and open.
In Warp, go to Settings → Appearance → Text and select the Hack Nerd Font on the Terminal font input.
To install Starship, follow this simple guide in their documentation:
Starship Installation Guide
NOTE: The default Warp shell is the Zsh. So, in Step 2 to configure Starship, choose the Zsh option.
Warp comes with some default themes, which you can choose by opening the command palette with Command + P and searching for 'Open Theme Picker'. However, I prefer to use the same theme that I use in my VSCode, which is the Catppuccin Mocha.
The final result is as follows:

React Native environment
Now it's time to configure the React Native environment. While I'll describe the main steps here, it's important to refer to the React Native documentation to ensure that no additional configurations or different steps are required.
iOS
- Update Ruby
MacOS 13.2 is shipped with Ruby 2.6.10, which is not what is required by this version of React Native (2.7.6).
The easiest approach I found is to update Ruby using the RVM Ruby version manager:
curl -sSL https://raw.githubusercontent.com/rvm/rvm/master/binscripts/rvm-installer | bash -s stable
rvm install ruby@latest
Set the ruby default, replacing the X.X.X with the installed version:
rvm use ruby-X.X.X --default
- Install CocoaPods
sudo gem install cocoapods
- Install Xcode
Download on the App Store.
Android
- Install the JDK 11 (LTS)
Download the .dmg file, and follow the installer steps.
Mac Apple Silicon JDK 11 Download
Mac Intel JDK 11 Download
Verify if the installation succeeds:
java -version
Create a folder to install the Android SDK. I like to create on ~/Android and named it as Sdk:
mkdir ~/Android/Sdk
Add the following lines to your ~/.zshrc file:
export JAVA_HOME=/Library/Java/JavaVirtualMachines/zulu-11.jdk/Contents/Home
export ANDROID_HOME=~/Android/Sdk
export PATH=$PATH:$ANDROID_HOME/emulator
export PATH=$PATH:$ANDROID_HOME/tools
export PATH=$PATH:$ANDROID_HOME/tools/bin
export PATH=$PATH:$ANDROID_HOME/platform-tools
NOTE: Make sure of the variables JAVA_HOME (path where you installed the JDK) and ANDROID_HOME (path of the folder you created to install the Android SDK).
- Download Android Studio
Download and execute the .dmg file:
Android Studio Download
After installing Android Studio, the first time you open it you will need to make some configurations.
If the first screen asks if you want to import settings, choose "Do not import" and click OK.
After that, it should ask for the type of installation. Choose the Custom option.
Then, it should ask you to select the JDK path, make sure to choose the path you used in the JAVA_HOME variable previously.
After selecting the JDK path, Android Studio should ask for the theme.
After that, it should ask what you want to install and the path to install the Android SDK. Check all options and in the path, select the folder you created earlier (in my case it was /Users/ambegossi/Android/Sdk).

If everything is correct, just click on Next and then on Finish on the next screen.
Flipper
Flipper is a platform for debugging React Native apps. It's nice to visualize, inspect, and control your apps from a desktop interface.
Download the .dmg file on the official website and install it like any other app.
Expo
At the time of this publication, the Expo Go app from Expo is not yet supported by the new Apple chips. So I had to install Rosetta 2 so my apps wouldn't crash as soon as I opened them in the simulator.
To install Rosetta 2 run:
softwareupdate --install-rosetta --agree-to-license
Other apps
There are some other apps that I use and always install after formatting my computer. They are:
- VSCode
- AltTab (Windows alt-tab on macOS)
- Spark Mail
- Cron Calendar
These last two, I thank my coworker Vini for the recommendation.
If this post helped you, please show your support by liking and comment below if you have any suggestions 😉


Top comments (0)