Written by Suresh Regmi
If you want to have a basic understanding of Liquibase, I would suggest you look into our previous article on database version control with liquibase https://www.turtle-techies.com/database-version-controler-with-liquibase/.
We are assuming that you have already installed liquibase in your system.
If you haven’t, please refer to this official documentation from liquibase https://www.liquibase.org/get-started/first-steps.
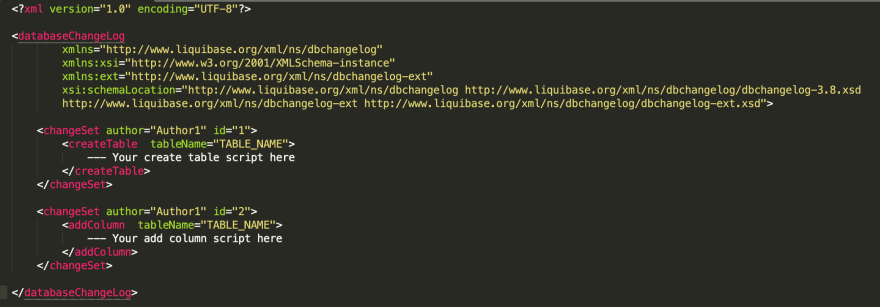
In this article, we will be discussing changelogs, changesets and some examples of how to write changesets in XML format.
The database I am referring to while writing changesets is Oracle.
You might need to change some of the values from code I provided according to the database you are using for example the driver detail, the connection parameter, data types etc.
Some background information
What is a changelog
A changelog is a collection of the changesets. Changelogs can be written in SQL, XML, JSON and YAML format.
Changelogs can include nested elements like preConditions, property, changeSet, include, context etc.
What is a changeset
Changeset in liquibase represents a single change to your database.
Each changeset is executed in a transaction and will be either committed or rolled back depending on whether there is an error or not.
Each changeset is uniquely identified by “ID”, “AUTHOR” and the directory and filename of the changelog file.
Let’s start with organizing your changelog files
Changelog files can be managed in two ways - either to create a single changelog file and add all of your changesets to that file, or create multiple files and split the changesets across them.
In my experience, the latter is more manageable and has a lot of advantages.
Segregating changesets based on database objects and release versions help to manage the changes in a more organized way.
If you already have a base database and you want to implement liquibase to that project, you can add changesets for initial tables, data and procedures in different folders and manage database updates based on release versions.
Managing changelog files based on release will help you to understand the changes that were part of the release and will be easier for other developers.
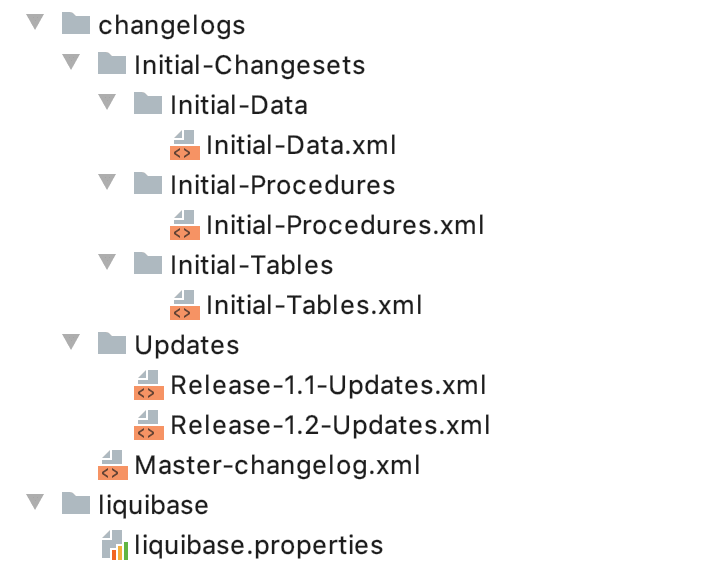
Working in an agile environment, here is an example of organizing changelogs that I use most and suggest others to follow.
I also prefer organizing changesets in multiple files and using the include tag in the database changelog of master changelog file to define the files and order of execution.
We can also define a master changelog file containing nested include elements to define the execution order of the files. An example of a master changelog file including other changeset files to run in order is given below.
<?xml version="1.0" encoding="UTF-8"?>
<databaseChangeLog
        xmlns="http://www.liquibase.org/xml/ns/dbchangelog"
        xmlns:xsi="http://www.w3.org/2001/XMLSchema-instance"
        xsi:schemaLocation="http://www.liquibase.org/xml/ns/dbchangelog
         http://www.liquibase.org/xml/ns/dbchangelog/dbchangelog-3.1.xsd">

    <include file="Initial-Changesets/Initial-Tables/Initial-Tables.xml" relativeToChangelogFile="true" />
    <include file="Initial-Changesets/Initial-Procedures/Initial-Procedures.xml" relativeToChangelogFile="true" />
    <include file="Initial-Changesets/Initial-Data/Initial-Data.xml" relativeToChangelogFile="true" />
    <include file="Updates/Release-1.1-Updates.xml" relativeToChangelogFile="true" />
    <include file="Updates/Release-1.2-Updates.xml" relativeToChangelogFile="true" />

</databaseChangeLog>
Here, I will explain to you different methods of writing changesets in liquibase with an example of two tables EMPLOYEE and DEPARTMENT.
1. How to create tables with liquibase XML
We can create one or more than one table in a single changeset.
We can define NOT NULL constraint, Primary Key and Foreign Key etc inside the createTable tag.
Constraints can also be defined outside the create table tag.
Here is an example of creating tables DEPARTMENT and EMPLOYEES in a single changeset.
<changeSet author="Author1" id="1">
 <createTable tableName="DEPARTMENT">
   <column name="ID" type="NUMBER">
     <constraints nullable="false" primaryKey="true"/>
   </column>
   <column name="DEPT_NAME" type="VARCHAR2(100 BYTE)">
   <constraints nullable="false"/>
   </column>
   <column name="DEPT_DESCRIPTION" type="VARCHAR2(1000 BYTE)">
   </column>
 </createTable>

 <createTable tableName="EMPLOYEES">
   <column name="ID" type="NUMBER">
     <constraints nullable="false" primaryKey="true"/>
   </column>
   <column name="NAME" type="VARCHAR2(100 BYTE)">
   </column>
   <column name="DEPARTMENT_ID" type="NUMBER">
     <constraints nullable="false" foreignKeyName="DEPARTMENT_ID_FK" references="DEPARTMENT(ID)"/>
   </column>
   <column name="DESIGNATION" type="VARCHAR2(250 BYTE)"/>
   <column name="SALARY" type="NUMBER"/>
 </createTable>

 <addNotNullConstraint columnName="NAME" tableName="EMPLOYEES"/>
</changeSet>
While creating changesets, I would suggest using a single database change in changeset so that if there is an error in one database change in a changeset, we don’t need to roll back the whole changesets.
For example, in the changeset given, if there is an error in EMPLOYEES table, Liquibase will fail after creating the DEPARTMENT table, so in the next execution after resolving the error it will throw an exception saying table DEPARTMENT has already been created. So, we need to manually rollback the changes that come before the one with the error.
2. Let’s insert some data using SQL file
Liquibase allows us to run the SQL stored in an external file.
This is valuable in the event that when the changesets are not supported by Liquibase, if there should be an occurrence of bulk insertions and furthermore for the situation where users incline toward utilizing SQL contents over the other Liquibase changelog alternatives, as XML, JSON, and YAML.
Here is how you can insert records in the table EMPLOYEES using an external SQL file.
<changeSet author="Author1" id="2">
 <sqlFile dbms="oracle"
          encoding="utf8"
          endDelimiter=";"
          path="Release1_SQL/insert_into_employees_file.sql"
          relativeToChangelogFile="true"
          splitStatements="true"
          stripComments="true"/>
</changeSet>
SQL File
---- DEPARTMENT
Insert into DEPARTMENT (ID,DEPT_NAME,DEPT_DESCRIPTION) values (1,'D1','D1 Department');

---- EMPLOYEES
Insert into EMPLOYEES (ID,NAME,DEPARTMENT_ID,DESIGNATION,SALARY) values (1,'John Doe',1,'Developer',50000);
3. How to write SQL statements using SQL tag
Liquibase also allows us to write SQL inside XML changeset to run whatever SQL you want.
It can be useful in the cases when complex changesets aren’t supported by liquibase automated changesets.
Below is an example of writing complex changes using the SQL tag.
<changeSet author="Author1" id="2">
 <sql dbms="oracle"
      endDelimiter=";"
      splitStatements="true"
      stripComments="true">
   MERGE INTO EMPLOYEES  dest
   USING  (SELECT 2   AS id, 'John Doe2'  AS Name,  1 AS DEPARTMENT_ID, 'Clerk'  AS DESIGNATION, 40000 AS SALARY  FROM   dual) src
   ON (dest.id = src.id )
   WHEN NOT matched THEN
   INSERT (dest.ID,dest.NAME,dest.DEPARTMENT_ID,dest.DESIGNATION,dest.SALARY) VALUES  (src.ID,src.NAME,src.DEPARTMENT_ID,src.DESIGNATION,src.SALARY) ;
 </sql>
</changeSet>
4. How to create Procedures and Triggers
Procedures and triggers can be created/run using the createProcedure tag in Liquibase or using custom SQL changesets.
If you want to use the CREATE OR REPLACE feature in Liquibase, runOnChange='true' can be set which will either create or update stored procedures while running.
<changeSet author="Author1" id="4" runOnChange="true">
   <createProcedure
           encoding="utf8"
           procedureName="LIST_EMPLOYEES_BY_DEPT">
<![CDATA[CREATE OR REPLACE PROCEDURE "LIST_EMPLOYEES_BY_DEPT" (
 P_PARAM1    IN EMPLOYEES.DEPARTMENT_ID%TYPE,
 RETURNCURSOR    OUT SYS_REFCURSOR) AS
BEGIN
 OPEN RETURNCURSOR FOR
 SELECT *
 FROM EMPLOYEES
 WHERE DEPARTMENT_ID=P_PARAM1;
END LIST_EMPLOYEES_BY_DEPT;
]]>
   </createProcedure>
</changeSet>
5. How to work with changelog parameters
Liquibase allows us to define global changelog parameters which will allow dynamic substitution of the parameter in the changelogs described using the ${parameter-name} syntax.
There are many ways to configure parameter values including command line parameter, properties file, parameter block of the database changelog file etc.
Here is an example of using the changelog parameter in the liquibase.properties file:
changeLogFile: target/classes/changelog/master.xml
driver: oracle.jdbc.OracleDriver

url: ${schema.connection.url}
username: ${schema.user}
password: ${schema.password}

# ChangeLog Parameters
client.name: ${dept.name}
Using changelog parameter in changeSet:
<changeSet author="Author1" id="5">
 <sql dbms="oracle"
      endDelimiter=";"
      splitStatements="true"
      stripComments="true">
  UPDATE DEPARTMENT SET DEPT_DESCRIPTION='D1 Department New' WHERE DEPT_NAME= '${dept.name}' ;
 </sql>
</changeSet>
Changelog parameter in changelog file
<?xml version="1.0" encoding="UTF-8"?>
<databaseChangeLog
        xmlns="http://www.liquibase.org/xml/ns/dbchangelog"
        xmlns:xsi="http://www.w3.org/2001/XMLSchema-instance"
        xsi:schemaLocation="http://www.liquibase.org/xml/ns/dbchangelog
         http://www.liquibase.org/xml/ns/dbchangelog/dbchangelog-3.1.xsd">

    <property  name="table.name"  value="TEST_TABLE"/>

    <changeSet  author="Author1"  id="6" >
         <createTable  tableName="${table.name}">
             <column  name="id"  type="int"/>
             <column  name="column1"  type="varchar2(10)"/>
             <column  name="column2"  type="int"/>
         </createTable>
    </changeSet>
</databaseChangeLog>
That's all folks!
As the application development process goes on, increasingly more database changes are done by the development team which should be kept up and overseen.
With these examples, you will be able to complete the majority of migration tasks for your database including object creation, data insertion and migration, composing DDL and DML utilizing SQL tag, defining the changelog parameters and so on.


Top comments (0)