Email forms on websites are great for gathering customer data and enabling customers to opt-in for registrations, marketing communication, waitlists, product demos, and more. If you don’t want to use a vendor to generate the email workflow, you can build a series of free integrations with Reshuffle Open Source to automate the process and improve customer experience. You’ll give your customers and prospects a fast, automated process that delivers what they expect of you.
Let’s say you want people to register for a product demo. You build an email form on a webpage, then you want people who register to automatically receive a response with access info to the demo, or perhaps a Calendly invite - if you’re doing live demos.
You can use Reshuffle Open Source connectors to integrate your email form, populate the customer data from the email into a spreadsheet, and automatically send an email response providing the customer with the demo information you want them to have.
Reshuffle’s open-source integration framework makes this an easy process. In this article, you’ll learn how you can easily build a series of connections that link different services to create the experience you want your customers to have.
How to Build It
Reshuffle makes it easy to build integrations that complete complex tasks, so you can deliver unique experiences and outcomes for the business and customers. Reshuffle is an open source, lightweight, and event-driven framework that helps you integrate services — these integrations and workflows are created inside a Reshuffle App. The objects that let you interact with these services are called connectors.
Here’s how you’d build the email workflow example above:
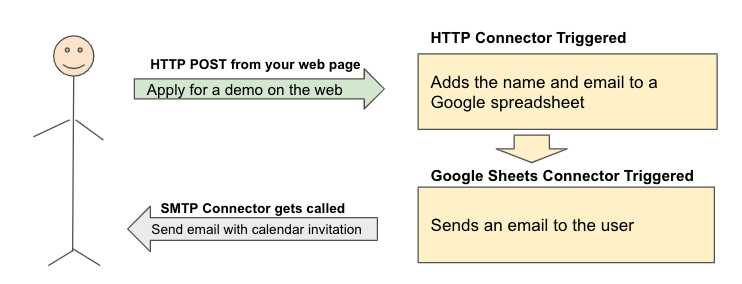
To get started, let's look at the workflow we want to create-
The first thing we need to do is to declare a Reshuffle App and configure the Connectors we will be using:
- HTTP Connector that will be triggered when the user submits their email on the web.
- Google Sheets Connector to add the entry to our spreadsheet, and trigger sending the email.
- SMTP Connector to send the email with the Calendly setup to the user.
Here is the code:
const app = new Reshuffle()

const httpConnector = new HttpConnector(app)

const googleSheetsConnector = new GoogleSheetsConnector(app, {
  credentials: {
    client_email: process.env.CLIENT_EMAIL,
    private_key: process.env.PRIVATE_KEY.replace(/\\n/g, "\n")
  },
  sheetsId: process.env.SHEET_ID
})

const smtpConnector = new SMTPConnector(app, {
   fromEmail: process.env.EMAIL_USER,
   fromName: 'Reshuffle Examples',
   host: process.env.EMAIL_SERVER,
   port: 587, //<smtp port number - usually 587>
   username: process.env.EMAIL_USER,
   password: process.env.EMAIL_PASS,
})
Now that we have all the connectors configured, let’s define what happens when the HTTP event comes from the form on the web page . We need to define the event we want to listen to using the HTTP connector on() method. In this case, we want to listen to an incoming POST HTTP event on the apply-for-demo path. We will then write handler code to extract the email and name from the POST request and use the Google Sheet connector to add these to our spreadsheet:
httpConnector.on({ method: 'POST', path: '/apply-for-demo' }, (event, app) => {
   const name = event.req.body.name
   const email = event.req.body.email
   const sheetId = 0
   const values = [name, email]
   await googleSheetsConnector.addRow(sheetId, values)
}
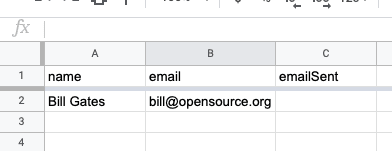
Here is how the spreadsheet looks after the first entry is entered:
The next step in the workflow is to send an email to the user that was added to the spreadsheet. For that we will use the on() method on the Google Sheets connector to add a handler for when a row is added to that spreadsheet. We will use the SMTP connector to send the email to the user:
googleSheetsConnector.on({}, (event, app) => {
  const rows = await myGoogleSheetsConnector.getRows(sheetTitle)
  rows.forEach(async row => {
    if (!row.emailSent) {
      Row.emailSent = 'true'
      row.save()
      smtpConnector.send({
        to: row.email,
        subject: `Book your demo!`,
        text: `Thank you for your email! Book your demo here...`
      })

    }
  })
Lastly, let's initiate the integration by starting the Reshuffle App:
app.start();
That’s it! With minimal code and an intuitive user interface for marketing staff (who love spreadsheets!), we have created a full workflow to get people signing up for your demo in no time.
Note that in real life, we would probably have some production safety precautions such as a “confirm_send” column so the marketing team can confirm that the email should be sent to the user.
Now, Start Building
As you work with your sales, marketing, and customer experience colleagues, we encourage you to get creative in making email workflow integrations that drive better customer experiences and help differentiate your business in the marketplace.
Reshuffle is continually listening to what our customers need and desire. Don’t see a Connector to a service you’d like to integrate? Send a tweet to @ReshuffleHQ to let us know which Connector you’d like us to develop next.


Top comments (2)
Would also be good to encrypt the email address at rest in the spreadsheet.
Yes, that makes a lot of sense.