
Using AWS Transcribe serverless service to create text from speech
Hey people!
I want to start a new series covering the most used AWS AI services today. For the first service, we’ll discuss AWS Transcribe.
Transcribe is an automatic speech recognition service that uses machine learning models to convert audio to text. It is an excellent service for getting text from audio/videos or adding speech-to-text capabilities to an application. It has multiple language support, and you can:
Use the general model provided by AWS
Train your model with custom data
Create vocabularies to enrich the selected model
Create vocabulary filters to remove/redact selected data
Demo Architecture
For our demo architecture, we will build a simple app with an S3 bucket and two folders: media and transcription. We’ll then configure S3 notifications so that when a file is added to the media folder, it triggers a Lambda function to start a new job in Transcribe. The job will then generate and add a transcription to the transcription folder.
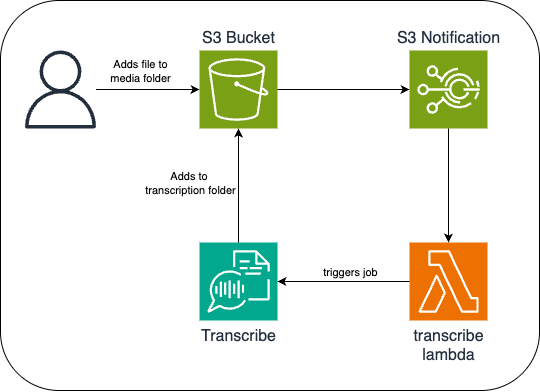
We'll be creating our infrastructure using Terraform as our Infrastructure as Code.
General Model
The quickest way to start with Transcribe is to use its General Model. It is suited for a broad audience but has no specialized capabilities.
Let’s start by creating our infrastructure. Create an iac folder and then add a terraform.tf file to initialize our Terraform configuration:
terraform {
  required_providers {
    aws = {
      source  = "hashicorp/aws"
      version = "~> 5.84"
    }
  }

  backend "s3" {
    bucket = "YOUR_BUCKET"
    key    = "state.tfstate"
  }
}

provider "aws" {}
Don’t forget to change YOUR_BUCKET for the bucket you want to use for your backend configuration.
Let’s now create the S3 buckets and folders. Create a s3.tf file:
resource "aws_s3_bucket" "bucket" {
  bucket = "aws-ai-transcribe"
}

resource "aws_s3_object" "media" {
  bucket = aws_s3_bucket.bucket.id
  key    = "media/"
}

resource "aws_s3_object" "transcription" {
  bucket = aws_s3_bucket.bucket.id
  key    = "transcription/"
}

resource "aws_lambda_permission" "allow_bucket" {
  action        = "lambda:InvokeFunction"
  function_name = aws_lambda_function.transcribe.arn
  source_arn    = aws_s3_bucket.bucket.arn
  principal     = "s3.amazonaws.com"
}

resource "aws_s3_bucket_notification" "bucket" {
  bucket = aws_s3_bucket.bucket.id
  lambda_function {
    filter_prefix       = aws_s3_object.media.key
    events              = ["s3:ObjectCreated:*"]
    lambda_function_arn = aws_lambda_function.transcribe.arn
  }

  depends_on = [aws_lambda_permission.allow_bucket]
}
Here, we are creating our aws-ai-transcribe bucket, adding the two folders, media and transcription, and then creating an S3 notification to the lambda function for every file added to the media folder.
Note that we added an explicit depends_on = [aws_lambda_permission.allow_bucket]. Because we want this notification to be created after we have created the permission for our lambda function to be invoked from S3 notifications.
Now, let’s create our lambda function in a lambdas.tf file:
resource "aws_lambda_function" "transcribe" {
  function_name    = "transcribe"
  runtime          = "nodejs22.x"
  handler          = "index.handler"
  filename         = data.archive_file.file.output_path
  source_code_hash = data.archive_file.file.output_base64sha256
  role             = aws_iam_role.role.arn

  environment {
    variables = {
      JOB_ROLE_ARN = "${aws_iam_role.job_role.arn}"
      OUTPUT_KEY   = "${aws_s3_object.transcription.key}"
    }
  }
}

resource "aws_iam_role" "role" {
  name               = "transcribe-lambda-role"
  assume_role_policy = data.aws_iam_policy_document.assume_role.json
}

resource "aws_iam_role_policy" "policies" {
  role   = aws_iam_role.role.name
  policy = data.aws_iam_policy_document.policies.json
}

resource "aws_iam_role" "job_role" {
  name               = "transcribe-job-role"
  assume_role_policy = data.aws_iam_policy_document.assume_job_role.json
}

resource "aws_iam_role_policy" "job_policies" {
  role   = aws_iam_role.job_role.name
  policy = data.aws_iam_policy_document.job_policies.json
}

data "archive_file" "file" {
  source_dir  = "${path.root}/init_code"
  output_path = "lambda_payload.zip"
  type        = "zip"
}
Here, we are creating our lambda function and the role that our transcribe jobs will assume to be able to download the media file and upload the transcription to the S3 bucket.
This lambda requires an initialization code from the init_code folder. So, under iac, create a folder init_code with an index.js:
// Default handler generated in AWS
export const handler = async (event) => {
  const response = {
    statusCode: 200,
    body: JSON.stringify({ message: 'Hello from Lambda!' }),
  };

  return response;
};
And a package.json file:
{
  "name": "second-lambda",
  "version": "1.0.0",
  "main": "index.js",
  "type": "module",
  "scripts": {
    "test": "echo \"Error: no test specified\" && exit 1"
  },
  "keywords": [],
  "author": "",
  "license": "ISC"
}
Last, let’s create the policies for our lambda and transcribe job IAM role in a policies.tf file:
data "aws_iam_policy_document" "assume_role" {
  statement {
    effect = "Allow"

    principals {
      type        = "Service"
      identifiers = ["lambda.amazonaws.com"]
    }

    actions = ["sts:AssumeRole"]
  }
}

data "aws_iam_policy_document" "assume_job_role" {
  statement {
    effect = "Allow"

    principals {
      type        = "Service"
      identifiers = ["transcribe.amazonaws.com"]
    }

    actions = ["sts:AssumeRole"]
  }
}

data "aws_iam_policy_document" "policies" {
  statement {
    effect = "Allow"

    actions = [
      "logs:CreateLogGroup",
      "logs:CreateLogStream",
      "logs:PutLogEvents"
    ]

    resources = ["arn:aws:logs:*:*:*"]
  }

  statement {
    effect = "Allow"

    actions = ["iam:PassRole"]

    resources = [aws_iam_role.job_role.arn]
  }

  statement {
    effect = "Allow"

    actions = ["transcribe:StartTranscriptionJob"]

    resources = ["arn:aws:transcribe:*:*:transcription-job/*"]
  }
}

data "aws_iam_policy_document" "job_policies" {
  statement {
    effect = "Allow"

    actions = ["s3:GetObject"]

    resources = ["${aws_s3_object.media.arn}*"]
  }
  statement {
    effect = "Allow"

    actions = ["s3:PutObject"]

    resources = ["${aws_s3_object.transcription.arn}*"]
  }
}
Our lambda role must have the transcribe:StartTranscriptionJob permission, or else it cannot start a job in Transcribe. The job role needs permission to get the media file from the S3 bucket folder and put the transcription into the S3 bucket folder.
Now that we have our infrastructure files let’s set up our GitHub workflow to create them. Create a .github/workflows folder and add a deploy-infrastructure.yml file:
name: Deploy Transcribe Infra
on:
  workflow_dispatch:
  push:
    branches:
      - main
    paths:
      - transcribe/iac/**/*

defaults:
  run:
    working-directory: transcribe/iac

jobs:
  deploy:
    name: 'Deploy'
    runs-on: ubuntu-latest
    steps:
      - name: Checkout
        uses: actions/checkout@v3

      - name: Configure AWS Credentials Action For GitHub Actions
        uses: aws-actions/configure-aws-credentials@v1
        with:
          aws-access-key-id: ${{ secrets.AWS_ACCESS_KEY }}
          aws-secret-access-key: ${{ secrets.AWS_SECRET_ACCESS_KEY }}
          aws-region: YOUR_REGION

      # Install the latest version of Terraform CLI and configure the Terraform CLI configuration file with a Terraform Cloud user API token
      - name: Setup Terraform
        uses: hashicorp/setup-terraform@v3

      # Initialize a new or existing Terraform working directory by creating initial files, loading any remote state, downloading modules, etc.
      - name: Terraform Init
        run: terraform init

      # Checks that all Terraform configuration files adhere to a canonical format
      - name: Terraform Format
        run: terraform fmt -check

      # Generates an execution plan for Terraform
      - name: Terraform Plan
        run: |
          terraform plan -out=plan -input=false

        # On push to "main", build or change infrastructure according to Terraform configuration files
        # Note: It is recommended to set up a required "strict" status check in your repository for "Terraform Cloud". See the documentation on "strict" required status checks for more information: https://help.github.com/en/github/administering-a-repository/types-of-required-status-checks
      - name: Terraform Apply
        run: terraform apply -auto-approve -input=false  plan
Make sure you have AWS_ACCESS_KEY and AWS_SECRET_ACCESS_KEY variables added to GitHub actions secrets and that these credentials have permission to create resources in your account. Also, don’t forget to replace YOUR_REGION with the region where you want these resources created.
Now, push the code to GitHub, and you should have the basic infrastructure created after it finishes.
Now, let’s create the lambda function that will start a transcription job whenever a file is added to S3 media bucket folder.
Create an app folder and run the following code to start our TypeScript project:
npm init -y
npm i -s @aws-sdk/client-transcribe
npm i -D typescript copyfiles @types/aws-sdk @types/aws-lambda
Now, we need to the a tsc and a build script to your package.json :
{
  "name": "app",
  "version": "1.0.0",
  "description": "",
  "main": "index.js",
  "type": "module",
  "scripts": {
    "tsc": "tsc",
    "build": "tsc && copyfiles package.json build/",
    "test": "echo \"Error: no test specified\" && exit 1"
  },
  "author": "",
  "license": "ISC",
  "dependencies": {
    "@aws-sdk/client-transcribe": "^3.760.0"
  },
  "devDependencies": {
    "@types/aws-lambda": "^8.10.147",
    "@types/aws-sdk": "^0.0.42",
    "copyfiles": "^2.4.1",
    "typescript": "^5.8.2"
  }
}
Now, let’s initialize our TypeScript project with:
npm run tsc -- --init --target esnext --module nodenext \
--moduleResolution nodenext --rootDir src \
--outDir build --noImplicitAny --noImplicitThis --newLine lf \
--resolveJsonModule
Or, for Windows:
npm run tsc -- --init --target esnext --module nodenext `
--moduleResolution nodenext --rootDir src `
--outDir build --noImplicitAny --noImplicitThis --newLine lf `
--resolveJsonModule
You should have a tsconfig.json file:
{
  "compilerOptions": {
    "target": "esnext",
    "module": "nodenext",
    "rootDir": "src",
    "moduleResolution": "nodenext",
    "resolveJsonModule": true,
    "outDir": "build",
    "newLine": "lf",
    "esModuleInterop": true,
    "forceConsistentCasingInFileNames": true,
    "strict": true,
    "noImplicitAny": true,
    "noImplicitThis": true,
    "skipLibCheck": true
  }
}
Now, to our actual lambda function code, create a src folder, and an index.ts file:
import {
  MediaFormat,
  StartTranscriptionJobCommand,
  TranscribeClient,
  type StartTranscriptionJobRequest,
} from '@aws-sdk/client-transcribe';
import type { S3Event } from 'aws-lambda';

const JOB_ROLE_ARN = process.env.JOB_ROLE_ARN;
const transcribeClient = new TranscribeClient({});

export const handler = async (event: S3Event) => {
  for (let record of event.Records) {
    const bucket = record.s3.bucket.name;
    const key = record.s3.object.key;

    const fileInput = `s3://${bucket}/${key}`;
    const mediaFormat = fileInput.split('.').at(-1);

    if (
      !mediaFormat ||
      !Object.values(MediaFormat).includes(mediaFormat as MediaFormat)
    ) {
      console.warn('No media format for this file');
      return;
    }

    const jobName = key.replace('/', '_') + Date.now();

    const jobRequest: StartTranscriptionJobRequest = {
      TranscriptionJobName: jobName,
      Media: { MediaFileUri: fileInput },
      MediaFormat: mediaFormat as MediaFormat,
      LanguageCode: 'en-US',
      OutputBucketName: bucket,
      OutputKey: `transcription/${jobName}.json`,
      JobExecutionSettings: {
        DataAccessRoleArn: JOB_ROLE_ARN,
      },
    };

    const job = new StartTranscriptionJobCommand(jobRequest);

    try {
      const response = await transcribeClient.send(job);
      console.log(
        'Finished job %s. Data %s',
        jobName,
        response.TranscriptionJob
      );
    } catch (error: any) {
      console.error(
        "Couldn't start transcription job %s. Error: %s",
        jobName,
        error
      );
      throw error;
    }
  }
};
Notice the LanguageCode we are passing to our StartTranscriptionJobRequest object. We know the language will be en-US and have set it up for better transcription (You can find all the supported languages here). If you do not know the languages spoken in your media, use either IdentifyLanguage or IdentifyMultipleLanguages and let Amazon Transcribe identify the languages for you. Just remember that one of these three language configurations is required.
Now, to deploy the lambda with GitHub Actions, create a new deploy-lambda.yml workflow under .github/workflows :
name: Deploy Transcribe Lambda
on:
  workflow_dispatch:
  push:
    branches:
      - main
    paths:
      - app/**/*

defaults:
  run:
    working-directory: app/

jobs:
  deploy:
    name: 'Deploy Lambda'
    runs-on: ubuntu-latest
    steps:
      # Checkout the repository to the GitHub Actions runner
      - name: Checkout
        uses: actions/checkout@v3

      - name: Setup NodeJS
        uses: actions/setup-node@v4
        with:
          node-version: 22

      - name: Configure AWS Credentials Action For GitHub Actions
        uses: aws-actions/configure-aws-credentials@v1
        with:
          aws-access-key-id: ${{ secrets.AWS_ACCESS_KEY }}
          aws-secret-access-key: ${{ secrets.AWS_SECRET_ACCESS_KEY }}
          aws-region: YOUR_REGION

      - name: Install packages
        run: npm install

      - name: Build
        run: npm run build

      - name: Zip build
        run: cd build && zip -r ../main.zip .

      - name: Update Lambda code
        run: aws lambda update-function-code --function-name=transcribe --zip-file=fileb://main.zip
After the workflow finishes running, you can upload a media file to the media/ folder, and you should get a transcription in the transcription/ folder. For example, I uploaded a file of me saying, Hello, how are you?. The file you get in JSON format contains the whole transcript, broken down into multiple items:
{
  "jobName": "audio_hello.m4a17393009178780818",
  "accountId": "044256433832",
  "status": "COMPLETED",
  "results": {
    "transcripts": [{ "transcript": "Hello, how are you?" }],
    "items": [
      {
        "id": 0,
        "type": "pronunciation",
        "alternatives": [{ "confidence": "0.999", "content": "Hello" }],
        "start_time": "0.72",
        "end_time": "1.419"
      },
      {
        "id": 1,
        "type": "punctuation",
        "alternatives": [{ "confidence": "0.0", "content": "," }]
      },
      {
        "id": 2,
        "type": "pronunciation",
        "alternatives": [{ "confidence": "0.996", "content": "how" }],
        "start_time": "1.629",
        "end_time": "1.809"
      },
      {
        "id": 3,
        "type": "pronunciation",
        "alternatives": [{ "confidence": "0.999", "content": "are" }],
        "start_time": "1.809",
        "end_time": "1.99"
      },
      {
        "id": 4,
        "type": "pronunciation",
        "alternatives": [{ "confidence": "0.999", "content": "you" }],
        "start_time": "1.99",
        "end_time": "2.259"
      },
      {
        "id": 5,
        "type": "punctuation",
        "alternatives": [{ "confidence": "0.0", "content": "?" }]
      }
    ],
    "audio_segments": [
      {
        "id": 0,
        "transcript": "Hello, how are you?",
        "start_time": "0.709",
        "end_time": "2.349",
        "items": [0, 1, 2, 3, 4, 5]
      }
    ]
  }
}
Custom Vocabulary
Creating a Custom Vocabulary https://docs.aws.amazon.com/transcribe/latest/dg/custom-vocabulary.html
There are some considerations when using custom vocabularies:
Each AWS account can have up to 100 vocabularies.
The file size limit is 50 KB.
When using API to create, the file must be a text file (txt). For the AWS Console, it can also be a CSV file.
Each entry must have a maximum of 256 characters.
Vocabulary is region-locked, meaning you can only use it in the same region in which it was created.
Entries with multiple words must be separated with a hyphen (
-). For example:Event-Driven-ArchitectureEntries that represent acronyms must have a trailing period (
.) after each letter. For example:A.W.S.,A.I.,C.L.I..For entries with words and acronyms, words should be separated with a hyphen from the acronyms, and the acronyms should follow the rule above. Example:
Dynamo-D.B.
To create a new vocabulary, we can do it in two ways:
Directly in the Terraform configuration
Through a configuration text file
To do it with the Terraform configuration, we need to add them to the phrases property:
resource "aws_transcribe_vocabulary" "vocabulary" {
  vocabulary_name = "example"
  phrases         = ["A.W.S.", "A.I.", "Serverless"]
  language_code   = "en-US"
}
For creating a vocabulary with a file, we need to upload it to S3 before referencing it to the vocabulary. This is my preferred approach, as you can better have control over the vocabulary entries, and it also allows you to set how the entry should be displayed in the transcription.
Let’s create a vocabulary file. It should be in the following structure:
Phrase[TAB]SoundsLike[TAB]IPA[TAB]DisplayAs
Entry[TAB][TAB][TAB]Entry
Another-Entry[TAB][TAB][TAB]Another Entry
X.Y.Z.[TAB][TAB][TAB]XYZ
Amazon-dot-com[TAB][TAB][TAB]Amazon.com
A.B.C.-s[TAB][TAB][TAB]ABCs
Dynamo-D.B.[TAB][TAB][TAB]DynamoDB
zero-one-two-A.B.[TAB][TAB][TAB]012AB
Where [TAB] is the tab character.
So, let’s create a vocabulary.txt file under the iac folder:
Phrase[TAB]SoundsLike IPA DisplayAs
A.W.S.   AWS
A.I.   AI
Serverless   serverless
Now, let’s create the object in S3. In the s3.tf file, add the following:
resource "aws_s3_object" "vocabulary_folder" {
  bucket = aws_s3_bucket.bucket.id
  key    = "vocabularies/"
}

resource "aws_s3_object" "vocabulary" {
  bucket      = aws_s3_bucket.bucket.id
  key         = "${aws_s3_object.vocabulary_folder.key}vocabulary.txt"
  source      = "${path.module}/transcribe/vocabulary.txt"
  source_hash = filemd5("${path.module}/transcribe/vocabulary.txt")
}
Then, let’s create a transcribe.tf file:
resource "aws_transcribe_vocabulary" "vocabulary" {
  vocabulary_name     = "example"
  vocabulary_file_uri = "s3://${aws_s3_object.vocabulary.bucket}/${aws_s3_object.vocabulary.key}"
  language_code       = "en-US"
}
We now add the vocabulary name to our lambda environment variables:
resource "aws_lambda_function" "transcribe" {
  function_name    = "transcribe"
  runtime          = "nodejs22.x"
  handler          = "index.handler"
  filename         = data.archive_file.file.output_path
  source_code_hash = data.archive_file.file.output_base64sha256
  role             = aws_iam_role.role.arn

  environment {
    variables = {
      JOB_ROLE_ARN    = "${aws_iam_role.job_role.arn}"
      OUTPUT_KEY      = "${aws_s3_object.transcription.key}"
      VOCABULARY_NAME = "${aws_transcribe_vocabulary.vocabulary.vocabulary_name}"
    }
  }
}
And lastly, you need to then add the Vocabulary ARN to the StartTranscriptionJob policy we created. It should be like:
statement {
  effect = "Allow"
  actions = ["transcribe:StartTranscriptionJob"]
  resources = [
    "arn:aws:transcribe:*:*:transcription-job/*",
    aws_transcribe_vocabulary.vocabulary.arn
  ]
}
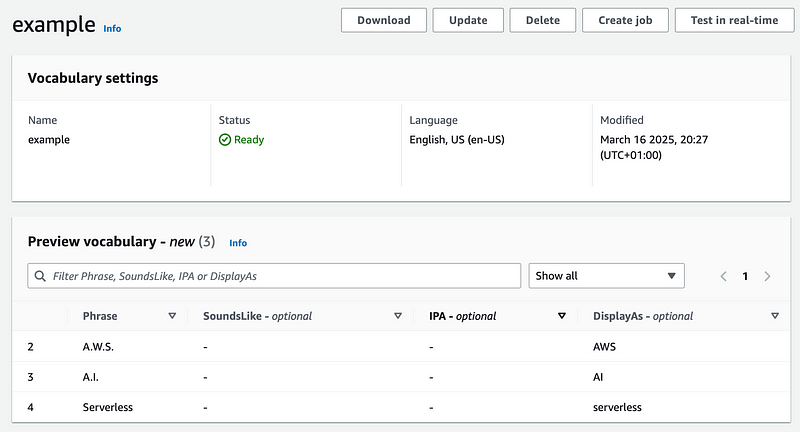
You can now push the code to GitHub, wait for the action to finish, and then see the vocabulary in Transcribe.
Then, when you upload a media containing these words, Transcribe will give you a better transcription with a better match of words.
Vocabulary Filter
Sometimes, you might want to filter some words from your transcription, like removing offensive language or redacting/masking sensitive data.
In these cases, you can create and use a custom vocabulary filter, a list of words you want to filter from your transcription.
Things to note when creating your custom vocabulary filter:
Words are case-insensitive. So, “offensive” and “OFFENSIVE” are considered the same.
Word matching works with exact matches. You must include all variations of the words you want to filter from your transcription. Example: “hate”, “hating”, “hated”.
As mentioned previously, filters work with exact matches, so you don’t need to worry about variant words being filtered if you don’t want them. Example: You have the filter for “car”, so “scar” won’t be filtered.
Each entry can only contain one word (no spaces).
Text files must be in plain text with UTF-8 encoding.
100 custom vocabulary filters per account.
Vocabulary filter files can be up to 50 KB in size.
Only characters supported for the selected language can be used. (See documentation here for supported characters)
Just as with the custom vocabulary, we can create our vocabulary filter in two ways:
In line words through the
wordsproperty in TerraformText file in S3
For text files, it needs to be in a txt file, and each word needs to be in a new line:
hate
offensive
masked
We can follow the same approach for the custom vocabulary. Add a file vocabulary_filter.txt with the content, then create the folder and object:
resource "aws_s3_object" "vocabulary_filters_folder" {
  bucket = aws_s3_bucket.bucket.id
  key    = "vocabulary_filters/"
}

resource "aws_s3_object" "vocabulary_filter" {
  bucket      = aws_s3_bucket.bucket.id
  key         = "${aws_s3_object.vocabulary_filters_folder.key}vocabulary_filter.txt"
  source      = "${path.module}/transcribe/vocabulary_filter.txt"
  source_hash = filemd5("${path.module}/transcribe/vocabulary_filter.txt")
}
Then, we can create a new vocabulary filter with:
resource "aws_transcribe_vocabulary_filter" "filter" {
  vocabulary_filter_name     = "example"
  vocabulary_filter_file_uri = "s3://${aws_s3_object.vocabulary_filter.bucket}/${aws_s3_object.vocabulary_filter.key}"
  language_code              = "en-US"
}
Now, if you want a vocabulary with inline words, you can easily add them through the words property:
After pushing to GitHub and the workflow completes, you can find the filters in the Transcribe vocabulary filtering console.

Now, to use it, let’s add the vocabulary filter name to our lambda environment variables:
resource "aws_lambda_function" "transcribe" {
  function_name    = "transcribe"
  runtime          = "nodejs22.x"
  handler          = "index.handler"
  filename         = data.archive_file.file.output_path
  source_code_hash = data.archive_file.file.output_base64sha256
  role             = aws_iam_role.role.arn

  environment {
    variables = {
      JOB_ROLE_ARN           = "${aws_iam_role.job_role.arn}"
      OUTPUT_KEY             = "${aws_s3_object.transcription.key}"
      VOCABULARY_NAME        = "${aws_transcribe_vocabulary.vocabulary.vocabulary_name}"
      VOCABULARY_FILTER_NAME = "${aws_transcribe_vocabulary_filter.filter.vocabulary_filter_name}"
    }
  }
}
Then, let’s give permission to our lambda role to use the filter when calling StartTranscriptionJob in the policies.tf file:
statement {
  effect = "Allow"
  actions = ["transcribe:StartTranscriptionJob"]
  resources = [
    "arn:aws:transcribe:*:*:transcription-job/*",
    aws_transcribe_vocabulary.vocabulary.arn,
    aws_transcribe_vocabulary_filter.filter.arn
  ]
}
And finally, let’s modify our lambda code to use the vocabulary filter when starting a transcription job:
import {
  MediaFormat,
  StartTranscriptionJobCommand,
  ToxicityCategory,
  TranscribeClient,
  VocabularyFilterMethod,
  type StartTranscriptionJobRequest,
} from '@aws-sdk/client-transcribe';
import type { S3Event } from 'aws-lambda';

const JOB_ROLE_ARN = process.env.JOB_ROLE_ARN;
const OUTPUT_KEY = process.env.OUTPUT_KEY; // transcription/
const vocabularyName = process.env.VOCABULARY_NAME;
const vocabularyFilterName = process.env.VOCABULARY_FILTER_NAME;

const transcribeClient = new TranscribeClient({});

export const handler = async (event: S3Event) => {
  for (let record of event.Records) {
    const bucket = record.s3.bucket.name;
    const key = record.s3.object.key;

    const fileInput = `s3://${bucket}/${key}`;
    const mediaFormat = fileInput.split('.').at(-1);

    if (
      !mediaFormat ||
      !Object.values(MediaFormat).includes(mediaFormat as MediaFormat)
    ) {
      console.warn('No media format for this file');
      return;
    }

    const jobName = key.replace('/', '_') + Date.now();

    const jobRequest: StartTranscriptionJobRequest = {
      TranscriptionJobName: jobName,
      Media: { MediaFileUri: fileInput },
      MediaFormat: mediaFormat as MediaFormat,
      LanguageCode: 'en-US',
      OutputBucketName: bucket,
      OutputKey: `${OUTPUT_KEY}${jobName}.json`,
      JobExecutionSettings: {
        DataAccessRoleArn: JOB_ROLE_ARN,
      },
      Settings: {
        VocabularyName: vocabularyName,
        VocabularyFilterMethod: VocabularyFilterMethod.MASK,
        VocabularyFilterName: vocabularyFilterName,
      },
    };

    const job = new StartTranscriptionJobCommand(jobRequest);

    try {
      const response = await transcribeClient.send(job);
      console.log(
        'Finished job %s. Data %s',
        jobName,
        response.TranscriptionJob
      );
    } catch (error: any) {
      console.error(
        "Couldn't start transcription job %s. Error: %s",
        jobName,
        error
      );
      throw error;
    }
  }
};
Notice that we have the VocabularyFilterMethod , it accepts one of the three. Let’s say we have the sentence This is an offensive content :
MASK— The filtered content will be masked. For example:{ “transcript”: “This is an *** content.” }REMOVE-The filtered content will be removed. Example:{ “transcript”: “This is an content.” }TAG— Adds avocabularyFilterMatch: truetag to the filter content but doesn’t remove it from the transcript. Example:
{
  ...
  "results": {
    "transcripts": [
      { "transcript": "This is an offensive content." }
    ],
    "items": [
      ...
      {
        "id": 3,
        "type": "pronunciation",
        "alternatives": [{ "confidence": "0.758", "content": "offensive" }],
        "start_time": "1.549",
        "end_time": "2.589",
        "vocabularyFilterMatch": true
      }
    ]
  }
}
Content Redaction
Transcribe also has the capability of content redaction, where it can identify PII (personally identifiable information) data and automatically redact or flag it. To do so, we need to update our StartTranscriptionJobRequest to tell our job to do it for us:
import {
  MediaFormat,
  PiiEntityType,
  RedactionOutput,
  StartTranscriptionJobCommand,
  ToxicityCategory,
  TranscribeClient,
  VocabularyFilterMethod,
  type StartTranscriptionJobRequest,
} from '@aws-sdk/client-transcribe';
import type { S3Event } from 'aws-lambda';

const JOB_ROLE_ARN = process.env.JOB_ROLE_ARN;
const OUTPUT_KEY = process.env.OUTPUT_KEY; // transcription/
const vocabularyName = process.env.VOCABULARY_NAME;
const vocabularyFilterName = process.env.VOCABULARY_FILTER_NAME;

const transcribeClient = new TranscribeClient({});

export const handler = async (event: S3Event) => {
  for (let record of event.Records) {
    const bucket = record.s3.bucket.name;
    const key = record.s3.object.key;

    const fileInput = `s3://${bucket}/${key}`;
    const mediaFormat = fileInput.split('.').at(-1);

    if (
      !mediaFormat ||
      !Object.values(MediaFormat).includes(mediaFormat as MediaFormat)
    ) {
      console.warn('No media format for this file');
      return;
    }

    const jobName = key.replace('/', '_') + Date.now();

    const jobRequest: StartTranscriptionJobRequest = {
      TranscriptionJobName: jobName,
      Media: { MediaFileUri: fileInput },
      MediaFormat: mediaFormat as MediaFormat,
      LanguageCode: 'en-US',
      OutputBucketName: bucket,
      OutputKey: `${OUTPUT_KEY}${jobName}.json`,
      JobExecutionSettings: {
        DataAccessRoleArn: JOB_ROLE_ARN,
      },
      Settings: {
        VocabularyName: vocabularyName,
        VocabularyFilterMethod: VocabularyFilterMethod.MASK,
        VocabularyFilterName: vocabularyFilterName,
      },
      ContentRedaction: {
        RedactionOutput: RedactionOutput.REDACTED,
        RedactionType: 'PII', // Only value allowed
        // If PiiEntityTypes is not provided, all PII data is redacted
        PiiEntityTypes: [
          PiiEntityType.CREDIT_DEBIT_NUMBER,
          PiiEntityType.BANK_ACCOUNT_NUMBER,
        ],
      },
    };

    const job = new StartTranscriptionJobCommand(jobRequest);

    try {
      const response = await transcribeClient.send(job);
      console.log(
        'Finished job %s. Data %s',
        jobName,
        response.TranscriptionJob
      );
    } catch (error: any) {
      console.error(
        "Couldn't start transcription job %s. Error: %s",
        jobName,
        error
      );
      throw error;
    }
  }
};
Here, we added the ContentRedaction property to our job request, and we then added the following:
RedactionOutput— It tells our job how to handle the redaction.REDACTEDorREDACTED_AND_UNREDACTED.RedactionType— Right now, the valid value isPIIPiiEntityTypes— A list of the PII type you want to redact.CREDIT_DEBIT_NUMBER,ADDRESS,BANK_ACCOUNT_NUMBER, …
If this property is not provided, all PII data will be redacted.
Custom Model
If your application has extensive data that represents the media that will be transcribed, then you can use a custom model trained with your user data.
This type of model will increase the reliability of your transcriptions by using a model with the exact data your applications use. In many cases, you can dismiss the custom vocabulary because your data already represents all the words that can be transcribed.
We have two types of data that we can use. Training data and tuning data:
Training data — This is the primary dataset used to train a new model from scratch. It typically represents a broad and diverse set of language or domain-specific data. For example, it can be text from your website, training manuals, or application documentation.
Tuning data—This data is used to refine and optimize an already trained model. Tuning data is typically more specialized or narrower in focus than training data. It’s meant to improve the model’s accuracy on a particular subset of data or domain. For example, audio transcripts of phone calls or media content directly relevant to your use case can be used to tune data or data containing slang or specialized vocabulary.
Your training and tuning datasets should have the following requirements:
Plain text (.txt) file. (Word, CSV, and PDF are not accepted)
Single sentence per line.
Encoded in UTF-8.
Doesn’t contain any formatting characters, such as HTML tags.
Less than 2 GB for the total size of all training data.
Less than 200 MB for the total size of optional tuning data.
So, let’s start by uploading our training and tuning data to S3. You can use the data I have here. It is just a simple training dataset from Wikipedia to train the model to be more specialized in games. In the s3.tf file:
resource "aws_s3_object" "clm" {
  bucket = aws_s3_bucket.bucket.id
  key    = "clm/"
}

resource "aws_s3_object" "training_data" {
  bucket = aws_s3_bucket.bucket.id
  key    = "${aws_s3_object.clm.key}training_data/"
}
resource "aws_s3_object" "tune_data" {
  bucket = aws_s3_bucket.bucket.id
  key    = "${aws_s3_object.clm.key}tune_data/"
}

resource "aws_s3_object" "nintendo_switch" {
  bucket      = aws_s3_bucket.bucket.id
  key         = "${aws_s3_object.training_data.key}NintendoSwitch.txt"
  source      = "${path.module}/transcribe/training_data/NintendoSwitch.txt"
  source_hash = filemd5("${path.module}/transcribe/training_data/NintendoSwitch.txt")
}

resource "aws_s3_object" "ps5" {
  bucket      = aws_s3_bucket.bucket.id
  key         = "${aws_s3_object.training_data.key}PlayStation5.txt"
  source      = "${path.module}/transcribe/training_data/PlayStation5.txt"
  source_hash = filemd5("${path.module}/transcribe/training_data/PlayStation5.txt")
}

resource "aws_s3_object" "xbox" {
  bucket      = aws_s3_bucket.bucket.id
  key         = "${aws_s3_object.training_data.key}XboxSeries.txt"
  source      = "${path.module}/transcribe/training_data/XboxSeries.txt"
  source_hash = filemd5("${path.module}/transcribe/training_data/XboxSeries.txt")
}

resource "aws_s3_object" "tune_data_file" {
  bucket      = aws_s3_bucket.bucket.id
  key         = "${aws_s3_object.tune_data.key}tune_data.txt"
  source      = "${path.module}/transcribe/tune_data/tune_data.txt"
  source_hash = filemd5("${path.module}/transcribe/tune_data/tune_data.txt")
}
In the policies.tf , let’s create a new policy document with access to list our bucket and access our training data:
data "aws_iam_policy_document" "transcribe_s3" {
  statement {
    effect = "Allow"

    actions = [
      "s3:GetObject",
    ]

    resources = [
      "${aws_s3_object.clm.arn}*",
    ]
  }
  statement {
    effect = "Allow"

    actions = [
      "s3:ListBucket"
    ]

    resources = [
      "${aws_s3_bucket.bucket.arn}",
    ]
  }
}
Also modify the policies IAM Policy document to add the language model ARN to the resources:
data "aws_iam_policy_document" "policies" {
  statement {
    effect = "Allow"

    actions = [
      "logs:CreateLogGroup",
      "logs:CreateLogStream",
      "logs:PutLogEvents"
    ]

    resources = ["arn:aws:logs:*:*:*"]
  }

  statement {
    effect = "Allow"

    actions = ["iam:PassRole"]

    resources = [aws_iam_role.job_role.arn]
  }

  statement {
    effect = "Allow"

    actions = ["transcribe:StartTranscriptionJob"]

    resources = [
      "arn:aws:transcribe:*:*:transcription-job/*",
      aws_transcribe_vocabulary.vocabulary.arn,
      aws_transcribe_vocabulary_filter.filter.arn,
      aws_transcribe_language_model.model.arn
    ]
  }
}
In the transcribe.tf file, let’s create our custom language model. Here, we’ll provision the model and assign a role with access to our datasets so it can train:
resource "aws_transcribe_language_model" "model" {
  model_name = "example"

  // NarrowBand: Use this option for audio with a sample rate of less than 16,000 Hz. This model type is typically used for telephone conversations recorded at 8,000 Hz.
  // WideBand: Use this option for audio with a sample rate greater than or equal to 16,000 Hz.
  base_model_name = "WideBand"

  language_code = "en-US"
  input_data_config {
    s3_uri               = "s3://${aws_s3_object.training_data.bucket}/${aws_s3_object.training_data.key}"
    tuning_data_s3_uri   = "s3://${aws_s3_object.tune_data.bucket}/${aws_s3_object.tune_data.key}"
    data_access_role_arn = aws_iam_role.transcribe_clm.arn
  }

  depends_on = [aws_iam_role_policy.transcribe_clm_policy]
}

resource "aws_iam_role" "transcribe_clm" {
  name               = "transcribe_clm"
  assume_role_policy = data.aws_iam_policy_document.transcribe_assume_role.json
}

resource "aws_iam_role_policy" "transcribe_clm_policy" {
  name = "transcribe_clm"
  role = aws_iam_role.transcribe_clm.id

  policy = data.aws_iam_policy_document.transcribe_s3.json
}
Then, let’s add the model name to our lambda’s environment variables in the lambdas.tf file:
resource "aws_lambda_function" "transcribe" {
  function_name    = "transcribe"
  runtime          = "nodejs22.x"
  handler          = "index.handler"
  filename         = data.archive_file.file.output_path
  source_code_hash = data.archive_file.file.output_base64sha256
  role             = aws_iam_role.role.arn

  environment {
    variables = {
      JOB_ROLE_ARN           = "${aws_iam_role.job_role.arn}"
      OUTPUT_KEY             = "${aws_s3_object.transcription.key}"
      VOCABULARY_NAME        = "${aws_transcribe_vocabulary.vocabulary.vocabulary_name}"
      VOCABULARY_FILTER_NAME = "${aws_transcribe_vocabulary_filter.filter.vocabulary_filter_name}"
      CUSTOM_MODEL           = "${aws_transcribe_language_model.model.model_name}"
    }
  }
}
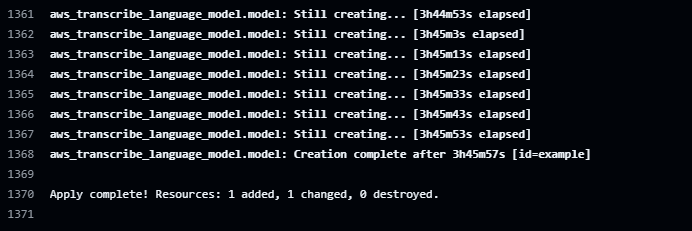
You can then push the code to GitHub Actions and wait for it to finish. According to AWS, training a Custom Language Model can take 6 to 10 hours, depending on the size of your training data. Mine took around 3 hours. Terraform will wait for it to finish training before completing the apply run.
If you are working on a distributed team, I recommend creating the IAM role and the training and tuning data in S3 through Terraform, and then you can make the Custom Language Model in the AWS console. Once finished, you can reference it in your Terraform configuration with a data source. This way, the model training won’t impact the delivery of other Terraform resources.
While it is being trained, you can see the status in the Transcribe Custom language model console:

After it finishes, you should see it as completed in the console:

We need to modify our Lambda code to pass the CLM name to the job request. Get the model name from the CUSTOM_MODEL environment variable and then pass in the ModelSettings.LanguageModelName property:
import {
  MediaFormat,
  PiiEntityType,
  RedactionOutput,
  StartTranscriptionJobCommand,
  ToxicityCategory,
  TranscribeClient,
  VocabularyFilterMethod,
  type StartTranscriptionJobRequest,
} from '@aws-sdk/client-transcribe';
import type { S3Event } from 'aws-lambda';

const JOB_ROLE_ARN = process.env.JOB_ROLE_ARN;
const OUTPUT_KEY = process.env.OUTPUT_KEY; // transcription/
const vocabularyName = process.env.VOCABULARY_NAME;
const vocabularyFilterName = process.env.VOCABULARY_FILTER_NAME;
const customModel = process.env.CUSTOM_MODEL;

const transcribeClient = new TranscribeClient({});

export const handler = async (event: S3Event) => {
  for (let record of event.Records) {
    const bucket = record.s3.bucket.name;
    const key = record.s3.object.key;

    const fileInput = `s3://${bucket}/${key}`;
    const mediaFormat = fileInput.split('.').at(-1);

    if (
      !mediaFormat ||
      !Object.values(MediaFormat).includes(mediaFormat as MediaFormat)
    ) {
      console.warn('No media format for this file');
      return;
    }

    const jobName = key.replace('/', '_') + Date.now();

    const jobRequest: StartTranscriptionJobRequest = {
      TranscriptionJobName: jobName,
      Media: { MediaFileUri: fileInput },
      MediaFormat: mediaFormat as MediaFormat,
      LanguageCode: 'en-US',
      OutputBucketName: bucket,
      OutputKey: `${OUTPUT_KEY}${jobName}.json`,
      JobExecutionSettings: {
        DataAccessRoleArn: JOB_ROLE_ARN,
      },
      Settings: {
        VocabularyName: vocabularyName,
        VocabularyFilterMethod: VocabularyFilterMethod.MASK,
        VocabularyFilterName: vocabularyFilterName,
      },
      ModelSettings: {
        LanguageModelName: customModel,
      },
      ContentRedaction: {
        RedactionOutput: RedactionOutput.REDACTED,
        RedactionType: 'PII', // Only value allowed
        // If PiiEntityTypes is not provided, all PII data is redacted
        PiiEntityTypes: [
          PiiEntityType.CREDIT_DEBIT_NUMBER,
          PiiEntityType.BANK_ACCOUNT_NUMBER,
        ],
      },
    };

    const job = new StartTranscriptionJobCommand(jobRequest);

    try {
      const response = await transcribeClient.send(job);
      console.log(
        'Finished job %s. Data %s',
        jobName,
        response.TranscriptionJob
      );
    } catch (error: any) {
      console.error(
        "Couldn't start transcription job %s. Error: %s",
        jobName,
        error
      );
      throw error;
    }
  }
};
Once you deploy your lambda code, you can test it by adding a media file with a more specific language for your domain, and you should start getting better transcriptions.
Testing in AWS Console
You can also test your Transcribe vocabularies, filters, and custom language models in the Transcribe Real-time transcription console:

Then, you can also specify the Vocabulary, Filter, and Custom Language Model in the Customizations options:
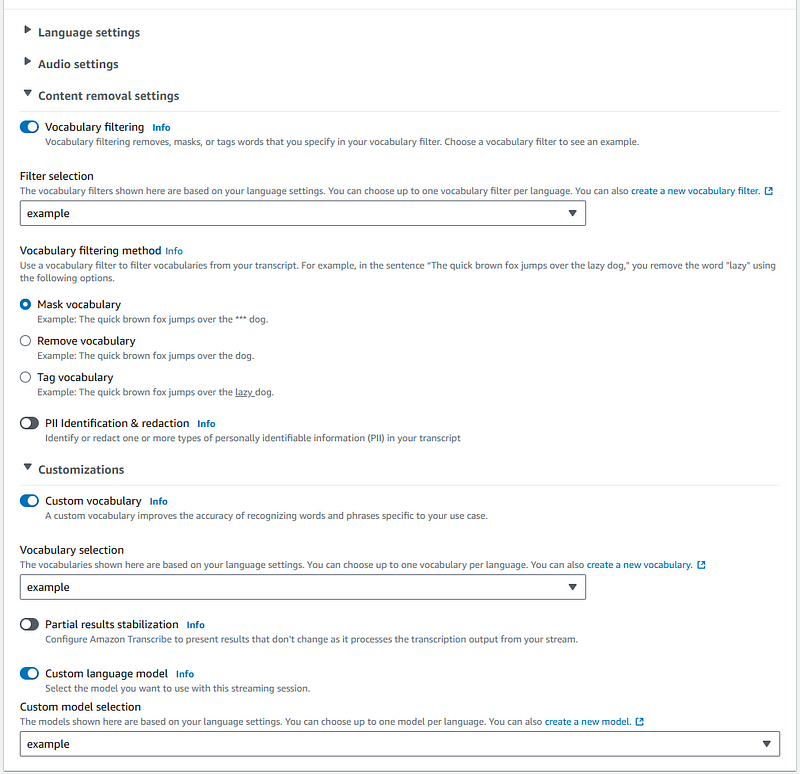
After configuring, you can click on Start streaming to test your Transcribe configurations.
Conclusion
In this story, we could learn more about AWS Transcribe, the serverless service to convert speech to text, as well as learn how you can quickly get started with a simple serverless architecture with S3, Lambda, and Transcribe to have your application to convert media files into text.
You could learn about the difference between using General and Custom language models and when you’d train your model.
Also, you can enrich the model you are using by adding vocabulary with words that are related to your domain.
We saw how we could filter and redact data by using custom vocabulary filters to match words we don’t want showing in our transcriptions and utilizing the content redaction native feature to redact or flag PII data automatically.
We saw how we can quickly train and tune a CLM with our data in the Custom Language Models domain. The only downside of doing that with Terraform is that the process will hang until the model is trained, which can take a few hours to complete, depending on the size of your data.
I hope you had fun with this story.
Happy coding! 💻
The code for this project can be found here.


Top comments (1)
Thanks for this comprehensive overview. It gives a practical way to deploy and immediate grasp of what the service capabilities are!