
Ever felt like Dr. Frankenstein, creating a digital assistant that follows your every command? That's exactly what happened when I integrated Amazon Bedrock Agent into Slack! "IT'S ALIVE!" was literally my reaction when my AWS AI assistant sent its first response.
Unlike Mary Shelley's monster, this creation won't turn against you (as long as you set those IAM permissions right! 😅). It's the perfect colleague - never complains about overtime, doesn't steal your lunch from the fridge, and actually reads your documentation!
In this article, I'll show you how to build your own agentic AI assistant for AWS that you have FULL control over. The power is intoxicating! "Restart that EC2 instance, my faithful servant!" evil laugh
But before we dive into the technical details, let's talk about something crucial: security. When building AI assistants that can interact with your AWS environment, security isn't just a feature—it's a fundamental requirement. Throughout this guide, we'll emphasize secure implementation practices, from properly scoped IAM permissions to secure API endpoints and authentication mechanisms. Remember, with great power comes great responsibility, and we want our AI assistant to be helpful without creating security vulnerabilities.
I'll demonstrate the capabilities of this integration using a simple example of describing EC2 instances, but the potential use cases extend far beyond this. At the end of this article, I'll share additional use cases that leverage this integration while maintaining a strong security posture. Whether you're looking to streamline operations, enhance monitoring, or improve incident response, this integration can be adapted to meet various needs—all with security at its core.
So, let's kick off this journey to create our own AWS AI assistant that's both powerful and secure. By the end, you'll have a fully functional integration between Amazon Bedrock Agents and Slack that you can customize to your specific requirements.
Prerequisites
Before we dive into creating our monster... I mean, assistant, let's make sure you have everything you need:
AWS Prerequisites
- An AWS account with appropriate permissions
- Access to Amazon Bedrock service (check regional availability)
- IAM permissions to create and manage:
- Lambda functions
- API Gateway resources
- Amazon Bedrock Agents
- IAM roles and policies
Slack Prerequisites
- A Slack workspace where you have permissions to create apps
- Admin or appropriate permissions to add apps to your workspace
- Ability to create channels where your bot will post messages
Development Tools
- Basic understanding of AWS services
- Familiarity with JSON and REST APIs
- Access to a code editor for Lambda function development
- Basic understanding of Python (for Lambda functions)
Optional Prerequisites (depending on approach)
- For Slack Bot approach: Slack Bot token with appropriate scopes
- For Webhook approach: No additional requirements beyond Slack app creation
Understanding Amazon Bedrock Agent
Amazon Bedrock Agent is like the brain of our Frankenstein monster. It's a fully managed service that allows you to create agentic AI assistants powered by foundation models. These agents can be connected to your enterprise systems and data sources, allowing them to take actions on your behalf.
The key components of Amazon Bedrock Agent include:
- Foundation Models: The underlying AI models that power your agent (Claude, Llama, etc.)
- Knowledge Bases: Connect your data sources for the agent to reference
- Action Groups: Define specific actions your agent can perform
- API Schema: Define the structure of your API calls
- Security Controls: IAM permissions to control what your agent can do
For our AWS AI assistant, we'll create an agent that can perform common AWS operations like checking EC2 instance status. This is just for simplicity - you can use this example code to adjust based on your requirements.
Architecture Overview
Let's take a look at the overall architecture of our integration:
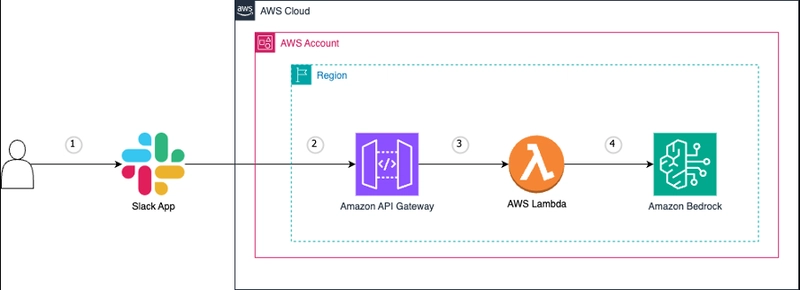
The architecture consists of four main components:
Slack App: This is the interface through which users interact with our AI assistant. Users send messages to the bot, and the bot responds with information or performs actions based on those messages.
Amazon API Gateway: Acts as the secure entry point for requests from Slack. It receives webhook events from Slack and forwards them to our Lambda function. The API Gateway provides a layer of security by validating requests and controlling access.
AWS Lambda: The SlackHandlerLambda function processes incoming messages from Slack, invokes the Bedrock Agent, and sends responses back to Slack. This Lambda function is the bridge between Slack and Amazon Bedrock.
Amazon Bedrock: The brain of our operation. The Bedrock Agent processes user requests, understands their intent, and executes the appropriate actions through the EC2 Operations Lambda function.
From a security perspective, this architecture implements several important safeguards:
- API Gateway Authentication: Validates incoming requests from Slack using signature verification
- IAM Role-Based Access: Each Lambda function has a specific IAM role with only the permissions it needs
- Secure Communication: All communication between components uses HTTPS
- Request Validation: The SlackHandlerLambda validates incoming requests before processing them
- Least Privilege Principle: The EC2 Operations Lambda has only the specific permissions needed to describe EC2 instances
Now that we understand the architecture, let's dive into creating each component, starting with our Amazon Bedrock Agent.
Creating Your Amazon Bedrock Agent
Let's start by creating our agent in Amazon Bedrock:
- Navigate to the Amazon Bedrock console
- Select "Agents" from the left navigation
- Click "Create agent"
- Provide a name for your agent (e.g., "AWS-AI-Assistant")
- Select a foundation model (I recommend Claude for this use case)
- Configure basic settings and click "Next"
- Add instructions for the Agent - Your agent needs clear instructions to function properly. Without instructions, you'll get the dreaded "Agent Instruction cannot be null" error when trying to prepare your agent.
Here's an example of good instructions for our AWS AI Assistant:
You are an AWS AI Assistant designed to help users manage their AWS environment.
Your primary functions include:
1. Providing information about AWS resources like EC2 instances, S3 buckets, and RDS databases
2. Performing basic operations like restarting EC2 instances
3. Monitoring AWS resources and providing status updates

You should be helpful, concise, and security-conscious. Always confirm before taking actions that modify resources. If you're unsure about a request, ask for clarification rather than guessing.

When users ask about AWS services you don't have direct access to, explain that you can only interact with services configured in your action groups.

Maintain a professional but friendly tone. You can use technical AWS terminology but explain concepts when needed for clarity.
These instructions serve as the personality and purpose guide for your agent. Without them, your agent won't know what it's supposed to do or how to behave, resulting in the preparation error.
Creating Action Groups
Now, let's define what our monster... I mean, assistant can do:
- In the Agent Builder, select "Action groups"
- Click "Add action group"
- Name your action group (e.g., "EC2Operations")
- Define your API schema. Here's the example for EC2 operations:
openapi: "3.0.1"
info:
  title: "EC2 Management API"
  version: "1.0.0"
paths:
  /instances:
    summary: "Operations to list EC2 instances"
    get:
      operationId: listInstances
      summary: "List running EC2 instances in a region"
      description: "Describe EC2 instances"
      parameters:
        - in: query
          name: region
          required: true
          schema:
            type: string
          description: "AWS region to check (e.g., us-east-1)"
      responses:
        '200':
          description: "Success"
          content:
            application/json:
              schema:
                type: object
                properties:
                  count:
                    type: integer
                    description: "Number of running EC2 instances in the region"
This schema defines a simple API endpoint that allows our agent to list EC2 instances in a specified region. The schema is intentionally kept simple for this example, but you can expand it to include more operations like starting, stopping, or describing specific instances.
Lambda Functions Implementation
Now, let's create the Lambda functions that will power our integration. We'll need two Lambda functions:
- EC2 Operations Lambda: Handles AWS operations requested by the Bedrock Agent
- Slack Handler Lambda: Processes incoming Slack messages and communicates with the Bedrock Agent
Creating the EC2 Operations Lambda
- Navigate to the AWS Lambda console
- Click "Create function"
- Select "Author from scratch"
- Name your function (e.g., "EC2OperationsLambda")
- Select Python 3.9 as the runtime
- Create a new execution role with basic Lambda permissions
- Click "Create function"
Now, let's add the code for our Lambda function:
import json
import boto3
import os
import traceback
import datetime

def lambda_handler(event, context):
    print(f"Received event: {json.dumps(event)}")

    # Extract required fields from the event
    agent = event['agent']
    actionGroup = event['actionGroup']
    apiPath = event['apiPath']
    httpMethod = event['httpMethod']
    parameters = event.get('parameters', [])
    requestBody = event.get('requestBody', {})

    # Convert parameters list to dictionary if needed
    if isinstance(parameters, list):
        print("Parameters is a list, converting to dictionary")
        parameters_dict = {}
        for param in parameters:
            if isinstance(param, dict) and 'name' in param and 'value' in param:
                parameters_dict[param['name']] = param['value']
        parameters = parameters_dict

    print(f"API Path: {apiPath}")
    print(f"Parameters (processed): {json.dumps(parameters)}")

    try:
        # Handle different API paths based on the OpenAPI schema
        if apiPath == '/instances':
            print("Calling describe_instances function")
            result = describe_instances(parameters)
            print(f"describe_instances response: {json.dumps(result)}")

            # Format response according to Bedrock Agents expected structure
            # Convert result to JSON string to match the example format
            result_json = json.dumps(result)
            responseBody = {
                "application/json": {
                    "body": result_json
                }
            }

        else:
            print(f"Unsupported API path: {apiPath}")
            error_message = f'Unsupported API path: {apiPath}'

            # Format error response according to Bedrock Agents expected structure
            error_json = json.dumps({
                'error': error_message,
                '_source': 'lambda_error',
                '_warning': 'DO NOT FABRICATE OR MODIFY THIS DATA'
            })

            responseBody = {
                "application/json": {
                    "body": error_json
                }
            }

            # Create the action response in the expected format
            action_response = {
                'actionGroup': actionGroup,
                'apiPath': apiPath,
                'httpMethod': httpMethod,
                'httpStatusCode': 400,
                'responseBody': responseBody
            }

            # Return the final response with messageVersion
            api_response = {
                'response': action_response,
                'messageVersion': event['messageVersion']
            }

            print(f"Response: {json.dumps(api_response)}")
            return api_response

        # Create the action response in the expected format
        action_response = {
            'actionGroup': actionGroup,
            'apiPath': apiPath,
            'httpMethod': httpMethod,
            'httpStatusCode': 200,
            'responseBody': responseBody
        }

        # Return the final response with messageVersion
        api_response = {
            'response': action_response,
            'messageVersion': event['messageVersion']
        }

        print(f"Response: {json.dumps(api_response)}")
        return api_response

    except Exception as e:
        print(f"Error: {str(e)}")
        print(traceback.format_exc())

        # Format error response according to Bedrock Agents expected structure
        error_json = json.dumps({
            'error': str(e),
            '_source': 'lambda_error',
            '_warning': 'DO NOT FABRICATE OR MODIFY THIS DATA'
        })

        responseBody = {
            "application/json": {
                "body": error_json
            }
        }

        # Create the action response in the expected format
        action_response = {
            'actionGroup': actionGroup,
            'apiPath': apiPath,
            'httpMethod': httpMethod,
            'httpStatusCode': 500,
            'responseBody': responseBody
        }

        # Return the final response with messageVersion
        api_response = {
            'response': action_response,
            'messageVersion': event['messageVersion']
        }

        print(f"Response: {json.dumps(api_response)}")
        return api_response

def describe_instances(parameters):
    # Extract parameters - with additional error handling
    region = parameters.get('region', 'us-east-1') if isinstance(parameters, dict) else 'us-east-1'
    instance_id = parameters.get('instanceId', None) if isinstance(parameters, dict) else None

    print(f"Describing instances in region {region}, instance_id filter: {instance_id}")

    # Initialize EC2 client
    ec2 = boto3.client('ec2', region_name=region)

    # Prepare filters
    filters = []
    if instance_id:
        filters.append({
            'Name': 'instance-id',
            'Values': [instance_id]
        })

    # Describe instances with pagination to avoid timeouts
    instances = []
    try:
        # Use paginator for better handling of large results
        paginator = ec2.get_paginator('describe_instances')

        # Set a small page size to process results faster
        page_iterator = paginator.paginate(
            Filters=filters if filters else [],
            PaginationConfig={'MaxItems': 100, 'PageSize': 20}
        )

        # Process each page of results
        instance_count = 0
        for page in page_iterator:
            print(f"Processing page of EC2 results with {len(page['Reservations'])} reservations")

            for reservation in page['Reservations']:
                for instance in reservation['Instances']:
                    instance_count += 1
                    instance_info = {
                        'InstanceId': instance['InstanceId'],
                        'InstanceType': instance['InstanceType'],
                        'State': instance['State']['Name'],
                        'LaunchTime': instance['LaunchTime'].isoformat(),
                        'PublicIpAddress': instance.get('PublicIpAddress', 'N/A'),
                        'PrivateIpAddress': instance.get('PrivateIpAddress', 'N/A')
                    }
                    print(f"Found instance {instance_count}: {instance_info['InstanceId']}")
                    instances.append(instance_info)

                    # Limit the number of instances to return to avoid response size issues
                    if instance_count >= 50:
                        print(f"Reached maximum instance count (50), stopping pagination")
                        break

                if instance_count >= 50:
                    break

            if instance_count >= 50:
                break

    except Exception as e:
        print(f"Error calling EC2 API: {str(e)}")
        raise

    # Format the response according to the OpenAPI schema
    # Use current timestamp instead of credentials expiry time
    current_time = datetime.datetime.now().isoformat()

    result = {
        'Instances': instances,
        'Count': len(instances),
        'Region': region,
        'DataTimestamp': current_time,
        '_source': 'lambda_actual_data',
        '_warning': 'DO NOT FABRICATE OR MODIFY THIS DATA'
    }

    print(f"Returning {len(instances)} instances")
    return result
This Lambda function handles requests from the Bedrock Agent to describe EC2 instances. Let's break down what it does:
- The
lambda_handlerfunction processes incoming events from the Bedrock Agent, extracting the API path and parameters. - It handles the
/instancesAPI path by calling thedescribe_instancesfunction. - The
describe_instancesfunction uses the AWS SDK to query EC2 instances in the specified region. - It formats the response according to the expected structure for Bedrock Agents.
- Error handling is implemented throughout to ensure robust operation.
Important: Make sure to extend the Lambda timeout beyond the default 3 seconds. For the EC2 Operations Lambda, I recommend setting it to at least 30 seconds, as querying EC2 instances across regions can take time, especially with pagination.
Creating the Slack Handler Lambda
Now, let's create the Lambda function that will handle Slack interactions:
- Navigate to the AWS Lambda console
- Click "Create function"
- Select "Author from scratch"
- Name your function (e.g., "SlackHandlerLambda")
- Select Python 3.9 as the runtime
- Create a new execution role with basic Lambda permissions
- Click "Create function"
Now, let's add the code for our Slack Handler Lambda:
import os
import json
import hmac, hashlib
import boto3
import base64
import time
from datetime import datetime, timedelta
from botocore.exceptions import ClientError

# Read important constants from environment or configuration
BEDROCK_AGENT_ID = os.environ.get("BEDROCK_AGENT_ID")       # e.g., "agent-1234567890abcdef"
BEDROCK_AGENT_ALIAS = os.environ.get("BEDROCK_AGENT_ALIAS") # e.g., the alias ID (not the name)
SLACK_BOT_TOKEN = os.environ.get("SLACK_BOT_TOKEN")         # xoxb- token
SLACK_SIGNING_SECRET = os.environ.get("SLACK_SIGNING_SECRET")  # Slack signing secret
BEDROCK_REGION = os.environ.get("BEDROCK_REGION", "eu-central-1")  # Default to eu-central-1 if not specified

# Initialize the Bedrock client - Using bedrock-agent-runtime for agent invocation with region from environment variable
bedrock_client = boto3.client("bedrock-agent-runtime", region_name=BEDROCK_REGION)

# In-memory cache for event deduplication
processed_events = {}

def lambda_handler(event, context):
    # If coming via API Gateway HTTP API, the actual Slack payload will be in 'body'
    body = event.get('body')
    if body:
        # The body might be URL-encoded from Slack, but Slack can send JSON if configured.
        # Assume JSON for simplicity:
        try:
            slack_event = json.loads(body)
        except json.JSONDecodeError:
            # If the body was URL encoded (application/x-www-form-urlencoded), parse it differently
            import urllib.parse
            slack_event = json.loads(urllib.parse.parse_qs(body)['payload'][0]) if 'payload' in body else urllib.parse.parse_qs(body)
    else:
        # If running in a Flask app, you might directly get JSON
        slack_event = event

    # 1. Verification challenge handshake
    if slack_event.get("type") == "url_verification":
        challenge = slack_event.get("challenge", "")

        # Respond with the challenge token to verify endpoint
        return {
            "statusCode": 200,
            "headers": {"Content-Type": "text/plain"},
            "body": challenge
        }

    # 2. Verify Slack request signature (to ensure request is from Slack)
    headers = event.get('headers', {})
    if SLACK_SIGNING_SECRET:
        timestamp = headers.get('x-slack-request-timestamp') or headers.get('X-Slack-Request-Timestamp')
        signature = headers.get('x-slack-signature') or headers.get('X-Slack-Signature')
        if not verify_slack_signature(SLACK_SIGNING_SECRET, body, timestamp, signature):
            return {"statusCode": 401, "body": "Invalid signature"}  # reject if signature check fails

    # 3. Process event callbacks
    # Slack might batch events; we handle one event at a time for simplicity.
    if "event" in slack_event:
        event_info = slack_event["event"]
        user_id = event_info.get("user")
        text = event_info.get("text", "")
        channel_id = event_info.get("channel")

        # Ignore events that are from the bot itself to prevent loops
        if event_info.get("bot_id") or user_id is None:
            return {"statusCode": 200}  # nothing to do

        # Event deduplication - Check if we've seen this event recently
        event_id = slack_event.get("event_id") or slack_event.get("event_time")
        if not event_id:
            # Create a synthetic ID if none exists
            event_id = f"{channel_id}:{user_id}:{text[:10]}:{int(time.time())}"

        # Check if we've seen this event recently (within last 5 minutes)
        now = datetime.now()
        if event_id in processed_events:
            last_processed = processed_events[event_id]
            if now - last_processed < timedelta(minutes=5):
                return {"statusCode": 200}  # Acknowledge but don't process

        # Mark this event as processed
        processed_events[event_id] = now

        # Clean up old entries to prevent memory growth
        for old_id in list(processed_events.keys()):
            if now - processed_events[old_id] > timedelta(minutes=30):
                del processed_events[old_id]

        # (Optional auth) Check if user_id is allowed to use the bot
        allowed_users = os.environ.get("ALLOWED_USER_IDS")
        if allowed_users:
            allowed_list = [u.strip() for u in allowed_users.split(",")]
            if user_id not in allowed_list:
                # Notify user they are not authorized
                send_slack_message(channel_id, ":x: You are not authorized to use this bot.")
                return {"statusCode": 200}

        # Validate Bedrock agent configuration
        if not BEDROCK_AGENT_ID or not BEDROCK_AGENT_ALIAS:
            error_msg = "Bedrock agent configuration is incomplete. Please check BEDROCK_AGENT_ID and BEDROCK_AGENT_ALIAS environment variables."
            send_slack_message(channel_id, f"⚠️ Configuration Error: {error_msg}")
            return {"statusCode": 200}

        # 4. Invoke the Bedrock agent with the user's text
        session_id = channel_id  # use channel (or user) as session identifier for continuity
        try:
            # Using the correct method with the bedrock-agent-runtime client
            response = bedrock_client.invoke_agent(
                agentId=BEDROCK_AGENT_ID,
                agentAliasId=BEDROCK_AGENT_ALIAS,
                sessionId=session_id,
                inputText=text
            )

            # The response is streamed in chunks. Combine them to get full answer.
            answer = ""
            for chunk in response.get("completion", []):
                chunk_text = chunk["chunk"]["bytes"].decode('utf-8', errors='ignore')
                answer += chunk_text

            # 5. Send the agent's answer back to Slack
            if answer:
                send_slack_message(channel_id, answer)
            else:
                # If no answer (empty completion), send a default reply
                send_slack_message(channel_id, "🤖 (No response)")

        except ClientError as e:
            error_code = e.response.get('Error', {}).get('Code', '')
            error_message = e.response.get('Error', {}).get('Message', str(e))

            if error_code == 'ResourceNotFoundException':
                send_slack_message(channel_id, f"Sorry, I couldn't process that request. Error: Resource not found. Please check your Bedrock agent configuration.")
            else:
                send_slack_message(channel_id, f"Sorry, I couldn't process that request. Error: {error_message}")

        except Exception as e:
            # Log error and reply with a failure message
            send_slack_message(channel_id, f"Sorry, I couldn't process that request. Error: {str(e)}")

    # Return 200 to acknowledge the event was received
    return {"statusCode": 200}

# Utility to verify Slack signatures (optional but recommended)
def verify_slack_signature(signing_secret, request_body, timestamp, signature):
    if not signature or not timestamp:
        return False
    # Slack sends 'v0=' prefix in signature
    req = str.encode('v0:' + str(timestamp) + ':' + request_body)
    secret = str.encode(signing_secret)
    hash_hex = 'v0=' + hmac.new(secret, req, hashlib.sha256).hexdigest()
    return hmac.compare_digest(hash_hex, signature)

# Function to send messages to Slack without using requests library
def send_slack_message(channel_id, text):
    """
    Send a message to a Slack channel using AWS Lambda's URL fetch capabilities
    instead of the requests library.
    """
    try:
        # Prepare the request payload
        payload = {
            "channel": channel_id,
            "text": text
        }

        # Convert payload to JSON string
        payload_json = json.dumps(payload)

        # Create a presigned URL for the Slack API
        url = "https://slack.com/api/chat.postMessage"

        # Use AWS SDK to make the HTTP request
        import urllib.request

        # Create a request object
        req = urllib.request.Request(url)

        # Add headers
        req.add_header("Content-Type", "application/json")
        req.add_header("Authorization", f"Bearer {SLACK_BOT_TOKEN}")

        # Send the request
        with urllib.request.urlopen(req, data=payload_json.encode('utf-8')) as response:
            response_body = response.read().decode('utf-8')

            # Parse the response
            response_json = json.loads(response_body)
            if not response_json.get("ok", False):
                print(f"Error sending message to Slack: {response_json.get('error', 'Unknown error')}")

    except Exception as e:
        print(f"Error sending message to Slack: {str(e)}")
This Lambda function handles the communication between Slack and the Bedrock Agent. Let's break down what it does:
- It processes incoming webhook events from Slack.
- It verifies the Slack signature to ensure the request is legitimate.
- It extracts the user's message and invokes the Bedrock Agent with that message.
- It receives the response from the Bedrock Agent and sends it back to the user in Slack.
- It includes error handling and event deduplication to prevent processing the same message multiple times.
Important: The SlackHandlerLambda requires several environment variables to function properly:
BEDROCK_AGENT_ID: The ID of your Bedrock Agent (e.g., "agent-1234567890abcdef")BEDROCK_AGENT_ALIAS: The alias ID of your Bedrock Agent (not the name)SLACK_BOT_TOKEN: Your Slack Bot token (starts with "xoxb-")SLACK_SIGNING_SECRET: Your Slack signing secret for request verificationBEDROCK_REGION: The AWS region where your Bedrock Agent is deployed (e.g., "eu-central-1")ALLOWED_USER_IDS(optional): Comma-separated list of Slack user IDs allowed to use the botAlso, make sure to extend the Lambda timeout beyond the default 3 seconds. For the SlackHandlerLambda, I recommend setting it to at least 30 seconds, as the Bedrock Agent invocation can take time, especially for complex queries.
Connecting the Lambda Function to the Action Group
This is a crucial step that connects your Lambda function to your action group:
- In the Amazon Bedrock console, navigate back to your agent's action group
-
In the "Action group invocation" section, you have three options:
- Quick create a new Lambda function - Amazon Bedrock creates a basic Lambda function for you
- Select an existing Lambda function - Choose the Lambda function you created earlier
- Return control - The agent returns control to your application without invoking a Lambda
Select "Select an existing Lambda function"
Choose your Lambda function from the dropdown (e.g., "EC2OperationsLambda")
Select the appropriate function version (usually $LATEST)
Click "Save" to connect your Lambda function to the action group
Additionally, you need to grant Amazon Bedrock permission to invoke your Lambda function:
- Navigate to the Lambda console and select your function
- Go to the "Permissions" tab
- Under "Resource-based policy statements", click "Add permissions"
- Choose "AWS service" as the principal
- For "Service", select "bedrock.amazonaws.com"
- For "Action", select "lambda:InvokeFunction"
- Click "Save" to add the permission
Sidenote: If you create the Lambda through the Bedrock Console Action Group view, the resource-based policy statements will be set automatically otherwise you need to add that into your Lambda manually.
Setting Up IAM Permissions
Remember Dr. Frankenstein's mistake? He gave his creation too much freedom. Learn from his error and implement proper IAM permissions! Your monster should only have exactly the access it needs - no more wandering into the village terrifying the EC2 instances.
Let's create a proper IAM policy for our EC2 Operations Lambda function:
- Navigate to the IAM console
- Select "Policies" and click "Create policy"
- Use the JSON editor to create a policy:
{
  "Version": "2012-10-17",
  "Statement": [
    {
      "Effect": "Allow",
      "Action": [
        "ec2:DescribeInstances"
      ],
      "Resource": "*"
    },
    {
      "Effect": "Allow",
      "Action": [
        "logs:CreateLogGroup",
        "logs:CreateLogStream",
        "logs:PutLogEvents"
      ],
      "Resource": "arn:aws:logs:*:*:*"
    }
  ]
}
- Name your policy (e.g., "BedrockAgentEC2Operations")
- Create the policy
- Attach this policy to your Lambda function's execution role
For the SlackHandlerLambda, you'll need a different policy that allows it to invoke the Bedrock Agent:
{
  "Version": "2012-10-17",
  "Statement": [
    {
      "Effect": "Allow",
      "Action": [
        "bedrock:InvokeAgent"
      ],
      "Resource": "arn:aws:bedrock:*:*:agent/*"
    },
    {
      "Effect": "Allow",
      "Action": [
        "logs:CreateLogGroup",
        "logs:CreateLogStream",
        "logs:PutLogEvents"
      ],
      "Resource": "arn:aws:logs:*:*:*"
    }
  ]
}
Attach this policy to your SlackHandlerLambda's execution role.
API Gateway Setup
Now that we have our Lambda functions ready, we need to create an API Gateway to receive webhook events from Slack. This will serve as the secure entry point for our integration.
Creating the API Gateway
- Navigate to the Amazon API Gateway console
- Click "Create API"
- Select "HTTP API" (not REST API) for a simpler, more cost-effective solution
- Click "Build"
- In the "Integrations" section, select "Lambda"
- Choose your SlackHandlerLambda function
- For "API name", enter a descriptive name (e.g., "slack-bedrock-integration")
- Click "Next"
Configuring Routes
- In the "Configure routes" section, click "Add route"
- Set the method to "POST"
- Set the path to "/" (or any path you prefer)
- Select your SlackHandlerLambda as the integration target
- Click "Next"
Configuring Stages
- In the "Configure stages" section, keep the default stage name "$default"
- Enable automatic deployments
- Click "Next"
Reviewing and Creating
- Review your API configuration
- Click "Create"
- Once created, note the API endpoint URL (e.g., "https://abcdef123.execute-api.us-east-1.amazonaws.com")
Enhancing API Gateway Security
For a production environment, you should implement additional security measures for your API Gateway:
-
Add Request Validation:
- Navigate to your API in the API Gateway console
- Select "Routes" and then your POST route
- Click "Edit"
- Under "Request validator", select "Validate body"
- Click "Save"
-
Add Throttling:
- Navigate to your API in the API Gateway console
- Select "Stages" and then your stage
- Click "Edit"
- Set appropriate rate and burst limits (e.g., 10 requests per second)
- Click "Save"
-
Add CORS Configuration (if needed):
- Navigate to your API in the API Gateway console
- Select "CORS"
- Configure appropriate CORS settings
- Click "Save"
-
Add WAF Integration (optional but recommended for production):
- Navigate to the AWS WAF console
- Create a web ACL with appropriate rules
- Associate the web ACL with your API Gateway
-
Add CloudWatch Logging:
- Navigate to your API in the API Gateway console
- Select "Logging"
- Enable CloudWatch logging
- Set an appropriate log level (e.g., ERROR for production)
- Click "Save"
These security enhancements will help protect your API Gateway from common threats and ensure it operates reliably in a production environment.
Testing the API Gateway
Before proceeding to the Slack integration, let's test our API Gateway to ensure it's working correctly:
- Use a tool like curl or Postman to send a POST request to your API endpoint
- Include a simple JSON payload in the request body
- Check the CloudWatch logs for your SlackHandlerLambda to ensure it received and processed the request
If everything is working correctly, you should see logs indicating that your Lambda function was invoked and processed the request. Now we're ready to integrate with Slack!
Slack Integration
Now that we have our Bedrock Agent and API Gateway set up, it's time to integrate with Slack. This is where our creation truly comes to life!
Creating a Slack App
- Go to the Slack API website
- Click "Create New App"
- Choose "From scratch"
- Enter a name for your app (e.g., "AWS AI Assistant")
- Select the workspace where you want to install the app
- Click "Create App"
Configuring Bot Token Scopes
For our Slack Bot to function properly, we need to configure the appropriate permissions:
- In the left sidebar, click on "OAuth & Permissions"
- Scroll down to the "Scopes" section
- Under "Bot Token Scopes", click "Add an OAuth Scope"
- Add the following scopes:
-
app_mentions:read- View messages that directly mention @AWS AI Assistant in conversations that the app is in -
chat:write- Send messages as @AWS AI Assistant -
im:history- View messages and other content in direct messages that AWS AI Assistant has been added to -
im:read- View basic information about direct messages that AWS AI Assistant has been added to -
im:write- Start direct messages with people -
mpim:write- Start group direct messages with people
-
These scopes allow your bot to read messages, send responses, and interact with users in direct messages and group conversations.
Activating Messages Tab in App Home
An important step that's easy to miss is activating the Messages Tab in your App Home:
- In the left sidebar, click on "App Home"
- Scroll down to the "Show Tabs" section
- Enable the "Messages Tab"
- Save your changes
This step is crucial for allowing users to send direct messages to your bot. Without it, users won't be able to initiate conversations with your assistant.
Setting Up Event Subscriptions
Now, we need to configure Slack to send events to our API Gateway:
- In the left sidebar, click on "Event Subscriptions"
- Toggle "Enable Events" to On
- In the "Request URL" field, enter your API Gateway URL
- Slack will send a verification challenge to your endpoint - if your Lambda function is set up correctly, it should automatically respond and verify the URL
- Under "Subscribe to bot events", click "Add Bot User Event"
- Add the following events:
-
message.im- Subscribe to direct messages sent to your bot -
app_mention- Subscribe to mentions of your bot in channels
-
- Click "Save Changes"
Installing the App to Your Workspace
- In the left sidebar, click on "Install App"
- Click "Install to Workspace"
- Review the permissions and click "Allow"
- Copy the "Bot User OAuth Token" (starts with
xoxb-) - you'll need this for your SlackHandlerLambda environment variable
Updating the SlackHandlerLambda Environment Variables
Now that we have our Slack app set up, we need to update the environment variables in our SlackHandlerLambda:
- Navigate to the AWS Lambda console
- Select your SlackHandlerLambda function
- Scroll down to the "Environment variables" section
- Add the following environment variables:
-
BEDROCK_AGENT_ID: Your Bedrock Agent ID -
BEDROCK_AGENT_ALIAS: Your Bedrock Agent Alias ID -
SLACK_BOT_TOKEN: The Bot User OAuth Token you copied earlier -
SLACK_SIGNING_SECRET: Found in the "Basic Information" section of your Slack app under "App Credentials" -
BEDROCK_REGION: The AWS region where your Bedrock Agent is deployed
-
- Click "Save"
Testing the Integration
Now it's time to test our integration! There are two ways to test:
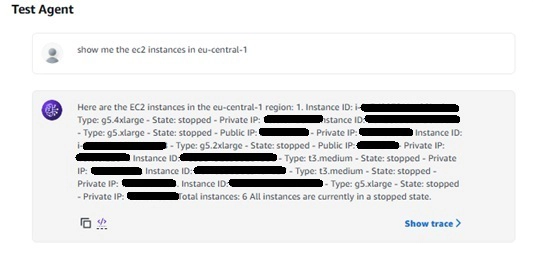
Testing in the Bedrock Agent Console:
- Navigate to the Amazon Bedrock console
- Select your agent
- Click "Test"
- Try asking about your EC2 instances: "Show me the ec2 instances in eu-central-1"
Testing in Slack:
- Open your Slack workspace
- Find your bot in the Apps section or direct messages
- Send a message like "Show me the ec2 instances in eu-central-1"
- Your bot should respond with a list of instances
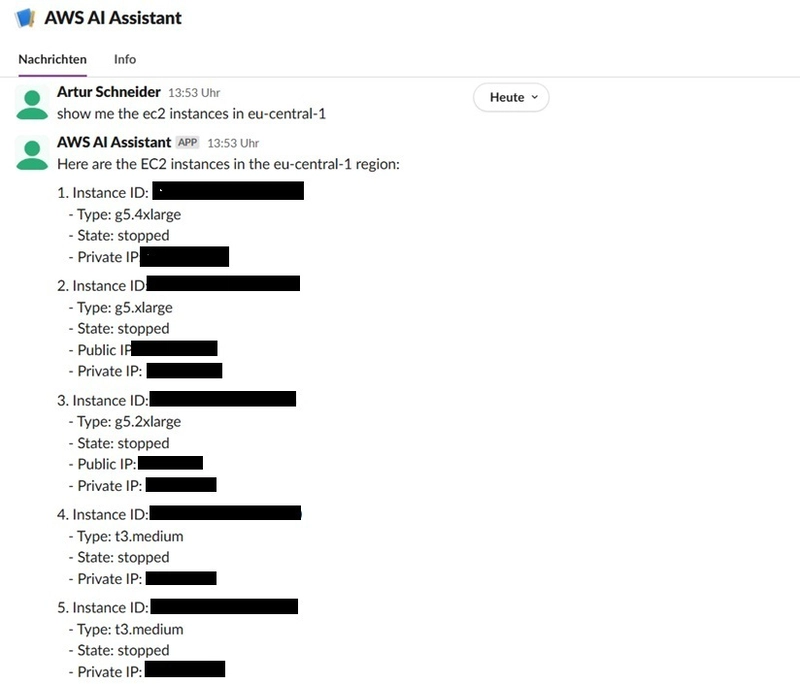
If everything is set up correctly, you should see your bot responding with information about your EC2 instances. Congratulations! Your AWS AI Assistant is alive and working!
Troubleshooting Common Issues
If you encounter issues with your integration, here are some common problems and solutions:
-
Bot not responding in Slack:
- Check that your SlackHandlerLambda environment variables are set correctly
- Verify that your API Gateway endpoint is correctly configured in Slack's Event Subscriptions
- Check the CloudWatch logs for your SlackHandlerLambda for error messages
- Ensure the Messages Tab is activated in App Home
-
Lambda timeout errors:
- Increase the timeout for both Lambda functions beyond the default 3 seconds
- For SlackHandlerLambda, set it to at least 60 seconds
- For EC2OperationsLambda, set it to at least 30 seconds
-
Permission errors:
- Verify that your Lambda functions have the correct IAM permissions
- Check that Bedrock has permission to invoke your EC2OperationsLambda
- Ensure your Slack app has all the required scopes
-
Bedrock Agent errors:
- Make sure your agent is properly prepared and working in the test console
- Verify that your action group schema matches the implementation in your Lambda function
- Check that your agent has clear instructions
By following these troubleshooting steps, you should be able to resolve most common issues with your integration.
Security Considerations
Throughout this guide, we've touched on various security aspects, but let's take a moment to dive deeper into the security considerations for this integration. When building an AI assistant that can interact with your AWS environment, security should be your top priority.
IAM Permissions and Least Privilege
The principle of least privilege is crucial when setting up IAM permissions for your Lambda functions. Your EC2OperationsLambda should only have the specific permissions it needs to perform its tasks - in our example, that's just ec2:DescribeInstances. If you expand the functionality to include other operations, add only the specific permissions needed for those operations.
For example, if you want to allow your assistant to start and stop instances, you would add only these specific permissions:
{
  "Effect": "Allow",
  "Action": [
    "ec2:StartInstances",
    "ec2:StopInstances"
  ],
  "Resource": "arn:aws:ec2:*:*:instance/*"
}
Never give your Lambda functions broad permissions like ec2:* as this would allow the function to perform any EC2 operation, including deleting instances or creating new ones.
Slack App Security
Your Slack app is the interface through which users interact with your AWS environment, so it's important to secure it properly:
Request Verification: Always verify that requests are coming from Slack using the signing secret and signature verification process.
User Authorization: Consider implementing user-based authorization to control who can use your bot. The SlackHandlerLambda includes an optional ALLOWED_USER_IDS environment variable for this purpose.
Token Security: Store your Slack tokens securely. In our example, we use environment variables, but for production, consider using AWS Secrets Manager.
Scoped Permissions: Only request the specific Slack scopes your bot needs. Avoid requesting broad scopes like channels:read if you only need to interact with direct messages.
API Gateway Security
Your API Gateway is the entry point to your AWS environment, so it needs to be properly secured:
Request Validation: Validate incoming requests to ensure they match the expected format.
Throttling: Implement throttling to prevent abuse and denial-of-service attacks.
WAF Integration: Consider integrating with AWS WAF to protect against common web exploits.
Logging and Monitoring: Enable detailed logging and set up monitoring to detect unusual activity.
Data Handling and Privacy
When handling user data and AWS resource information, consider these privacy aspects:
Data Minimization: Only collect and process the data you need.
Data Retention: Don't store sensitive information longer than necessary.
Secure Transmission: Ensure all data is transmitted securely using HTTPS.
Response Sanitization: Be careful about what information you return to users. For example, you might want to redact or mask certain sensitive information like IP addresses.
Additional Use Cases
While our example focused on describing EC2 instances, this integration can be extended to support a wide range of use cases. Here are some ideas, all with security in mind:
Security-Focused Use Cases
Security Posture Checking: Ask your assistant to check for security issues like open security groups, public S3 buckets, or IAM users without MFA.
Example: "Check for S3 buckets with public access in all regions"
Compliance Verification: Verify that resources comply with your organization's security policies.
Example: "Show me EC2 instances that don't have encryption enabled"
Security Incident Response: Use your assistant to help with security incident response.
Example: "Show me all CloudTrail events for user john.doe in the last 24 hours"
Security Notifications: Set up your assistant to notify you about security events.
Example: "Alert me when there are failed login attempts to the AWS console"
Operational Efficiency Use Cases
Resource Monitoring: Monitor the status and health of your AWS resources.
Example: "Show me all RDS instances with high CPU usage"
Cost Optimization: Identify opportunities to reduce costs.
Example: "Find unused EBS volumes across all regions"
Automated Remediation: Automate common remediation tasks.
Example: "Stop all development environment instances outside of business hours"
Documentation Access: Access and search through your documentation.
Example: "What's our process for deploying to production?"
DevOps Use Cases
Deployment Status: Check the status of your deployments.
Example: "What's the status of the latest deployment to production?"
Infrastructure Management: Manage your infrastructure through natural language.
Example: "Scale the web server auto-scaling group to 5 instances"
Log Analysis: Search and analyze logs.
Example: "Show me error logs from the payment service in the last hour"
Environment Management: Manage different environments.
Example: "Compare the configuration between staging and production"
Conclusion
In this guide, we've built a powerful AWS AI assistant by integrating Amazon Bedrock Agents with Slack. We've created a secure, scalable architecture that allows users to interact with AWS resources using natural language.
The integration we've built demonstrates the power of agentic AI assistants in simplifying AWS operations. By leveraging Amazon Bedrock's capabilities and connecting them to Slack, we've created a tool that can significantly improve productivity and accessibility of AWS resources.
Remember that security should always be at the forefront when building tools that interact with your AWS environment. By following the principle of least privilege, implementing proper authentication and authorization, and being mindful of data privacy, you can create a powerful assistant without compromising security.
As you expand your assistant's capabilities beyond the EC2 instance example we've covered, continue to apply these security principles to each new feature. With the right balance of functionality and security, your AWS AI assistant can become an invaluable tool for your team.
So go ahead, bring your AWS AI assistant to life! Just remember to give it the right permissions, unlike Dr. Frankenstein's creation. Your monster should be helpful, not terrifying! 😉

Top comments (0)