A bit of history…
For the last few years, the project I have been working on was using Mapbox to render maps with custom data until one day when the team decides to move away from it to an open-source solution. The project have grown big over the years and with that have grown the licensing cost for Mapbox. Hence, switching to an alternate and open-source solution was a wise option, so we decide to switch to TileServer.
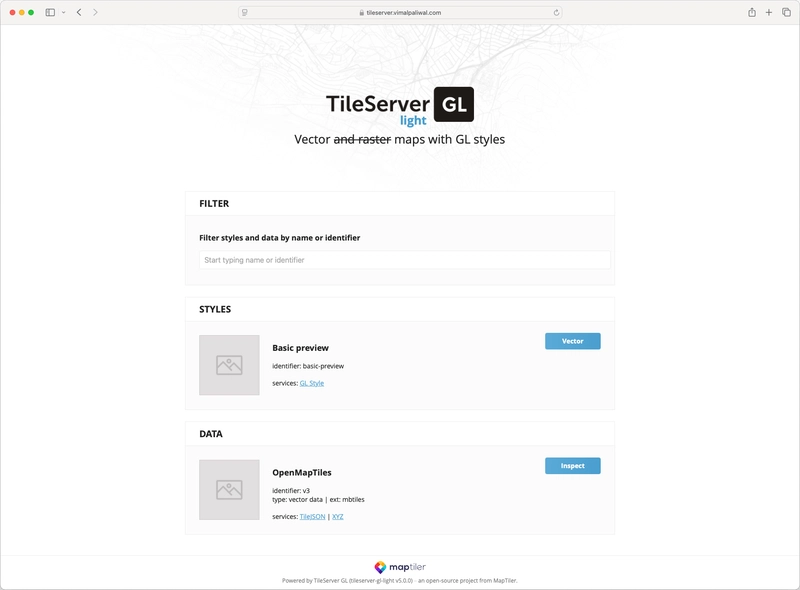
About TileServer
TileServer GL is an open-source map server that supports both serving vector tiles as well as raster tiles (through Mapbox GL Native).
Maptiler Data hosts vector files that can be used with the TileServer but as of writing this article, the file is available for free only for non-commercial/educational purpose. Otherwise, a license must be purchased. Alternatively, the vector files can be generated from scratch by following the instructions mentioned in the OpenMapTiles git repo.
Beginning of the journey
The dev team started working on the POC on their local machine and in few days they were able to confirm that TileServer is a great drop-in replacement to Mapbox but little they knew about the challenges that we were about to face while deploying TileServer to AWS for production use.
Let’s begin the real journey.
Generating Vector Files - A Nightmare
We face our initial challenge during the process of generating the planet.mbtiles vector file from scratch. We first try generating the file on a local Mac that has 32GB memory. After few hours, we encounter our first error and realise that we need a more powerful machine, so we decide to spin up an EC2 machine with 64GB memory and start the process to run in the background using nohup and stream the logs to a file.
It's been a few hours and we had managed to successfully run the first few steps/scripts. Somewhere during midday, we start the next script in the background and before logging off for the day, we look at the logs and the script still seems to be running, so leave the instance running overnight.
The next day, we check the logs and notice an error "No space left on the device". Not a good start of the day! We decided to double the storage to 200GB and re-ran the script. Periodically checking to make sure everything is working fine. Another day comes to an end and the script is still running.
Day 3 and the script is still running, surprising yet glad because of no errors. Unfortunately, the happiness stayed only for an hour or so before we hit the same error "No space left on the device". As frustrating it is, we upgrade the storage to 500GB and run the script once again.
Day 4 passed and on Day 5 we hit the same error once again. This time before increasing the disk space, I decide to check the disk usage metrics using "df -h" command and what I notice is that there's still around 200GB remaining. After brainstorming for sometime, we realised that we have come across similar case earlier as well where psql complains about "No space left on the device" and we decide to upgrade the instance type this time to have 128GB memory. We run the script again and after 2 days, we finally achieve success.
Wait, the struggle isn't over yet.
We still had 2-3 scripts left to run to generate the mbtiles file. The remaining scripts were very quick and by the end of the day we had managed to generate our mbtiles file.
We start celebrating the success but we soon the bubble bursts when we realised that the generated file isn’t valid.
The team starts investigating what went wrong during the entire process and during this we come across a reddit post that turned out to be a saviour for us. We don't need to generate the file anymore from scratch as this kind hearted person has done the heavy lifting for us. This person hosts the file on a public server to allow people to simply download and use it.
We were at the top of the mountain but before we can use the file, we had to make sure that it is safe to use the file as it is generated by a third person. The scan took few mins given the large file size but it came clean and we were excited by this.
The journey of setting up infrastructure starts now.
Onto the implementation part
I will be focusing mostly only on the architecture specific implementation details rather than generic steps about deploying a particular service to keep the article concise.
Entire source code is available in the GitHub repository. Feel free to customise it as per your use case and contributions are always appreciated.
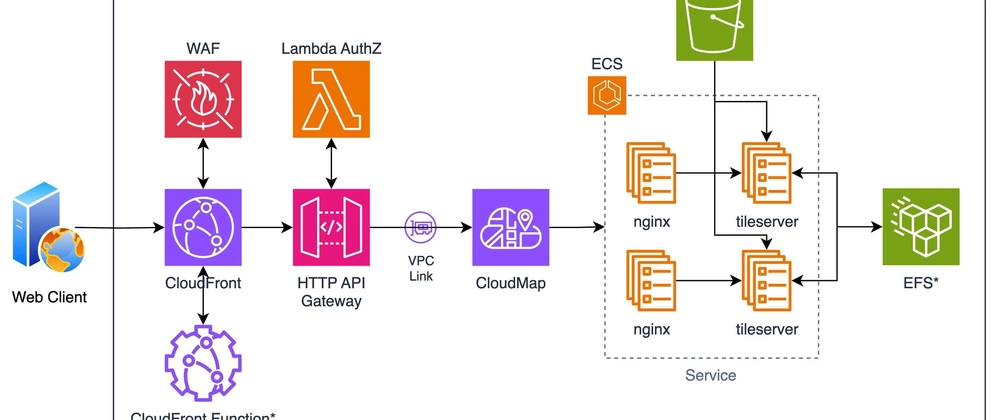
A quick overview of all the components involved:
CloudFront: Acts as an entry point to the incoming traffic and forwards the traffic to API Gateway along with a custom header.
WAF: Protects against application layer attacks and validates the incoming request.
CloudFront Function: Associated to Viewer Response event, adds CORS and security response headers. This is optional because you can use response headers policy feature of CloudFront to manage the same.
HTTP API Gateway: Responsible for routing incoming requests to the ECS service via VPC Private Link.
Lambda Authorizer: To validate and authorize requests based on origin, custom header from CloudFront and the bearer token.
Cloud Map: Keeps track of private IP addresses assigned to the privately hosted ECS service and share it with API Gateway.
ECS: To deploy nginx reverse proxy and TileServer containers.
S3 & EFS: To store the mbtiles file and tileserver config files. These are use-case specific and hence optional.
Let’s dive into individual components and understand the configuration.
CloudFront
I’ll skip walking through the setup process of the CloudFront for two reasons: firstly, because it’s a standard setup with HTTP API Gateway as origin and a default behaviour to forward all traffic to the origin server except introducing the custom header part and second, this has already discussed in detail in my previous article.
In brief, within the origin section, there’s an option to forward custom header and we have used this feature so that Lambda Authorizer attached to HTTP API Gateway can validate all the incoming requests are routed via CloudFront as this ensures that all the incoming requests are scanned by WAF.
Fig 1. CloudFront Overview
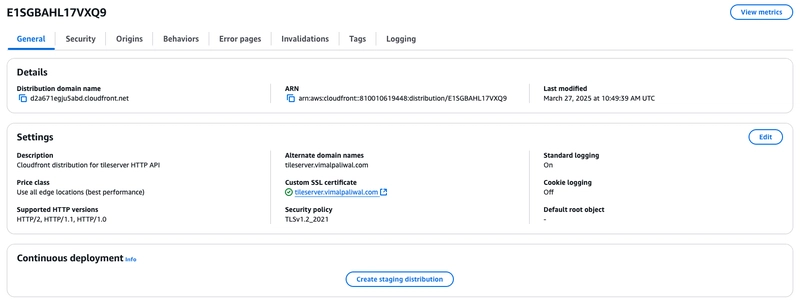
Fig 2. CloudFront Origin

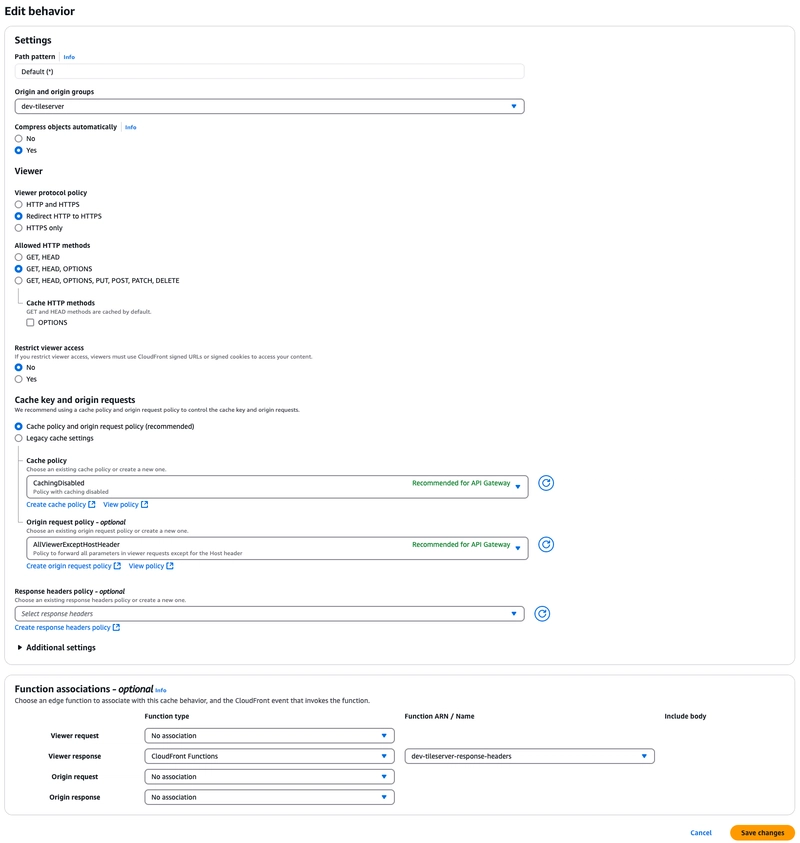
Fig 3. CloudFront Behavior
WAF
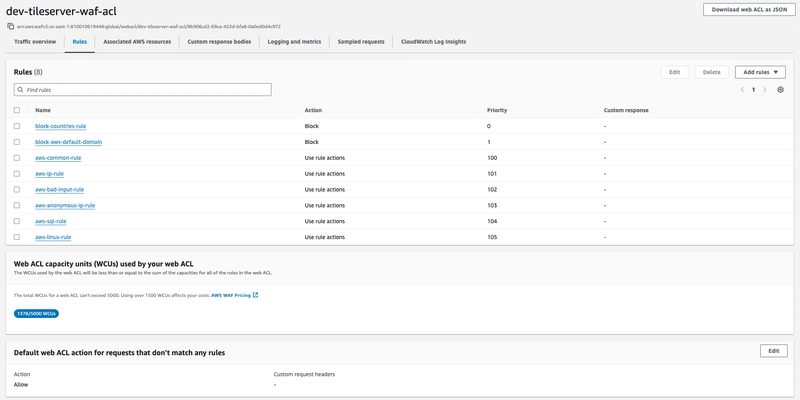
By default, we have set the action to block all the traffic and only allow the traffic if it has passed all the rules. To fulfil our requirement, we have used a combination of AWS managed rules and custom rules.
AWS Managed rules:
- AWSManagedRulesCommonRuleSet
- AWSManagedRulesAmazonIpReputationList
- AWSManagedRulesKnownBadInputsRuleSet
- AWSManagedRulesAnonymousIpList
- AWSManagedRulesSQLiRuleSet
- AWSManagedRulesLinuxRuleSet
Custom rules:
- Block Sanctioned Countries
- Block Traffic from AWS default domain
- Whitelist traffic from CORS domain
Block traffic from Sanctioned Countries
rule {
  name     = "block-countries-rule"
  priority = 0

  action {
    block {}
  }

  statement {
    geo_match_statement {
      country_codes = [
        "CU", # Cuba
        "IR", # Iran
        "KP", # N. Korea
        "RU", # Russia
        "SY"  # Syria
      ]
    }
  }

  visibility_config {
    cloudwatch_metrics_enabled = true
    metric_name                = "tileserver-block-countries-rule-waf-acl"
    sampled_requests_enabled   = true
  }
}
Block traffic from AWS default domain
rule {
  name     = "block-aws-default-domain"
  priority = 1

  action {
    block {}
  }

  statement {
    byte_match_statement {
      field_to_match {
        single_header {
          name = "host"
        }
      }
      positional_constraint = "ENDS_WITH"
      search_string         = ".cloudfront.net"
      text_transformation {
        type     = "NONE"
        priority = 0
      }
    }
  }

  visibility_config {
    cloudwatch_metrics_enabled = true
    metric_name                = "tileserver-block-aws-default-domain-waf-acl"
    sampled_requests_enabled   = true
  }
}
Whitelist traffic from product domain
rule {
  name     = "whitelist-cors-domain"
  priority = 200

  action {
    allow {}
  }

  statement {
    byte_match_statement {
      positional_constraint = "EXACTLY"
      search_string         = "xxxxxxxx.xxx"

      field_to_match {
        single_header {
          name = "origin"
        }
      }

      text_transformation {
        priority = 0
        type     = "NONE"
      }
    }
  }

  visibility_config {
    cloudwatch_metrics_enabled = true
    metric_name                = "tileserver-whitelist-cors-domain-rule-waf-acl"
    sampled_requests_enabled   = true
  }
}
Fig 4. WAF Rules
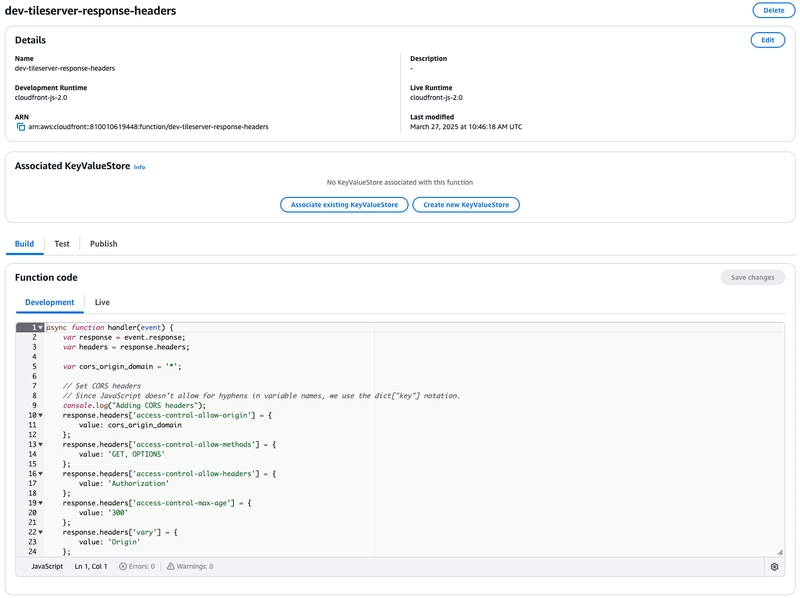
CloudFront Function
It is not necessary to utilise CloudFront Function to add CORS and Security headers because the same can be achieved by attaching response header policy to the CloudFront distribution.
We decided to use CloudFront Function because we had to dynamically generate the CORS access-control-allow-origin response header based on the origin request header and only generate the CORS response headers if the origin header is present in the list of whitelisted sub-domains.
async function handler(event) {
    var request = event.request;
    var response = event.response;
    var headers = response.headers;

    // Set CORS headers
    // Since JavaScript doesn't allow for hyphens in variable names, we use the dict["key"] notation.
    const originRegex = /^https:\/\/(?:[a-zA-Z0-9-]+\.)+abc\.example\.com$/;
    if (originRegex.test(request.headers['origin'].value)) {
        console.log("Adding CORS headers");
        response.headers['access-control-allow-origin'] = {
            value: request.headers['origin'].value
        };
        response.headers['access-control-allow-credentials'] = {
            value: 'true'
        };
        response.headers['access-control-allow-methods'] = {
            value: 'GET, OPTIONS'
        };
        response.headers['access-control-allow-headers'] = {
            value: 'Authorization'
        };
    }
    else {
        console.log("Origin does not match regex. Origin: " + request.headers['origin'].value);
    }

    // Set HTTP security headers
    // Since JavaScript doesn't allow for hyphens in variable names, we use the dict["key"] notation
    headers['strict-transport-security'] = {
        value: 'max-age=63072000; includeSubdomains; preload'
    };
    headers['x-content-type-options'] = {
        value: 'nosniff'
    };
    headers['x-frame-options'] = {
        value: 'DENY'
    };
    headers['x-xss-protection'] = {
        value: '1; mode=block'
    };
    headers['referrer-policy'] = {
        value: 'no-referrer-when-downgrade'
    };

    // Remove the Server header
    delete headers['server'];

    // Return the response to viewers
    return response;
}
Fig 5. CloudFront Function
HTTP API Gateway
Wondering why HTTP API Gateway instead of REST API Gateway?
Simple answer: Cost effective and serves all our requirements.
Nothing complicated with the setup. Just a single proxy path "/{path+}" that forwards all the incoming requests to the ECS service via VPC Private Link. Additionally, we have implemented Lambda AuthZ to validate the bearer token to ensure the request is coming from an authenticated user and the custom authZ token received from the CloudFront distribution to ensure the request is coming via CloudFront.
Fig 6. HTTP API Gateway
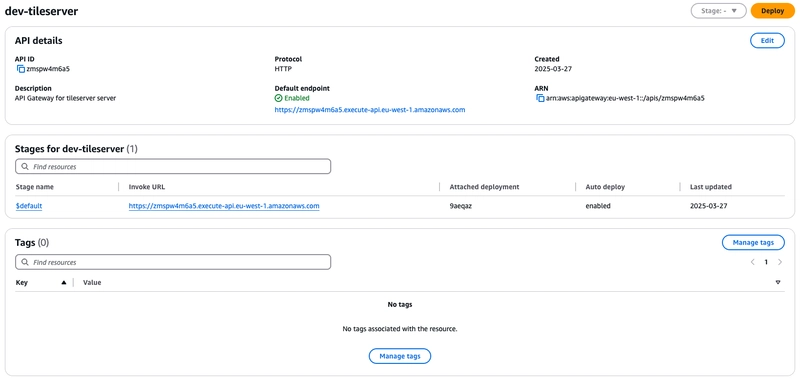
Fig 7. VPC Private Link
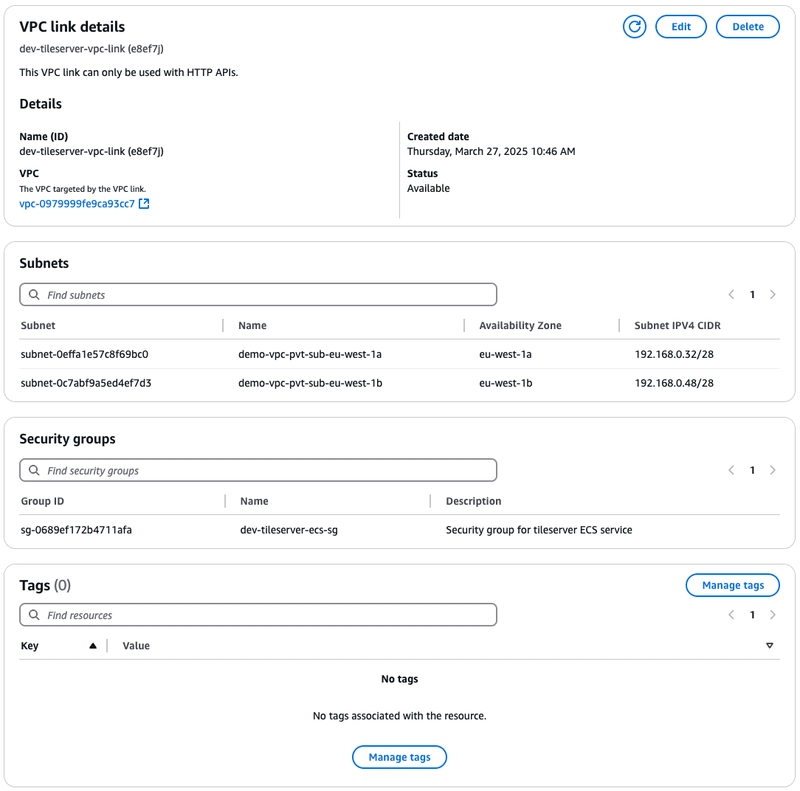
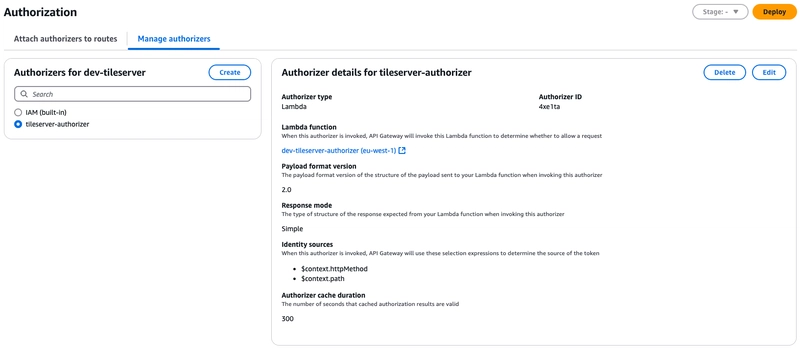
Fig 8. Lambda Authorizer
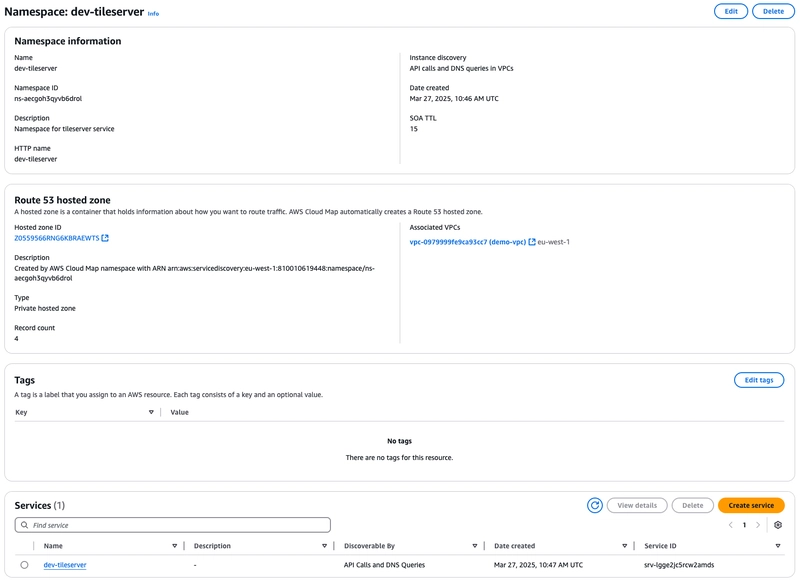
Cloud Map
HTTP API Gateway cannot directly discover the physical address of ECS service and given the self-healing nature and auto-scaling capability, it is not a wise option to hardcode the private IP of the service(s), so we use Cloud Map which provides the capability of service discovery. We need to make sure to configure service discovery while creating the ECS service to use this feature. Moreover, Cloud Map perform health checks and only registers healthy ECS tasks to the service.
There’s a detailed article by the AWS team on exposing ECS service via HTTP API Gateway using Private Link that you can read to understand all about the moving pieces involved.
Fig 9. CloudMap
S3 & EFS
S3 serves as a single source of truth for maintaining the mbtiles file and custom configuration for TileServer. The custom config is maintained in the GitHub repo and to sync the changes to S3 we have a GitHub workflow about which I won’t be covering in this article. The process to update mbtiles file is currently manual given that we have to download the file from a third-party server, scan it for any security risk before pushing it to S3 for production use. If you aren’t planning on customising the TileServer and serving just a specific small region, then you may skip maintaining the bucket.
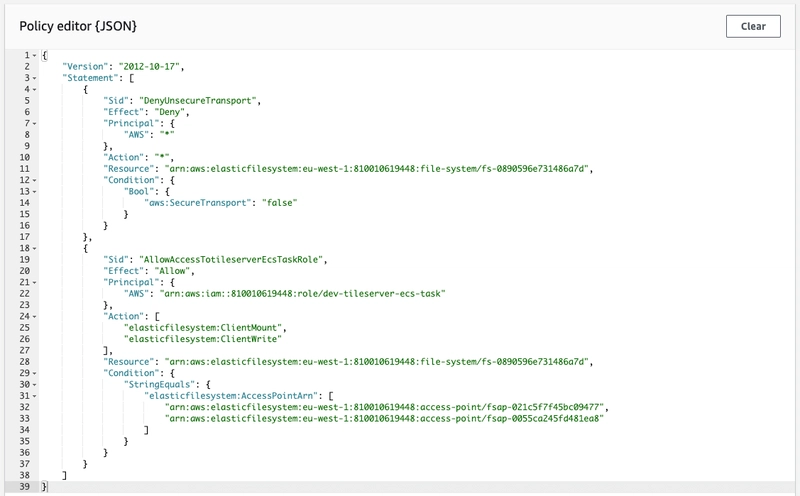
Provided we are running multiple replicas of the service, EFS was our obvious choice. We implemented access points and mapped them to non-root user along with mandating encryption and IAM auth via a resource policy for enhanced security.
Fig 10. EFS Access Points
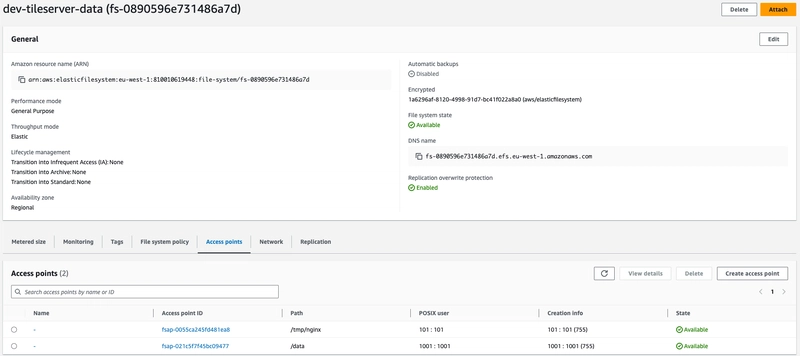
Fig 11. EFS Access Policy
ECS
It’s time to finally deploy TileServer. I initially chose to use EC2 as the capacity provider and Bottlerocket as the AMI but soon I hit a roadblock because as of writing this article, Bottlerocket do not support EFS with IAM authentication and encryption mode enabled, so we decided to go with Fargate as the capacity provider given the enhanced security, ease of deployment and less management overhead.
That being said, I have subscribed to the GitHub issue to stay up-to-date with any progress because I’m keen to switch to using EC2 with Bottlerocket AMI given the OS is specially designed to run containers securely with bare minimum essentials softwares resulting in reduced attack-surface compared to standard OS and at scale can achieve cost savings too.
Anyway, let’s get into the implementation details. As seen in the architecture diagram, the task comprises of 2 containers: nginx and tileserver. Along with these containers we also created an init containers for each of the services. These init containers were used to generate configuration and pull some data required to run the services.
Nginx
nginx act as a reverse-proxy because when running TileServer behind a proxy or load balancer, we need to ensure that X-Forwarded-* headers are forwarded to generate the URLs with correct protocol and domain. The init container is responsible for generating the custom nginx routing config.
TileServer
TileServer is the epicentre of this entire implementation. Before running the tileserver container we run an init container to pull the planet.mbtiles file from S3 and store it in EFS along with some custom configuration to style the UI. Given the planet.mbtiles file is around 90GB, choosing EFS over local storage seems wise to avoid startup delay every time a container starts. If you are planning to simply host map for a specific city/region, then you may just choose local/EBS storage given the file size is small and save some money.
Fig 12. ECS Cluster
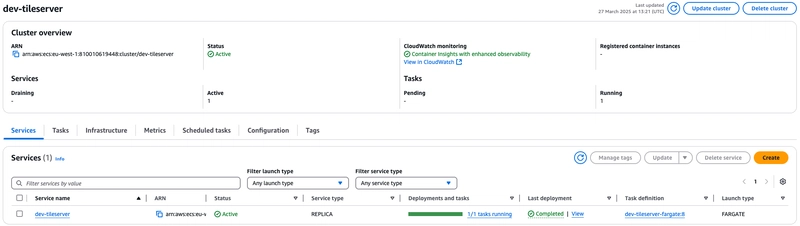
Fig 13. TileServer
Triumph mode on!
After weeks of struggle, we finally managed to host the TileServer on AWS using all serverless services and save around $20k annually compared to Mapbox.
But don’t worry, you will not have to spend weeks to get it up and running. All the source code is available in my GitHub repository that will help you to host TileServer on AWS within just few minutes or hours.

Top comments (0)