I googling a while for "how to install java 8 on macOS" but isn't help me so much to figure it out how to actually install java 8 in my MacBook. Some tutorial is outdated. So I decided to write a tutorial for setup java development environment in macOS which covering all of you need to setup and how to have multiple versions of java in the same machine, how to switch java version 8 to 13, etc.
Let's get started.
Install brew
Open terminal or iTerm and paste this line to install brew.
$ /usr/bin/ruby -e "$(curl -fsSL https://raw.githubusercontent.com/Homebrew/install/master/install)"
Install java
$ brew tap adoptopenjdk/openjdk

# javc 8
$ brew install --cask adoptopenjdk8

# java 11
$ brew install --cask adoptopenjdk11

# gradle
$ brew install gradle

# maven
$ brew install maven
List of java version see here: https://github.com/AdoptOpenJDK/homebrew-openjdk
Use multiple versions of java in the same machine
If you want to use other versions of java in the same machine, instead of setup JAVA_HOME every time that you started the terminal we'll use jenv for switching between versions and do the path setup for you.
Install jenv and setup
$ brew install jenv
Add java home folder to jenv
$ jenv add /Library/Java/JavaVirtualMachines/adoptopenjdk-8.jdk/Contents/Home

$ jenv add /Library/Java/JavaVirtualMachines/adoptopenjdk-11.jdk/Contents/Home
Jenv commands
➜  ~ jenv
jenv 0.5.2
Usage: jenv <command> [<args>]

Some useful jenv commands are:
   commands    List all available jenv commands
   local       Set or show the local application-specific Java version
   global      Set or show the global Java version
   shell       Set or show the shell-specific Java version
   rehash      Rehash jenv shims (run this after installing executables)
   version     Show the current Java version and its origin
   versions    List all Java versions available to jenv
   which       Display the full path to an executable
   whence      List all Java versions that contain the given executable

See `jenv help <command>' for information on a specific command.
For full documentation, see: https://github.com/hikage/jenv#readme
list versions with jenv versions
➜  ~ jenv versions
* system (set by /Users/<USER>/.jenv/version)
  1.8
  1.8.0.222
  11.0
  11.0.4
  openjdk64-1.8.0.222
  openjdk64-11.0.4
switching between version
usage jenv shell openjdk64-1.8.0.222 #or openjdk64-11.0.4
➜  ~ java -version
openjdk version "1.8.0_222"
OpenJDK Runtime Environment (AdoptOpenJDK)(build 1.8.0_222-b10)
OpenJDK 64-Bit Server VM (AdoptOpenJDK)(build 25.222-b10, mixed mode)
➜  ~ jenv versions
  system
  1.8
  1.8.0.222
  11.0
  11.0.4
* openjdk64-1.8.0.222 (set by JENV_VERSION environment variable)
  openjdk64-11.0.4
➜  ~ jenv shell openjdk64-11.0.4
➜  ~ java -version
openjdk version "11.0.4" 2019-07-16
OpenJDK Runtime Environment AdoptOpenJDK (build 11.0.4+11)
OpenJDK 64-Bit Server VM AdoptOpenJDK (build 11.0.4+11, mixed mode)
➜  ~ jenv versions
  system
  1.8
  1.8.0.222
  11.0
  11.0.4
  openjdk64-1.8.0.222
* openjdk64-11.0.4 (set by JENV_VERSION environment variable)
Set default java version in /Users/<USER>/.jenv/version and the content will be the version of java you wanna use, save file and start a new shell will be set default java version that you wrote in file.
➜  ~ jenv versions
  system
  1.8
  1.8.0.222
  11.0
  11.0.4
* openjdk64-1.8.0.222 (set by /Users/ayuth/.jenv/version)
  openjdk64-11.0.4
Set the JAVA_HOME
If the JAVA_HOME not found. Just using the jenv plugin export plugin.
➜  ~ echo $JAVA_HOME

➜  ~ jenv enable-plugin export

# -------- restart your shell session --------

➜  ~ echo $JAVA_HOME
/Users/ayuth/.jenv/versions/1.8.0.242
More interestingly, they have jenv enable-plugin maven and jenv enable-plugin gradle.
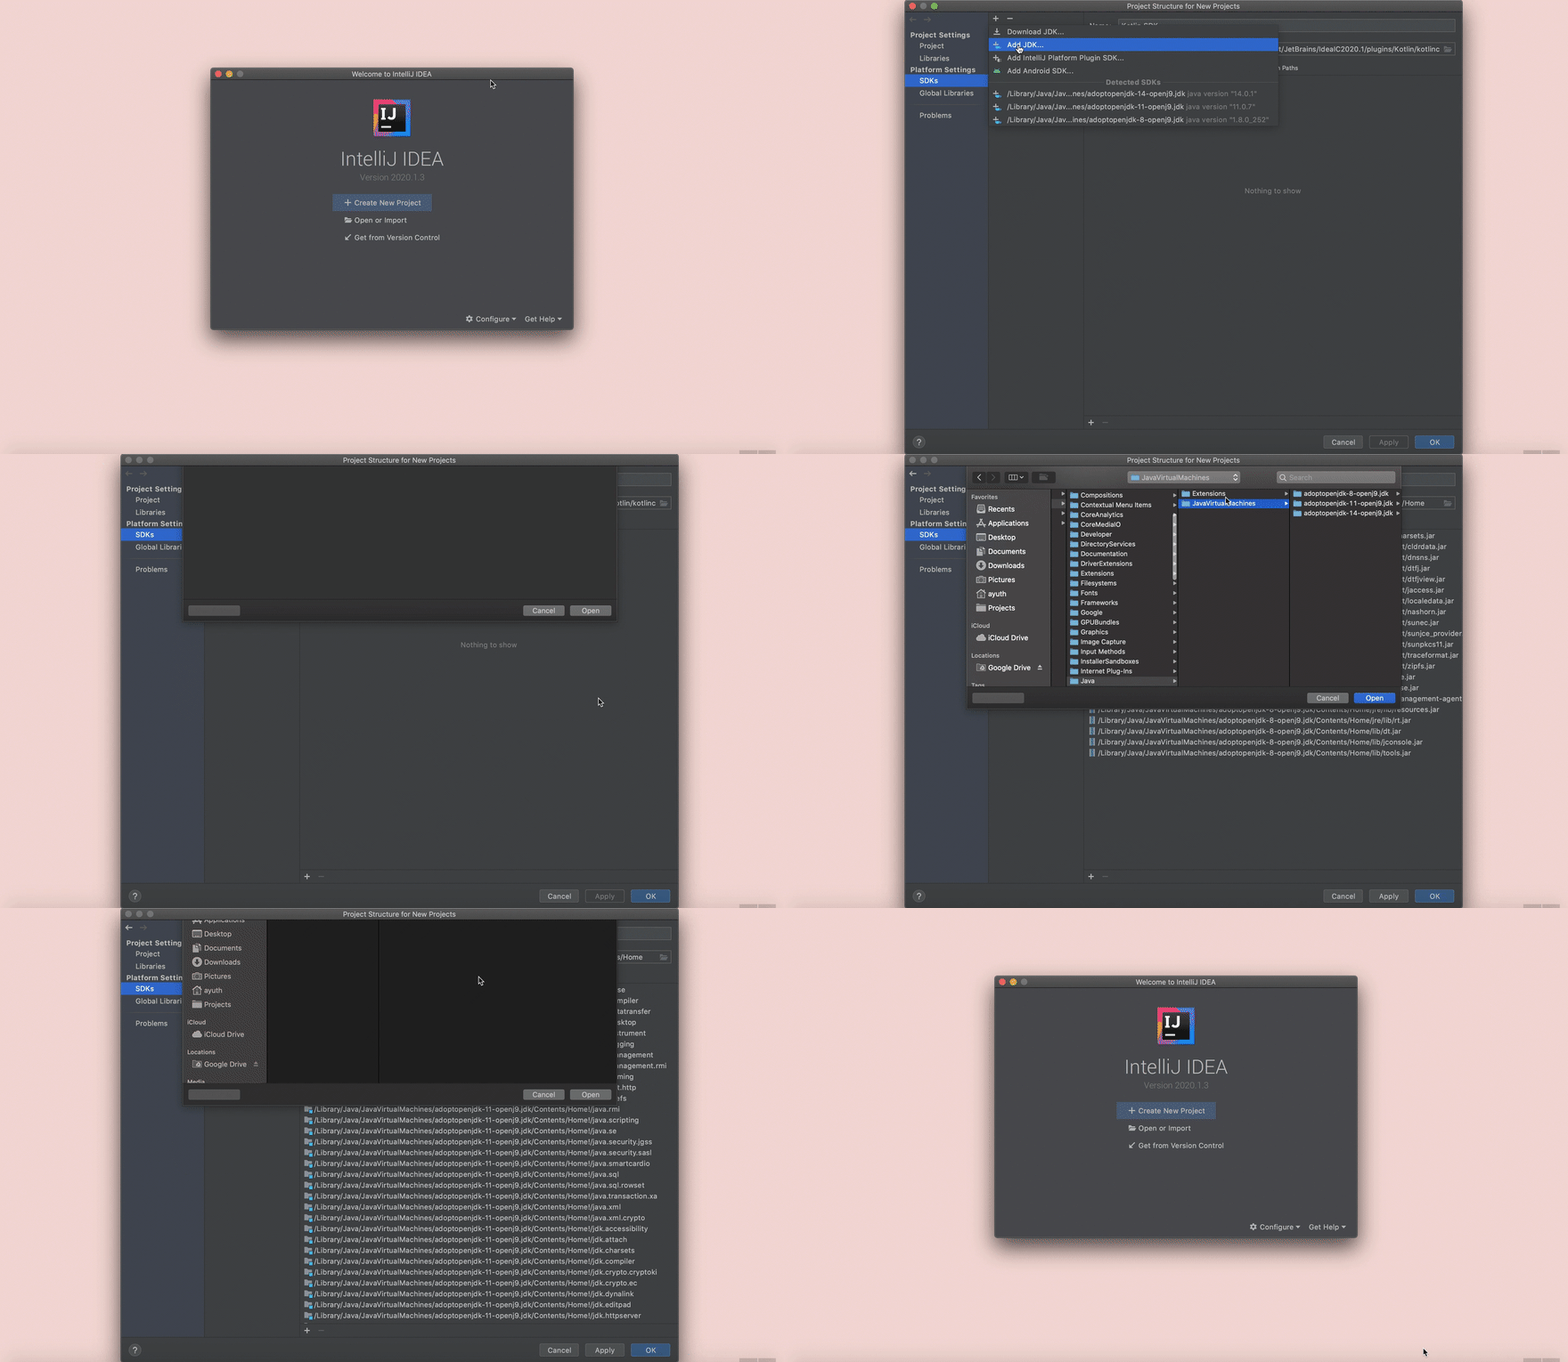
Configure global SDKs in Intellij
In case you wanna add your installed JDK versions to Intellij you can go to read there: https://www.jetbrains.com/help/idea/sdk.html#manage_sdks.
- Open IntelliJ.
- In the startup window, click "Configure" in the bottom right menu.
- Select "Structure for New Projects". You'll see the popup window open-up called "Project Structure for New Projects".
- In left menus, Select "Platform Settings" --> "SDK".
- Click the "+" button to add a new SDK, you'll see the drop-down menu.
- Click the "Add JDK..." button.
- You'll see the finder window.
- Press Command + Shift + G to open the go-to path dialog and paste
/Library/Java/JavaVirtualMachines, and then press go. - In the finder window, you'll see a list of JDK versions. Just select a JDK version that you wanna add and click "Open".
- You'll see the selected JDK in the list that means you're doing the right thing.
That's all.
Happy Hacking!


Top comments (0)