Docker is the most popular file format for Linux-based container development and deployments. If you’re using containers, you’re most likely familiar with the container-specific toolset of Docker tools, that enable you to create and deploy container images to a cloud-based container hosting environment.
This can work great for brand-new environments, but it can be a challenge to mix container tooling with the systems and tools you need to manage your traditional IT environments. And, if you’re deploying your containers locally, you still need to manage the underlying infrastructure and environment.
Bunnyshell allows you to automate Docker in your environment, enabling you to operationalize your Docker container build and deployment process in ways that you’re likely doing manually today, or not doing at all.
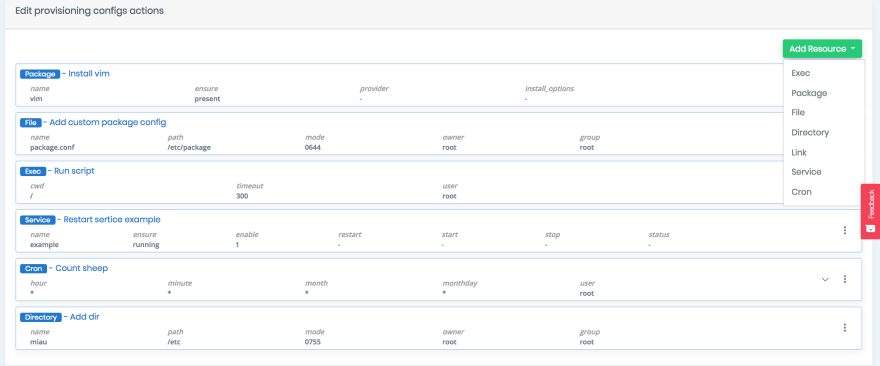
Using the provisioning configuration, Docker can be installed and configured as needed. First, let’s dive into provisioning for a moment, to better understand how it works with Bunnyshell.
Provisioning refers to bringing a server in a desired state. Some resources handled by provisioning are:
- Packages that should be installed and configured in a certain manner
- Services that should be running and enabled at boot
- Users and Groups
- Crons and Log rotates
- File system components
The provisioning can be done using two mechanisms:
1. Use supported Bunnyshell packages
The advantage of using these packages is that configuration and updates are easy to handle, with one-click install.
2. Use Bunnyconfig
This method can be used for all other provisioning resources which are not natively supported in Bunnyshell.
In order to provision your servers with Docker, you would do that through Bunnyconfig.
Next, let’s see how you can deploy a Docker image. Before, let’s take a look at how deployments work in Bunnyshell.
Bunnyshell supports multiple applications on a single server each application having its own:
- Source
- Secrets
- Deploy steps
Source
The application source can be from Git or archives. You can also use the deploy steps described below to get the application source. Furthermore, an application can have no source and contain only deploy step configurations.
Secrets
Application secrets are sensitive data which needs to be accessible by the application. We store these secrets in an encryption service and allow the application to get its own secrets at deployment time.
Deploy steps
There are three steps which are being executed when initiating a deployment action:
- Exec-Once – Action which is executed only for the first deploy or at demand. This may include:
- Global application configuration
- Install/Configure application dependencies
- Build Actions – Actions which are being executed every time before the application version switch. This may include:
- Building, compiling, warmup, etc
- Passing application secrets in required locations: config file, web server configs
- Creating symlinks to other application components
- Post Deploy Actions – Actions which are being executed after the application version switch. This may include:
- Restarting a service for example a web server
Using Docker
Bunnyshell can be adapted to easily deploy docker application.
Using the provisioning configuration, Docker can be installed and configured as needed.
For deploying the application you can do this in a number of ways.
The way you construct/maintain infrastructure depends on the application business logic and on project constraints. For example:
- All containers run a different application which has to be maintained
- All containers run the same application, same configuration
- A batch of containers runs the same application, others don’t
- Container configuration must be changed or not on application deploy
- Application deploy in parallel on all containers or not (in case all containers contain the same application, same configuration)
Assuming Docker is installed on one server and on that server will run all containers (created with docker-compose for example), being on one server you can only make all at once deployment for any defined environment application.
Docker & Bunnyshell usecases:
Docker-compose + 2 containers + same application/configuration on all containers
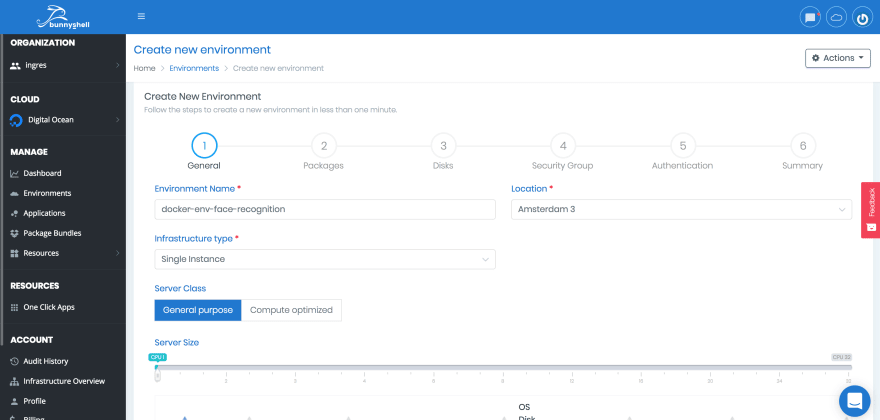
Let’s take this example. First steps will be to create a new environment of type single (only one server needed to run docker)
Go to Environments -> New Environment
Next step is to create docker configuration on a server.
To do this, we use the concept of Application. An application is an entity which can be installed on a server. The Application can contain source code (can import from git/gitlab existing repository) or can be empty.
When can the application be empty? Well, the reason we are discussing this is because an application means more than just a source code, it means commands which can be executed and configured using Bunnyconfig. Imagine you just need some commands to update server configuration, for this you don’t need any source code, just a way to run some commands.
Go to Environment -> Application -> New Application. Create a new one:
Note
Also, the application can have a git source where the “docker compose” file is versioned.
Use Bunnyconfig Build Actions to build the images. At this step you can also add application secrets to the configuration file in order to include them in the image.
Use Bunnyconfig Build Actions to run the new image.
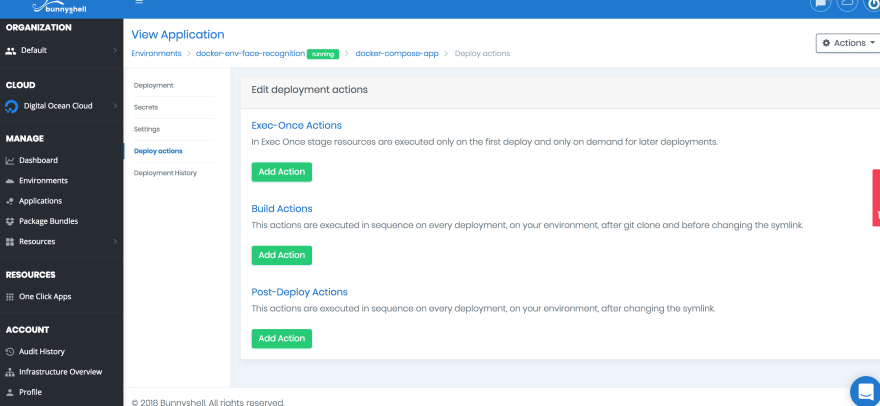
You will be redirect to application page, go to Deploy Actions
All commands which have to run only once (on first deploy action of the application) should be configured with Bunnyconfig on Exec-Once Actions. Here you can add docker specific boot commands like:
- Get Docker image from registry
- Create docker-compose file on server
- Run “docker-compose up -d” to start containers
All commands which have to run each time a deploy action is triggered should be configured in Bunnyconfig on Build Actions. You can use this section to stop docker before build by implementing command “docker-compose stop”, for example.
All commands which have to run on Post Deploy Event, should be configured in Bunnyconfig on Post Deploy Actions. You use this section to start docker after deploy by implementing command “docker-compose up -d”.
Now, let’s presume you have created an environment with an application used to manage Docker.
How can we maintain the code executed into containers?
The applications installed on all containers should have a hard/soft file system link on main server (path to the application). For simplicity we’ll consider 2 docker containers with two different applications.
Container 1 will run application 1, Container 2 will run application 2.
Application 1 has a path /var/www/app_1, Application 2 has path /var/www/app_2.
Go to Environment -> Applications -> New Application and create new application (git type). Do this for application 1 and application 2.
After all applications were created, configure deploy steps (exec once, build actions, post build actions) for both applications.
Go to Environment -> Applications -> Application 1 to deploy application 1.
Go to Environment -> Applications -> Application 2 to deploy application 2.
Container 1 will run application 1, Container 2 will run application 1.
In this case, both containers runs the same application. You can use a shared folder between containers to update the same source code for both of them using one application configured.
In this case, both containers runs the same application. You can use a shared folder between containers to update the same source code for both of them using one application configured.
Wrap up
In conclusion, regardless of your scenario, whether you have a simple architecture or a complex one (with load balancers, clusters or hundreds of servers, docker, etc), Bunnyshell helps you create and maintain your entire devops pipeline: from creating servers, provisioning, application deployments, monitoring or ops management.


Top comments (0)