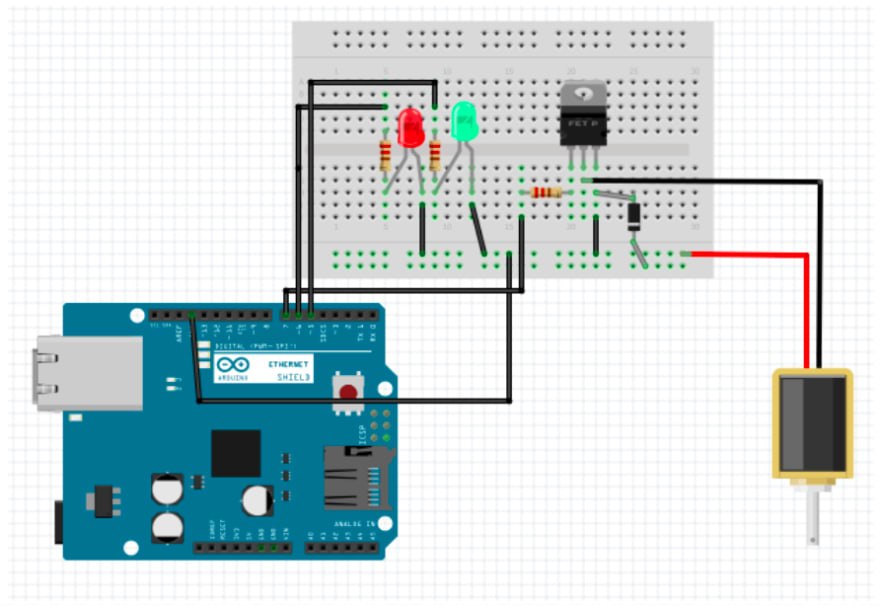
Few years ago when I got to know about Arduino Uno, I was really curious about the capabilities of this open-source microcontroller board. For those who might not be familiar with Arduino, it is a popular tool for IoT product development and Arduino Uno is one of their most popular products. It contains everything needed to support the microcontroller. Simply connect it to a computer with a USB cable or power it with a AC-to-DC adapter or battery to get started. You can tinker with your Uno without worrying too much about doing something wrong. It has 14 digital input/output pins (of which 6 can be used as PWM outputs), 6 analog inputs, a 16 MHz ceramic resonator (CSTCE16M0V53-R0), a USB connection, a power jack, an ICSP header and a reset button.
As always when I want to get to know a new piece of technology better, I decide to use it for a pet project. With the Arduino Uno, I decided to make a wireless door lock. For this I used the below components :
- Arduino Uno
- LED lights
- Solenoid Lock
- Relay Circuit
- Breadboard
- Ethernet Shield
- Some Android skills for developing the App to control the lock and C skills to write the ‘Sketch’ for Arduino Uno Computer
I got all the components required from a local hardware store, luckily all of it was available from the same place. Make sure you get the authentic Arduino Uno board as there are many aftermarket copies out there which don’t work as well.
Once I had all the components setup on my table, I had no clue where to begin with. Luckily, Arduino has a very helpful getting started guide here. I installed all the necessary softwares and drivers, wrote my first sketch in C to have an LED blink every 5 seconds, connected my Arduino Uno to the PC and uploaded my first sketch. The feeling when you get something to work for the first time, even if it’s something as small as a blinking LED, is just wonderful. I was hooked after that! I wrote multiple programs to do stuff with LEDs. I had a spare motor that I had got for another project and I uploaded a sketch to rotate it clockwise and anticlockwise within intervals.
After some googling (yes, I use that as a verb), I found out that I could use the Arduino Uno as a Web Server. My mind was blown, I quickly wrote a sketch to host a simple web page with 2 buttons: ‘Turn Left’ and ‘Turn Right’. I had my mobile on the same network as Uno and I could access a webpage that had two buttons which when I pressed, I could control the direction in which the motor connected to the Arduino Uno was turning. And slowly I realised how capable this small microcontroller board in my hand was.
Now coming to my actual project, I had a solenoid lock which is very simple to work with. It has a magnet inside it, if you pass electricity through the lock, it will pull the latch in thus leaving the lock in an ‘unlocked’ state. When there’s no electricity passing through, the latch will be out in the ‘locked’ state. After connecting this lock to the Arduino Uno on the breadboard, all I had to do was pass on/off signal on the port it was connected to. For those trying to work with modules like a Solenoid lock, make sure that you get a power adapter as the usb power from a computer won’t be enough to get it to work.
To control the lock remotely, I created a Web server on the Arduino Uno which could be used by an Android app for the lock/unlock functionality similar to the ‘Turn Left’ and ‘Turn Right’ buttons with the motor. There are tons of tutorials out there which will help you with this part and the one that pointed me to the right direction was this .
I had really enjoyed working on this project with my friend Abhishek, as he’s as intrigued with new tech as I am. I know some of you may ask why didn’t I use a Raspberry Pi? The answer is Arduino Uno was good enough for the task. Even though Raspberry Pi is a much stronger device which can practically run an Operating System(Raspbian) on it, I didn’t think it was a good decision to shell out almost thrice the price to get the same thing done.
I hope you’ll enjoyed reading this and if you have any questions please feel free to drop a comment or reach out to me. For those looking for some awesome project ideas involving Arduino, you can check out https://create.arduino.cc/projecthub .


Top comments (0)