TL;DR
In this tutorial, we’ll walk you through a step-by-step process of building an AI-powered Investment & Savings Copilot that helps you plan your savings and investments using Maybe Finance, Nextjs, and CopilotKit🪁.

Here’s what we’ll cover:
- Building up a Next.js project for the AI Investment & Savings Copilot.
- Adding CopilotKit UI components and API endpoints to your app.
- Integrating Maybe Finance API to provide personalized investment and savings insights.
Here’s a preview of the AI-Powered Finance App implementation:
Let’s get started!
What is CopilotKit
CopilotKit is a full-stack framework for building user-interactive agents and copilots. It gives Agents the tools to use your application and provides a feature-rich SDK that supports various AI copilot use cases, including context awareness, copilot actions, and generative UIs.
This lets you define your copilot’s role without dealing with complex setups or integrations.
Check out CopilotKit's GitHub ⭐️
What is Maybe Finance?
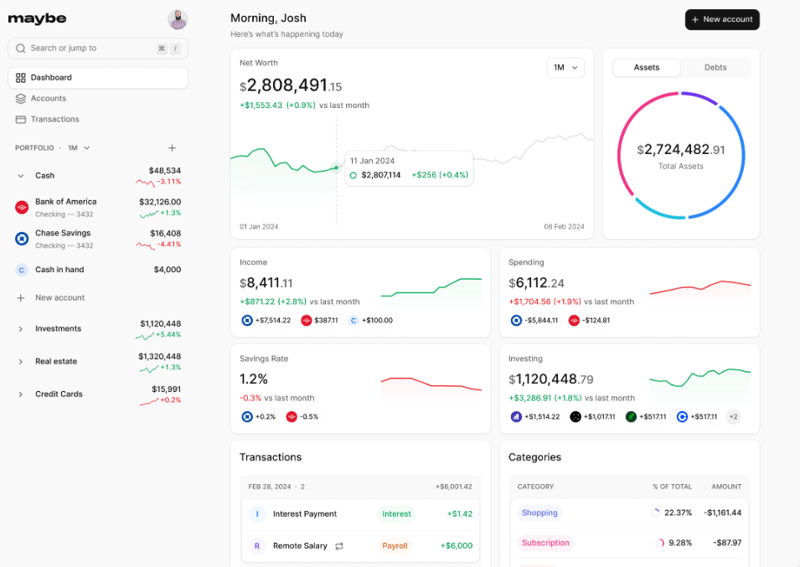
Maybe Finance is the open-source OS for personal finance, providing tools to securely manage, plan, and optimize your savings and investments.
In our project, we’ll tap into Maybe Finance’s real-time data and analytics to power our copilot’s insights—helping users optimize their savings and investments.
Prerequisites
Before we begin, make sure you have:
Technical Knowledge
- Intermediate understanding of Next.js and React
- Basic knowledge of TypeScript
- Familiarity with MongoDB
Required Accounts
- CopilotKit Cloud to get your API key for the AI assistant
- SynthFinance to access the Maybe Finance API
- MongoDB Atlas for database hosting
- Google Cloud Platform account for OAuth authentication
Development Environment
- Node.js 18+ and npm
- Code editor (VS Code recommended)
Once you get this sorted, we’ll start development! 🚀
This is the web application we will be building

Setting up the project
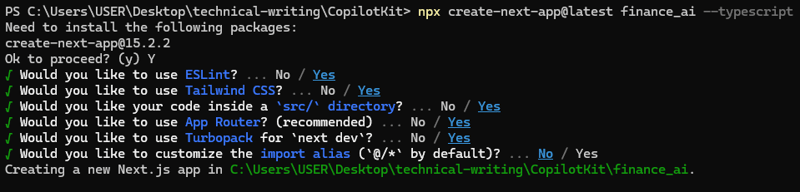
1. Create a New Next.js Project
Open your terminal and run this command to create a new Next.js project
npx create-next-app@latest finance_ai --typescript
Navigate to the project directory and start the development server:
cd finance_ai
npm run dev
Your app should now be running at http://localhost:3000.

2. Install Packages
Next, let’s install the necessary dependencies for this project. These include:
- CopilotKit Packages.
- Axios ( to fetch the API)
- Shadcn/ui (for pre-built UI components)
- Recharts (for chart representation)
Run the following command to install them:
npm install @copilotkit/react-ui @copilotkit/react-core axios
Then, for Shadcn UI, run this command
npx shadcn@latest add button card input label badge tabs
Note: If you are using CopilotKit Cloud, you don’t need to include the runtime package, as the CopilotKit Cloud automatically manages the runtime environment. However, if you are self-hosting the backend, you may need to handle runtime configurations manually. In this tutorial, we will focus on self-hosting, but keep in mind that CopilotKit Cloud is an option that simplifies runtime management.
Now, let’s set up the project structure. The key files and directories we’ll create include:
-
src/app/ui/service/index.ts– Handles API calls to fetch financial data. -
src/app/ui/components/FinanceCopilot.tsx– The main UI component for our AI-powered financial assistant. -
src/app/lib/types/investment.ts– Defines TypeScript types for investment and savings data. -
src/app/lib/data/mockData.ts– Contains financial data for testing. -
src/app/api/copilotkit/route.ts– The API endpoint for CopilotKit. -
src/app/api/finance/route.ts– An API for fetching financial insights.
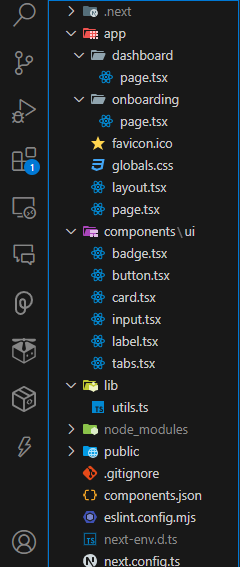
Project Structure
Below is the file tree for our application:
Building the Finance AI Frontend
1. Setting Up Global Providers in layout.tsx
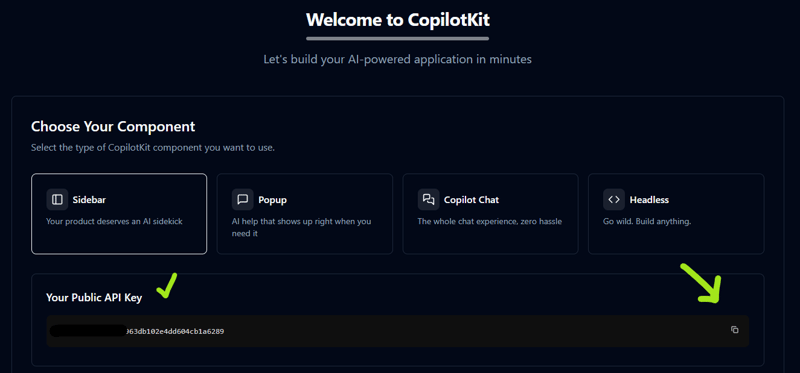
First, go to cloud.copilotkit.ai to obtain your CopilotKit Cloud key for authentication and API access. You can sign up with GitHub or Google.
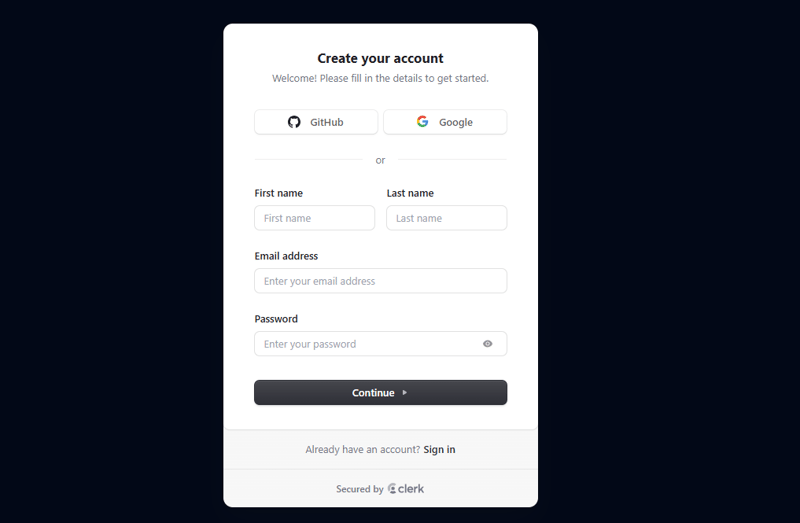
Then, copy your API key and save it in your .env file. Then, update your global layout to wrap your app with the CopilotKit provider. This makes the copilot functionality available throughout your application.
Now that is set, enter the code below in this directory finance_ai/app/layout.tsx
import { Metadata } from "next";
import { Geist, Geist_Mono } from "next/font/google";
import "./globals.css";
import { CopilotKit } from "@copilotkit/react-core";
import "@copilotkit/react-ui/styles.css";

// Load fonts for styling
const geistSans = Geist({
  variable: "--font-geist-sans",
  subsets: ["latin"],
});
const geistMono = Geist_Mono({
  variable: "--font-geist-mono",
  subsets: ["latin"],
});

// Metadata for SEO and display
export const metadata: Metadata = {
  title: "Coyamin - AI Investment Copilot",
  description: "Make informed financial decisions with AI-powered insights.",
};

// Retrieve the Copilot API key from environment variables
const copilotApiKey = process.env.NEXT_PUBLIC_COPILOTKIT_API_KEY;

export default function RootLayout({
  children,
}: Readonly<{ children: React.ReactNode }>) {
  return (
    <html lang="en">
      <body className={`${geistSans.variable} ${geistMono.variable} antialiased`}>
        {/* Conditionally wrap with CopilotKit if the API key is available */}
        {copilotApiKey ? (
          <CopilotKit publicApiKey={copilotApiKey}>{children}</CopilotKit>
        ) : (
          <>{children}</>
        )}
      </body>
    </html>
  );
}
In the code above, we start by importing global styles and fonts, ensuring a consistent design throughout the application.
Next, we wrap the app with the CopilotKit provider to use the API key; <CopilotKitProvider apiKey={process.env.NEXT_PUBLIC_COPILOTKIT_API_KEY}><App /> </CopilotKitProvider>
This setup makes AI functionality accessible across all components in the application.
2. Creating the Login and Onboarding Screens
To create a login form component, enter this code in app/api/auth/[...nextauth]/route.ts:
import NextAuth from "next-auth";
import GoogleProvider from "next-auth/providers/google";
import { PrismaAdapter } from "@auth/prisma-adapter";
import { prisma } from "@/lib/db";

export const authOptions = {
  adapter: PrismaAdapter(prisma),
  providers: [
    GoogleProvider({
      clientId: process.env.GOOGLE_CLIENT_ID as string,
      clientSecret: process.env.GOOGLE_CLIENT_SECRET as string,
    }),
  ],
  callbacks: {
    async session({ session, user }) {
      if (session?.user) {
        session.user.id = user.id;
        session.user.isOnboarded = user.isOnboarded;
      }
      return session;
    },
  },
  pages: {
    signIn: "/",
  },
};

const handler = NextAuth(authOptions);
export { handler as GET, handler as POST };
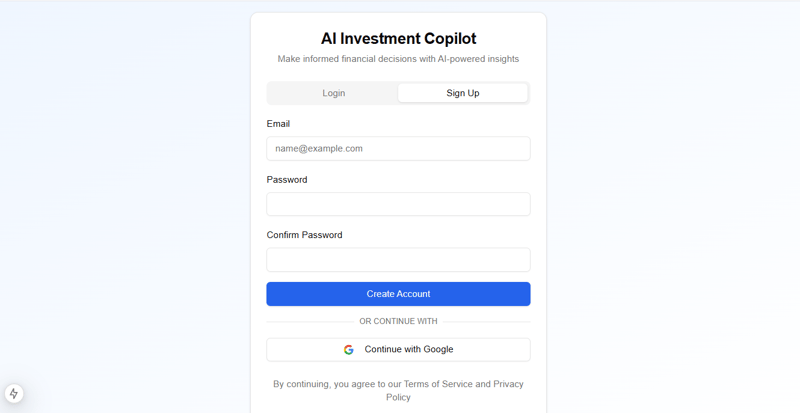
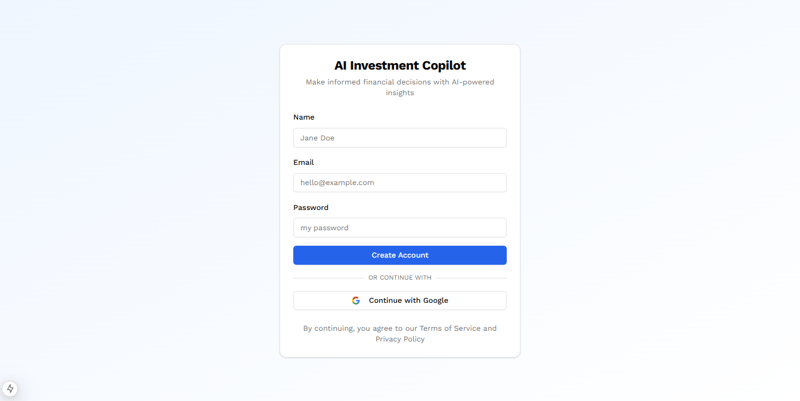
The authentication page is split into two tabs: Login and Sign Up. Each form uses labeled input fields and a button that redirects to the onboarding page upon successful authentication.
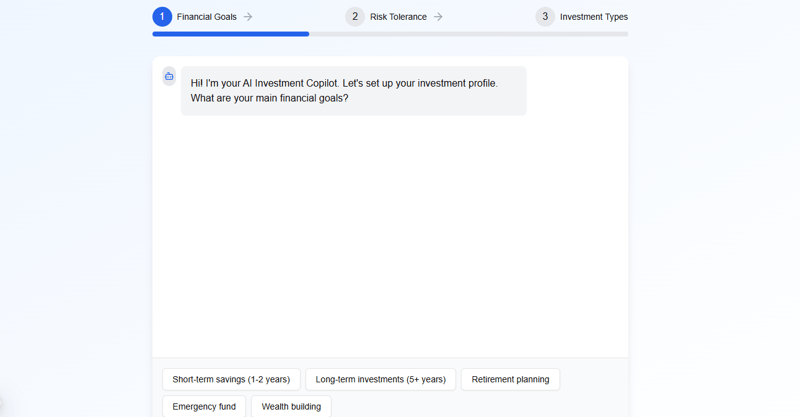
The Onboarding Page
The onboarding page has a chat interface that asks questions such as financial goals, risk tolerance, and investment preferences as part of the onboarding process.
In the app/onboarding directory, create a page.tsx file and enter this code:
"use client"

import { useState, useEffect } from "react"
import { useRouter } from "next/navigation"
import { Button } from "@/components/ui/button"
import { Card, CardContent } from "@/components/ui/card"
import { Badge } from "@/components/ui/badge"
import { ArrowRight, Bot, User, Sparkles } from "lucide-react"

interface Message {
  type: "bot" | "user"
  content: string
  options?: string[]
}

export default function OnboardingChat() {
  const router = useRouter()
  const [messages, setMessages] = useState<Message[]>([
    {
      type: "bot",
      content: "Welcome to Coyamin! I'm your AI Investment & Savings Copilot. Let's set up your financial profile. What are your main financial goals?",
      options: [
        "Short-term savings (1-2 years)",
        "Long-term investments (5+ years)",
        "Retirement planning",
        "Emergency fund",
        "Wealth building",
      ],
    },
  ])
  const [currentStep, setCurrentStep] = useState(0)
  const [selectedOptions, setSelectedOptions] = useState<Record<number, string[]>>({})
Here, we import the Shadcn UI button, card, and badge components and also add state management with import { useState, useEffect } from "react". We also include an OnboardingChat() function with a message to welcome the user and ask about their financial goals, which they can select from the options as shown below:
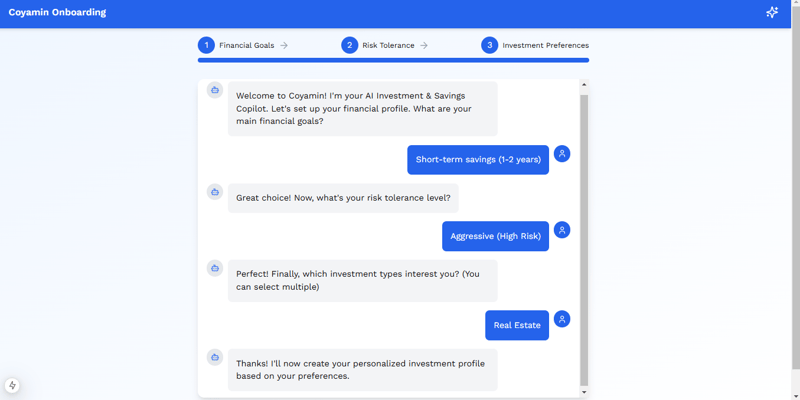
Handling User Selection and Chat Flow
When you select an option, the chatbot responds dynamically and progresses through different stages of onboarding. We also include a dropdown that explains each risk tolerance level:
  // Define the steps of the onboarding process
  const steps = [
    { title: "Financial Goals", progress: 33 },
    { title: "Risk Tolerance", progress: 66 },
    { title: "Investment Preferences", progress: 100 },
  ];

  const handleOptionSelect = (option: string) => {
    setMessages((prev) => [...prev, { type: "user", content: option }]);
    setSelectedOptions((prev) => ({
      ...prev,
      [currentStep]: [...(prev[currentStep] || []), option],
    }));

    setTimeout(() => {
      if (currentStep === 0) {
        setMessages((prev) => [
          ...prev,
          {
            type: "bot",
            content: "Great choice! Now, what's your risk tolerance level?",
            options: ["Conservative (Low Risk)", "Moderate (Medium Risk)", "Aggressive (High Risk)"],
          },
        ]);
        setCurrentStep(1);
      } else if (currentStep === 1) {
        setMessages((prev) => [
          ...prev,
          {
            type: "bot",
            content: "Perfect! Finally, which investment types interest you? (You can select multiple)",
            options: ["Stocks", "ETFs", "Bonds", "Crypto", "Real Estate", "Mutual Funds"],
          },
        ]);
        setCurrentStep(2);
      } else if (currentStep === 2) {
        setMessages((prev) => [
          ...prev,
          {
            type: "bot",
            content: "Thanks! I'll now create your personalized investment profile based on your preferences.",
          },
        ]);
        setTimeout(() => {
          router.push("/dashboard");
        }, 1500);
      }
    }, 500);
  };
3. Creating the Dashboard
The dashboard displays the financial overview and AI-generated recommendations. Enter the code snippets below in app/dashboard/page.tsx
Integrating the dashboard wrapper with the CopilotKit Sidebar
This wraps the entire dashboard with the CopilotSidebar component and sets up the main flex container for the dashboard content.
"use client"

import { CopilotSidebar } from "@copilotkit/react-ui";

export default function DashboardPage() {
  return (
    <CopilotSidebar
      defaultOpen={true}
      instructions="You are assisting the user as best as you can. Answer in the best way possible given the data you have."
      labels={{
        title: "Coyamin Assistant",
        initial: "How can I help you today?",
      }}
    >
      {/* Main container: fills the available viewport height */}
      <div className="flex h-[calc(100vh-3.5rem)]">
        <div className="flex-1 p-4 sm:p-6 lg:p-8 overflow-auto">
          {/* Dashboard content goes here */}
        </div>
      </div>
    </CopilotSidebar>
  );
}
The CopilotSidebar provides a persistent AI chat interface, while the flex container (div with flex h-[calc(100vh-3.5rem)]) ensures the dashboard occupies the full height of the viewport minus a header offset.
Also, the inner container ( <div className="flex-1 p-4 sm:p-6 lg:p-8 overflow-auto">) is padded and scrollable, ready to hold our overview and chart components.
Implementing the Overview cards in the dashboard
The “Overview” section of the dashboard defines a grid of cards, each displaying a key financial metric such as Total Balance, Investments, Monthly Savings, and Risk Score.
Still in the page.tsx file, enter the code below
<div className="grid gap-4 sm:grid-cols-2 lg:grid-cols-4">
  <Card>
    <CardHeader className="flex flex-row items-center justify-between space-y-0 pb-2">
      <CardTitle className="text-sm font-medium">Total Balance</CardTitle>
    </CardHeader>
    <CardContent>
      <div className="text-xl sm:text-2xl font-bold">$45,231.89</div>
      <p className="text-xs sm:text-sm text-muted-foreground">+20.1% from last month</p>
    </CardContent>
  </Card>
  <Card>
    <CardHeader className="flex flex-row items-center justify-between space-y-0 pb-2">
      <CardTitle className="text-sm font-medium">Investments</CardTitle>
    </CardHeader>
    <CardContent>
      <div className="text-xl sm:text-2xl font-bold">$32,123.45</div>
      <p className="text-xs sm:text-sm text-muted-foreground">78 active positions</p>
    </CardContent>
  </Card>
  <Card>
    <CardHeader className="flex flex-row items-center justify-between space-y-0 pb-2">
      <CardTitle className="text-sm font-medium">Monthly Savings</CardTitle>
    </CardHeader>
    <CardContent>
      <div className="text-xl sm:text-2xl font-bold">$2,400.00</div>
      <p className="text-xs sm:text-sm text-muted-foreground">+12% from last month</p>
    </CardContent>
  </Card>
  <Card>
    <CardHeader className="flex flex-row items-center justify-between space-y-0 pb-2">
      <CardTitle className="text-sm font-medium">Risk Score</CardTitle>
    </CardHeader>
    <CardContent>
      <div className="text-xl sm:text-2xl font-bold">7.2/10</div>
      <p className="text-xs sm:text-sm text-muted-foreground">Moderate risk profile</p>
    </CardContent>
  </Card>
</div>
Each Card is composed of a header (CardHeader and CardTitle) for the label and content (CardContent) for the metric value and description. The grid layout (grid gap-4 sm:grid-cols-2 lg:grid-cols-4) is to make sure that the cards are evenly spaced and responsive.
Adding the charts with Rechart
We use Recharts to create two types of charts in the application: a line chart for the portfolio overview and a pie chart for asset allocation. These charts are to visualize the financial trends and asset distribution clearly. For more details about Recharts, check out the Recharts documentation.
Run this command to install Recharts:
npm install recharts
And then add this code to the page.tsx file in the dashboard directory:
import {
  LineChart,
  Line,
  XAxis,
  YAxis,
  CartesianGrid,
  Tooltip,
  ResponsiveContainer,
  PieChart,
  Pie,
  Cell,
} from "recharts";

const chartData = [
  { name: "Jan", value: 4000 },
  { name: "Feb", value: 3000 },
  { name: "Mar", value: 2000 },
  { name: "Apr", value: 2780 },
  { name: "May", value: 1890 },
  { name: "Jun", value: 2390 },
];

const pieData = [
  { name: "Stocks", value: 400 },
  { name: "Bonds", value: 300 },
  { name: "Real Estate", value: 300 },
  { name: "Crypto", value: 200 },
];

const COLORS = ["#0088FE", "#00C49F", "#FFBB28", "#FF8042"];

export default function ChartsSection() {
  return (
    <div className="grid gap-4 sm:grid-cols-1 md:grid-cols-2 lg:grid-cols-7 mt-4">
      {/* Portfolio Overview - Line Chart */}
      <div className="col-span-1 md:col-span-2 lg:col-span-4">
        <div className="border rounded shadow p-4">
          <h3 className="text-lg font-semibold mb-2">Portfolio Overview</h3>
          <ResponsiveContainer width="100%" height="250px">
            <LineChart data={chartData}>
              <CartesianGrid strokeDasharray="3 3" />
              <XAxis dataKey="name" />
              <YAxis />
              <Tooltip />
              <Line type="monotone" dataKey="value" stroke="#8884d8" />
            </LineChart>
          </ResponsiveContainer>
        </div>
      </div>

      {/* Asset Allocation - Pie Chart */}
      <div className="col-span-1 md:col-span-2 lg:col-span-3">
        <div className="border rounded shadow p-4">
          <h3 className="text-lg font-semibold mb-2">Asset Allocation</h3>
          <ResponsiveContainer width="100%" height="250px">
            <PieChart>
              <Pie data={pieData} innerRadius={50} outerRadius={80} paddingAngle={5} dataKey="value">
                {pieData.map((entry, index) => (
                  <Cell key={`cell-${index}`} fill={COLORS[index % COLORS.length]} />
                ))}
              </Pie>
              <Tooltip />
            </PieChart>
          </ResponsiveContainer>
        </div>
      </div>
    </div>
  );
}
In the code above, the Line Chart (Portfolio Overview) uses a ResponsiveContainer to ensure the chart is fully responsive. The LineChart component plots the data with a CartesianGrid for visual reference, while the XAxis and YAxis provide labels for readability. Using Recharts in this modular way keeps the code clear and maintainable.
Then, update pages/index.tsx to display the Dashboard in the main application.
import Dashboard from '../components/Dashboard';

export default function Home() {
  return (
    <main className="min-h-screen bg-gray-100 p-10">
      <Dashboard />
    </main>
  );
}

4. Setting Up the Backend Endpoints
CopilotKit Endpoint
In pages/api/copilotkit.ts, set up the backend endpoint to process requests from the Copilot UI. This endpoint will forward requests to our AI engine (and interface with Maybe Finance):
import { NextApiRequest, NextApiResponse } from 'next';
import { copilotRuntimeNextJSAppRouterEndpoint } from '@copilotkit/runtime';
Maybe Finance API Endpoint
Now, let's integrate Maybe Finance with our Coyamin application. We'll create several API routes that act as secure intermediaries between our frontend and the Maybe Finance API.
First, set up environment variables to store our API credentials:
API_KEY=your_maybe_finance_api_key
BASE_URL=https://api.synthfinance.com
We will create a series of API routes that will serve as our financial data pipeline. Each route will handle a specific type of financial data:
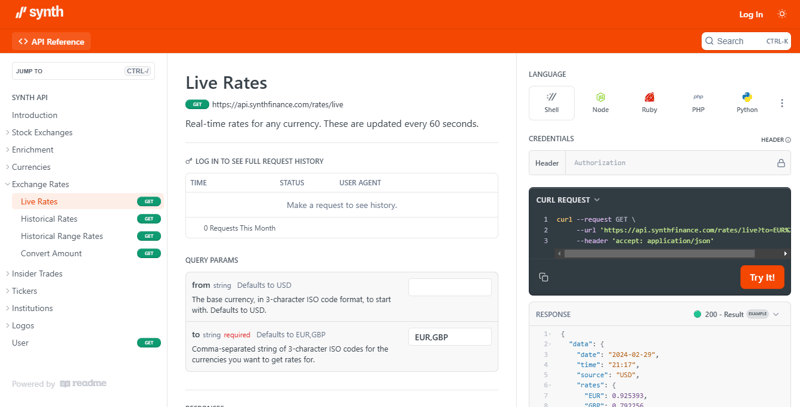
Currency Information API
This fetches different currencies for any information needed during the chat. Create a route.ts file in the app/api/rates/live directory:
import { NextResponse } from "next/server";
import axios from "axios";

const API_KEY = process.env.API_KEY;
const BASE_URL = process.env.BASE_URL;

export async function GET(req: Request) {
  try {
    const { searchParams } = new URL(req.url);
    const to = searchParams.get("to");

    if (!to) {
      return NextResponse.json(
        { message: "Missing required query parameter: to" },
        { status: 400 }
      );
    }

    const response = await axios.get(`${BASE_URL}/rates/live`, {
      params: { to },
      headers: {
        Authorization: `Bearer ${API_KEY}`,
        Accept: "application/json",
      },
    });

    return NextResponse.json(response.data, { status: 200 });
  } catch (error: unknown) {
    if(error instanceof Error) {
      return NextResponse.json(
        { message: "Error fetching live rates", error: error.message },
        { status: 500 }
      );
    }
    return NextResponse.json(
      { message: "Error fetching live rates"},
      { status: 500 }
    );
  }
}
This endpoint allows you to see how currency values and investment opportunities have changed over time to make data-driven decisions.
5. Running the Application
Start your development server:
npm run dev
Open http://localhost:3000 in your browser. You should see the dashboard with the Copilot sidebar. Log in, complete the onboarding chat, and then interact with the copilot to get financial insights powered by CopilotKit and Maybe Finance.
Sign Up Page
Onboarding
The result is a fully functioning AI-Powered Finance App using CopilotKit:
To clone the project from GitHub and run it locally, open your terminal and run this command:
git clone https://github.com/Tabintel/finance_ai.git
Then run npm install to install all dependencies needed for the project and npm run dev to run the web app.
Summary
In this guide, we walked through the process of building an AI-powered Investment & Savings Copilot using CopilotKit and Maybe Finance to help users plan their finances efficiently.
While we’ve covered key features, this is just the beginning—CopilotKit enables countless AI-driven use cases, from personalized financial assistants to intelligent automation in fintech applications.
Check out the full source code on GitHub here
Follow CopilotKit on Twitter and say hi, and if you'd like to build something cool, join the Discord community.


Top comments (14)
In-depth and detailed walkthrough. I love how you even added authorization to the app!
Thank you @nathan_tarbert! Integrating CopilotKit with Maybe Finance brings in the power of open-source to applications!
Awesome tutorial! I love how you’ve broken down the process of building an AI-powered financial manager with Maybe Finance and CopilotKit into such clear, actionable steps. The combo of Next.js, CopilotKit’s AI capabilities, and Maybe Finance’s open-source financial tools really makes this a powerful project for anyone looking to take control of their savings and investments.
The onboarding chat feature is a standout—guiding users through financial goals and risk tolerance in a conversational way feels so intuitive and user-friendly. And those Recharts visualizations? Super clean and effective for making financial data digestible at a glance. I also appreciate that you included both self-hosting and cloud options for CopilotKit—great to have that flexibility depending on the use case.
One question: Have you thought about adding real-time stock or crypto price updates via the Maybe Finance API (or another integration)? It could take the dashboard to the next level for users tracking volatile markets. Either way, this is a fantastic starting point for anyone wanting to dive into AI-driven fintech.
Thanks for sharing this—definitely cloning the repo to play around with it myself! Excited to see what else you comes up with.
Thank you for the kind words! I'm glad you found the tutorial and combination of technologies helpful!
Regarding real-time stock or crypto price updates - that's an excellent suggestion! The Maybe Finance API through SynthFinance does offer market data endpoints that we could leverage for this purpose.
We could add this for a v2 of our Open-Source Financial Manager! 😎
It would be cool to see the v2 with realtime market data
Yes, we can work on that!
I enjoyed this, thank you
Thank you Matthew!
Awesome tutorial!
Thank you!
How were you able to prompt engineer the chat so it stays within finance + knows what is being displayed on the frontend?
In the code, I set up financial actions using
useCopilotAction hooks. This naturally keeps the chat and conversations finance-focused with actions it can perform.To make it aware of what's on the frontend, the instructions prop in the
CopilotSidebarcomponent helps to feed the AI real-time data from the dashboard. Every time the state changes (like when a balance updates), it refreshes the context string with the latest info. This way, the chat knows exactly what financial data the user is seeing on their screen at that moment.Basically, CopilotKit's sidebar component and action hooks connect the chat directly to the financial data and functions.
You can check out the CopilotKit docs to learn more:
docs.copilotkit.ai/
Bookmarking for later
Thank you Steven, do try it out!
Some comments may only be visible to logged-in visitors. Sign in to view all comments.