Overview
In this tutorial, we will look at how to set up our project from my previous tutorial to use MongoDB.
In the previous article, we built a REST API that served data to our blog application. We build out endpoints to create, read, update and delete data. This data however is stored in an array in our blogController.js file.
This works when testing the application but all the changes made are temporary. If you create a new blog entry, this blog entry will remain visible but disappears when you restart the server.
We will now introduce a database to our project so as to persist our data. There are many different choices for a database depending on your applications needs.
For our application, we will use MongoDB with Mongoose.
MongoDB is a NoSQL document database used to build highly available and scalable applications.
Mongoose is an ODM (Object Data Modelling) library used to make it easier to connect to MongoDB by providing functions to manipulate the documents in collections.
REST API for a React FrontEnd
This is an express rest api for a simple blog app that enables one to manage a simple blog.
You can view the client app here .
Endpoints
| URL | METHOD | DESCRIPTION |
|---|---|---|
| api/blogs/ | GET | fetches all blogs |
| api/blogs/{id} | GET | fetches a single blog |
| api/blogs/ | POST | post a blog |
| api/blogs/{id} | DELETE | delete a single blog |
Project Structure
We have already built out the skeleton of this project in my previous article. As a recap, here's what we have so far.
We created a directory called server. In this server directory we have our server.js file which is our entry point to our API. We also have routes and controllers directories which hold the routes and the controllers (callback functions that are fired when these routes are matched) respectively.
That's the structure we have so far. Next we will do the database configuration.
Connecting to MongoDB
As described before, MongoDB is a document based database that allows us to build highly scalable applications. You can install MongoDB server locally but for our case, we will use MongoDB Atlas.
MongoDB Atlas is a fully-managed cloud database that handles all the complexity of deploying, managing, and healing your deployments on the cloud service provider of your choice (AWS , Azure, and GCP).
To get started, lets navigate to MongoDB homepage, create an account and login.
Click on "Create new organization" and give your organization a name. Let's call our organization tutorials and choose MongoDB Atlas as our preferred Cloud Service. Click on next and confirm organization creation on the next page.
Once the organization is created, we need to initialize a new project. Once you click on "create organization" you will be redirected to a projects page which is empty so far. Let's create a new project. Click on new project as below and name it dojo-blog-app. This is in line with the name of the blog app we are creating this database for. Confirm project creation on the subsequent pages.
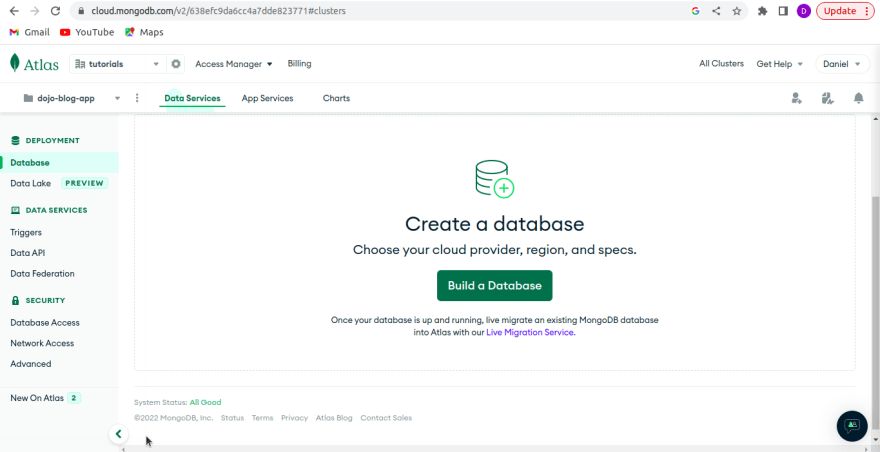
With our project up and running, we now need to create a database. Indeed after confirming project creation, we are now redirected to a "Create database" page. Let's click on "Build Database" and create a database for our project.
We are now redirected to choose a hosting plan. We, for the purposes of this tutorial, will use the free shared plan.
We will now be required to do some configuration for our shared cluster. As a tip, most of the recommended settings here can do. The only change we will make is naming our cluster something memorable than cluster0. Lets call our cluster dojo-cluster. Click on "Create".
Next up is a few more settings to configure the security of our database and clusters. You'll be asked how you would like to authenticate your connection (username and password) and where you would like to connect from (local environment).
Create a username and password.
Select "My local environment" as where you want to connect from and also add your current IP address to the list of whitelisted IP addresses.
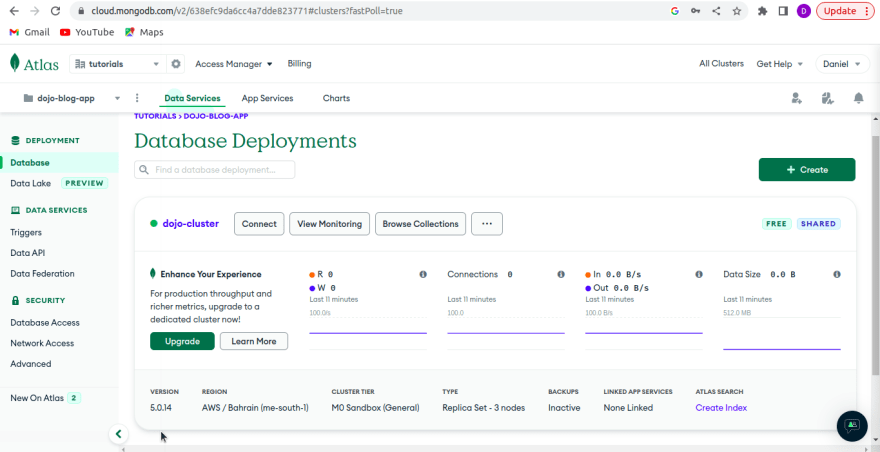
Click on finish and close and we are now done setting up our database. Under our created project, we can now see the cluster we have created (dojo-cluster).
With the clusters up and running, let's now focus on connecting our database to the rest of our REST API (no pun intended). Navigate to your cluster (like in the above screenshot) and click on "Connect".
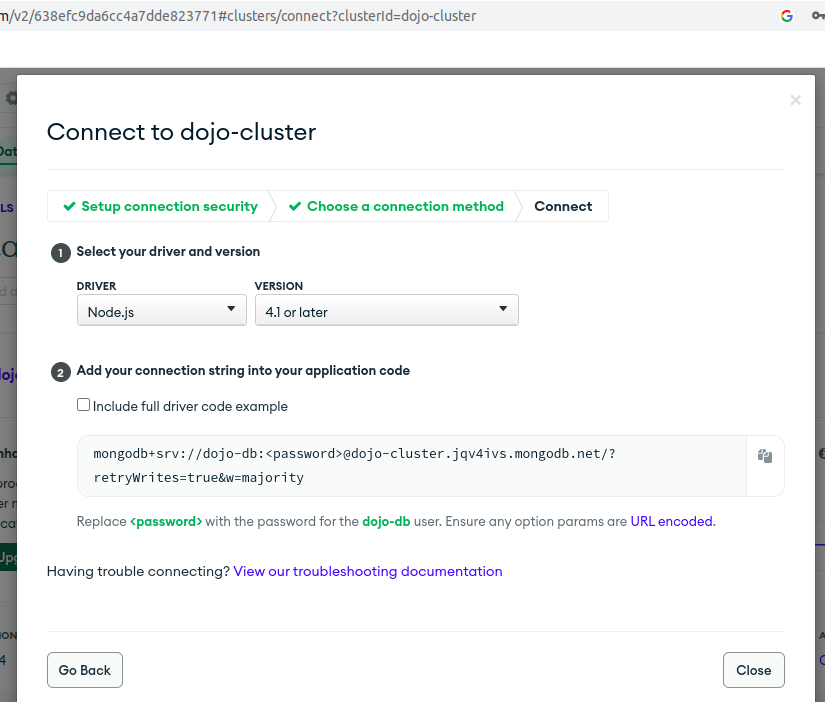
There are several options to connect. Primarily, we want to get a connection string that will be domiciled in our dotenv file that will enable us to connect to our database.
Let's click on the second option which is "Connect your application to your cluster using MongoDB's native drivers". Here we can now get a string that we will copy and paste in our dotenv file in our application code.
Copy the connection string and save it somewhere as we will need it up next as we refactor our existing code to use our database.
Connecting MongoDB to our project
In my previous tutorial/article, we saw how we can set up a REST API for a simple blog app to give it some CRUD functionality without having a functional database.
We are now implementing the database in this phase of the project.
In the previous section, we created a MongoDB Atlas account and set up a cluster. In this section, we will now connect our app to the cluster.
Create a new directory inside the server directory and lets name it config. Inside config lets create a file called db.js and this is where we will write all our database connection code.
Copy and paste the code below into your db.js file.
const mongoose = require('mongoose')

const connectDB = async() => {
    try {
        const conn = await mongoose.connect(process.env.MONGO_URI)
        console.log(`Database connected ${conn.connection.host}`.cyan.underline)
    } catch (error) {
        console.log(error)
        process.exit(1)
    }
}

module.exports = {
    connectDB
}
We begin by importing mongoose into our project (do npm install mongoose if not installed yet). We will then create a function called connectDB. This is the function we will call when we want to connect to our database in our main server.js file. This is an asynchronous function since we are now working with a database.
In connectDB, we will use the Mongoose method mongoose.connect to connect to our cluster. This method takes in a connection string as an argument.
Remember the connection string we copied and stored somewhere safe? We will now create an environment variable MONGO_URI and give it the value of the stored string as seen below.
NB: Remember to replace password with the actual password to the cluster that you created.
We then log a statement to our console to show that our connection is successful. The cyan.underline appended to the console.log() statement changes the color of the logged statement to cyan and is a feature of the colors package (do npm install colors if not installed yet).
The catch part of our try catch statement simply logs an error if any and exits the process. Lastly, we do a module.exports statement so as to export the function connectDB to be used elsewhere, in this case the server.js file.
Creating models
Now that we have the connection to the database up and running, let us create models for our database. We will first define the structure of our database using a schema.
Generally speaking, a schema is a structured framework or an outline. A database schema therefore defines how data is organized within a database including logical constraints such as, collection names, fields, data types, and the relationships between these entities.
Create a new directory named models where we will store our various data models. For our blog app, create a new file in the models directory called blogModel.js.
At the moment we are only concerned with a simple blog app but later we may need to add more functionality such as users etc and thus we may need to create new models. These models will be created in separate files eg userModel.js. Keeping each model separate is a good practice that ensures modularization of our code.
Let's have a look at blogModel.js.
const mongoose = require('mongoose')

const blogSchema = mongoose.Schema({
    title:{
        type:String,
        required:[true, 'Please add a title']
    },
    body:{
        type:String,
        required:[true, 'Please add a story']
    },
    author:{
        type:String,
        required:[true, 'Please add an author name']
    }
},{
    timestamps:true,
})

module.exports = mongoose.model('Blog', blogSchema)
As usual, we start by importing Mongoose. Each schema maps to a MongoDB collection and defines the shape of the documents within that collection.
To create our database schema, we will use the very handy Mongoose.schema() method to define blogSchema. Our blog entries have 3 fields i.e. title, author, and the blog body. MongoDB adds a unique ID field for us so we wont add that in our schema definition.
Read more about mongoose and schemas here.
After defining our fields and the data types in the schema, we can add another argument to our Mongoose.schema() method that adds timestamps for when we create or update posts.
As always, don't forget to export the model so that we can use it in our controller functions. We will use the mongoose.model() method. The mongoose.model() function of the mongoose module is used to create a collection of a particular database of MongoDB.
Creating controllers
Now that we have a single function we can fire up to connect to the database, let us re-purpose our controller functions to read, write or delete data from our database and not the array we were using before.
Let's see how our controllers/blogControllers.js file will now look like and then we will discuss the code below.
const asyncHandler = require('express-async-handler')
const Blog = require('../models/blogModel')


// @desc Get all blogs
// @route /api/blogs/
// @access public
const getBlogs = asyncHandler(async(req, res) => {
    const blogs = await Blog.find()
    res.json(blogs)
})


// @desc Get single blog
// @route /api/blogs/{id}
// @access public
const getBlog = asyncHandler(async(req, res) => {

    const blog = await Blog.findById(req.params.id)

    if(!blog){
        res.status(400)
        throw new Error('Blog not found')
    }

    res.json(blog)

})


// @desc Post a blog
// @route /api/blogs/{id}
// @access public
const postBlog = asyncHandler(async(req, res) => {

    if (!req.body.title || !req.body.body || !req.body.author){
        res.status(400)
        throw new Error ('Please fill all the required fields')

    } else{
        const blog = await Blog.create({
            title: req.body.title,
            body: req.body.body,
            author: req.body.author
        })

        res.status(200).json(blog)
    }
})


// @desc Delete a blog
// @route /api/blogs/{id}
// @access public
const deleteBlog = asyncHandler(async(req, res) => {

    const blog = await Blog.findById(req.params.id)
    if(!blog){
        res.status(400)
        throw new Error('Blog not found')
    }

    await blog.remove()

    res.status(200).json({message:"blog deleted"})
})


module.exports = {
    getBlogs,
    getBlog,
    postBlog,
    deleteBlog
}
We have 4 controller functions which are fired up when specific routes are matched. Our API has the following endpoints:
| URL | METHOD | DESCRIPTION |
|---|---|---|
| api/blogs/ | GET | fetches all blogs |
| api/blogs/{id} | GET | fetches a single blog |
| api/blogs/ | POST | posts a new blog |
| api/blogs/{id} | DELETE | deletes a single blog |
In blogController.js, we start by importing asyncHandler. asyncHandler wraps async functions and saves you writing your own try/catch for async/await and passes errors on to next.
We will also import the Blog model we created in our models directory
To get all blogs, we have:
const getBlogs = asyncHandler(async(req, res) => {
    const blogs = await Blog.find()
    res.json(blogs)
})
Using the Blog model, we will use the find() method provided by mongoose. find() returns all records found. Sometimes you may need to return a particular record by id etc and there are methods to do that. Read more about mongoose queries here.
To get a specific blog, we have the following code:
const getBlog = asyncHandler(async(req, res) => {

    const blog = await Blog.findById(req.params.id)

    if(!blog){
        res.status(400)
        throw new Error('Blog not found')
    }

    res.json(blog)
})
To return a specific blog post, we make use of the mongoose query findById(). We then check whether the blog with the requested id exists. We get the id from the request using req.params.id. If not we show an error message of 'Blog not found'. Otherwise we return the requested post.
To post a blog we have the following code:
const postBlog = asyncHandler(async(req, res) => {

    if (!req.body.title || !req.body.body || !req.body.author){
        res.status(400)
        throw new Error ('Please fill all the required fields')

    } else{
        const blog = await Blog.create({
            title: req.body.title,
            body: req.body.body,
            author: req.body.author
        })

        res.status(200).json(blog)
    }
})
We will use an if/else block to take care of empty entries. After checking that all fields have been filled, we then use the Model.create() method to create a new document in our collection. If successful, we return the created blog with a status code of 200.
To delete a blog, we have:
const deleteBlog = asyncHandler(async(req, res) => {

    const blog = await Blog.findById(req.params.id)
    if(!blog){
        res.status(400)
        throw new Error('Blog not found')
    }

    await blog.remove()

    res.status(200).json({message:"blog deleted"})
})
We target the post we want to delete using findById(). Once located, we use mongoose's remove() method to remove it.
Custom error handling middleware
One advantage of using Express.js is that it is unopinionated and allows us the flexibility to tackle challenges using custom solutions.
This is in contrast to opinionated frameworks (e.g. Django) which have set rules to tackle most problems.
To illustrate the unopinionated nature of express, we will build a custom error handler and chain it to all our requests as middleware.
In our root directory of server, lets create a middleware directory and inside it create the file errorHandler.js. In this file, we will implement some custom error handling. This will include the option to have verbose or abbreviated error messages depending on whether the app is in development or production mode.
Let's have a look at errorHandler.js and discuss it below:
const errorHandler = (err, req, res, next) => {

    const statusCode = (res.statusCode ? res.statusCode : 500)

    res.status(statusCode)

    res.json({
        message: err.message,
        stack: process.env.NODE_ENV === 'development' ? err.stack : 'null'
    })
}

module.exports = {
    errorHandler
}
We will define an error handler function which takes in 4 arguments (i.e. err, res, req and next).
In the callback, we check whether the response has a statusCode. If not we return a generic 500 (Internal server error). We then want to return an error message (from err.message) and a full description of the error (from err.stack) when process.env.NODE_ENV === 'development'. If we are in production, we want to see a more abbreviated description of the error (in this case null).
Testing the API
Congratulations. We have built a fully functional REST API complete with a supporting MongoDB database. In my previous article, we tested our API using Postman and all the endpoints worked as they should.
We shall follow a similar approach and retest our endpoints seeing as we have made significant changes to our API.
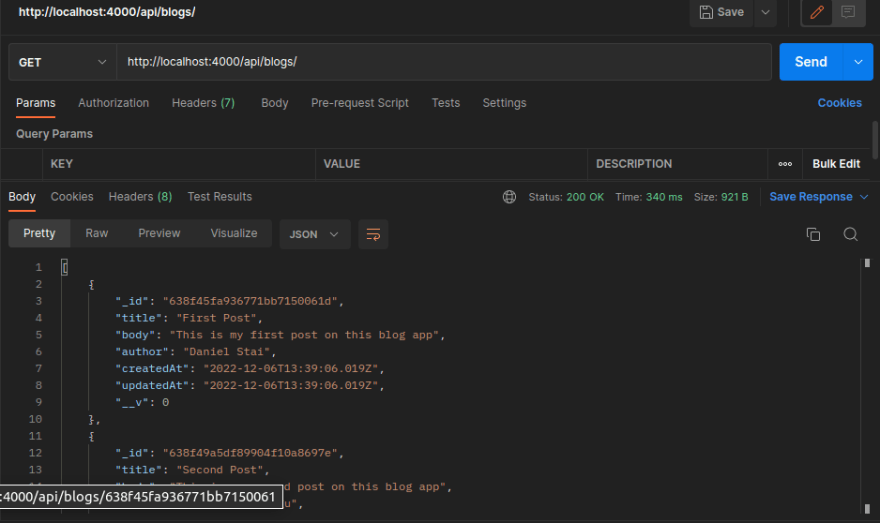
Lets fire up Postman and start by testing GET /api/blogs/:
As expected, we retrieve all blogs we have at the moment i.e. 2 blog posts.
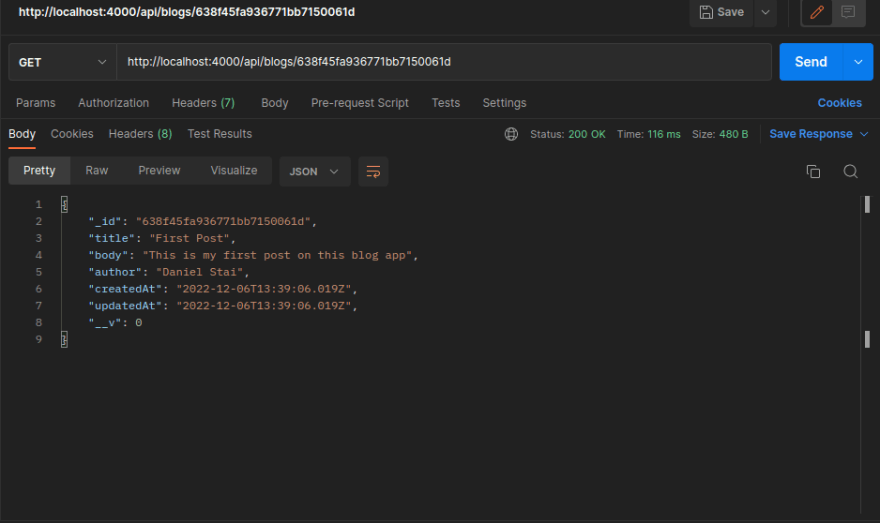
Next we will use one of the blog id's we get from requesting all blogs above to test our endpoint that retrieves a single blog i.e. GET /api/blogs/{id}:
Voila. Both retrieving all blogs and retrieving a single blog work as expected.
I will leave the two remaining methods i.e. POST and DELETE for you the reader to test them out tell me what you get by leaving a comment.
Conclusion
That's the end of this particular article. We have come a long way from building dummy express apps to now building a fully functional rest api.
To build further on this, we will add some type of authentication to our app in the next article.
Till then, adios.








Top comments (2)
Hey, it was a nice read, you got my follow, keep writing!
Thank you so much for the like and follow and for the kind words too.