Before we get into it,
Google Sheets is a powerful tool that can be used to store and organize data, it can technically be used as a database for a blog. However, it is not advisable to use Google Sheets as a database for a blog because it is not ACID compliant.
ACID is an acronym that stands for Atomicity, Consistency, Isolation, and Durability, which are the four key properties of a database that ensures data integrity and reliability. Google Sheets, as a spreadsheet application, does not offer the same level of data integrity and reliability as a traditional database that is ACID compliant.
In this easy to follow, step-by-step tutorial, I will be showing you an easy way to build a very simple blog with Google Sheets as the database. We will be creating a custom API which will allow us to fetch data from our spreadsheet, manipulate that data and display them on our page.
Who can follow this tutorial?
Basically anyone with some basic understanding of JavaScript and how the Fetch API works.
Project Setup
First, we'll need a text editor (Notepad++ is a great option if you are low on system resources) and a Google Account (obviously).
Setting up your main API and connecting it to Google Sheets
Head over to docs.google.com and sign in with your Google Account, if you are prompted to do so.
Click on the navigation menu on the top right hand side of the page and select 'Sheets'. You will be directed to a page where you can click the (+) icon to create a new sheet.
Once the new sheet is created, we will need to get the spreadsheet ID. Getting the spreadsheet ID is fairly simple. If the URL to your spreadsheet is
https://docs.google.com/spreadsheets/d/1AxVnqOgcu7h6rr030PtV7WIEiQRMAgYIL6uReg_x8BQ/edit#gid=0, then your spreadsheet ID is1AxVnqOgcu7h6rr030PtV7WIEiQRMAgYIL6uReg_x8BQ.Navigate to the A1 cell and type in the word, "Title". After doing that, click on B1 and type in the word, "By". Cell C1 should be filled with the word "Content".
Alright, so far, all we have now is a spreadsheet and a column for the title, another column for the content.
Now we are going to create an API that will allow us to retrieve data from our spreadsheets and return an array of objects. Each object should contain the keys (
Title,By,Contentand anid).On the menu bar, click on the "Extensions" button and select "Apps Script". You will be redirected to a new tab with a code editor.
Add the following function to your code.
function getSheetData() {
  var sheet = SpreadsheetApp.getActiveSheet();
  var data = sheet.getDataRange().getValues();
  var jsonData = [];
  for (var i = 1; i < data.length; i++) {
    var row = data[i];
    var obj = {};
    for (var j = 0; j < row.length; j++) {
      obj[sheet.getRange(1, j + 1).getValue()] = row[j];
    }
    obj["id"] = i;
    jsonData.push(obj);
  }
  return jsonData;
}
The
getSheetData()function retrieves all the data from the active sheet in the spreadsheet, converts it to an array of objects with each object representing a row of data from the sheet. It uses two nested loops to iterate through the data, the outer loop iterates through each row, and the inner loop iterates through each cell of the row.
The outer loop uses the indexito reference the current row and the inner loop uses the index j to reference the current cell of the current row. Thesheet.getRange(1, j + 1).getValue()function is used to get the header value of the current column, which is used as the key of the object.
Now, we need a function that receives the GET request, calls the getSheetData() function, and uses the ContentService.createTextOutput() method to create a text output with the JSON data and convert it using JSON.stringify(). The setMimeType() method is used to set the MIME type of the response to "application/json", so that the browser knows to interpret the response as JSON. So go ahead and add the following function to your code.
function doGet(e) {
  var jsonData = getSheetData();
  return ContentService.createTextOutput(JSON.stringify(jsonData)).setMimeType(ContentService.MimeType.JSON);
}
Your final code should look something like this:
function getSheetData() {
  var sheet = SpreadsheetApp.getActiveSheet();
  var data = sheet.getDataRange().getValues();
  var jsonData = [];
  for (var i = 1; i < data.length; i++) {
    var row = data[i];
    var obj = {};
    for (var j = 0; j < row.length; j++) {
      obj[sheet.getRange(1, j + 1).getValue()] = row[j];
    }
    obj["id"] = i;
    jsonData.push(obj);
  }
  return jsonData;
}

function doGet(e) {
  var jsonData = getSheetData();
  return ContentService.createTextOutput(JSON.stringify(jsonData)).setMimeType(ContentService.MimeType.JSON);
}
Deploying our API
- Click on the "Deploy" button in the top menu
- A dialog box should appear on the screen. Click on the "Settings" icon and select "Web App". Click on the icon again and select "Library".
- In the "Execute the app as" field, select your Google account.
- In the "Who has access to the app" field, select "Anyone"
- Click on the "Deploy" button.
- A dialog box will appear with the "Current web app URL" which you can use to access your web app. The web app URL is the API link.
Note
If this is your first time using Apps Script, you might get a menu that says "The Web App requires you to authorize access to your data.". Click on "Authorise access". A window will open for you to sign in with your Google Account. You will be presented with a warning screen that tells you that Google has not verified the web app. Click the "Advanced" button and click the "Go to Project Name' link. You will then be presented with an authorization screen where you must click "Allow" in order to proceed.When you deploy a Google Apps Script as a web app, it will be accessible via a unique URL. The format of this URL is determined by the configuration of the deployment. By default, the URL will be in the following format:
https://script.google.com/macros/s/{SCRIPT_ID}/exec
Where SCRIPT_ID is a unique identifier for your script. The SCRIPT_ID can be found in the Apps Script editor by clicking on the "Project settings" button in the top right corner of the window, it will be in the top right corner of the page, under the "Project ID" header.
Setting up another API for the number of rows
For this project, we will need another API that will tell us the number of rows in the spreadsheet. Since each row represents a single blogpost, the total number of blogposts is simply, the number of rows in the spreadsheet - 1 . So if our spreadsheet contains three rows, it means that there are two blogposts because each cell in the firstrow contains the title of each column. Just we did previously, head over to Extensions > Apps Script.
- On the side bar, navigate to files and click the (+) icon to create a new file. Name the file
length.gs(or whatever you feel like). Paste the following code in the editor. ```
function doGet(e) {
var spreadsheet = SpreadsheetApp.openById(SHEET_ID);
var sheet = spreadsheet.getActiveSheet();
var rowCount = sheet.getLastRow();
return ContentService.createTextOutput(rowCount);
}
> This script uses the `SpreadsheetApp` class from the Google Apps Script API to access a specific spreadsheet, identified by its ID.
>
> Then it opens the spreadsheet by its ID using `SpreadsheetApp.openById(SHEET_ID)` and retrieves the active sheet using `getActiveSheet()` method. After that, it retrieves the number of rows in the sheet using `getLastRow()` method. Finally, it returns the number of rows as the response to the GET request using `ContentService.createTextOutput(rowCount)`.
### Populating our spreadsheet cells
Now, we are done with our APIs, it is time to start inputting some data in the spreadsheet. The `Title` column is where we store the title of our blogpost and the `Content` column is where we store the actual content. The `By` column is where you can input the name of the blog author.
You are free to include HTML tags in your content column. One really cool thing about Google Sheets is that we do not have to worry about saving our data, because everything is synced with your Google Drive account automatically.
## Setting up our frontend
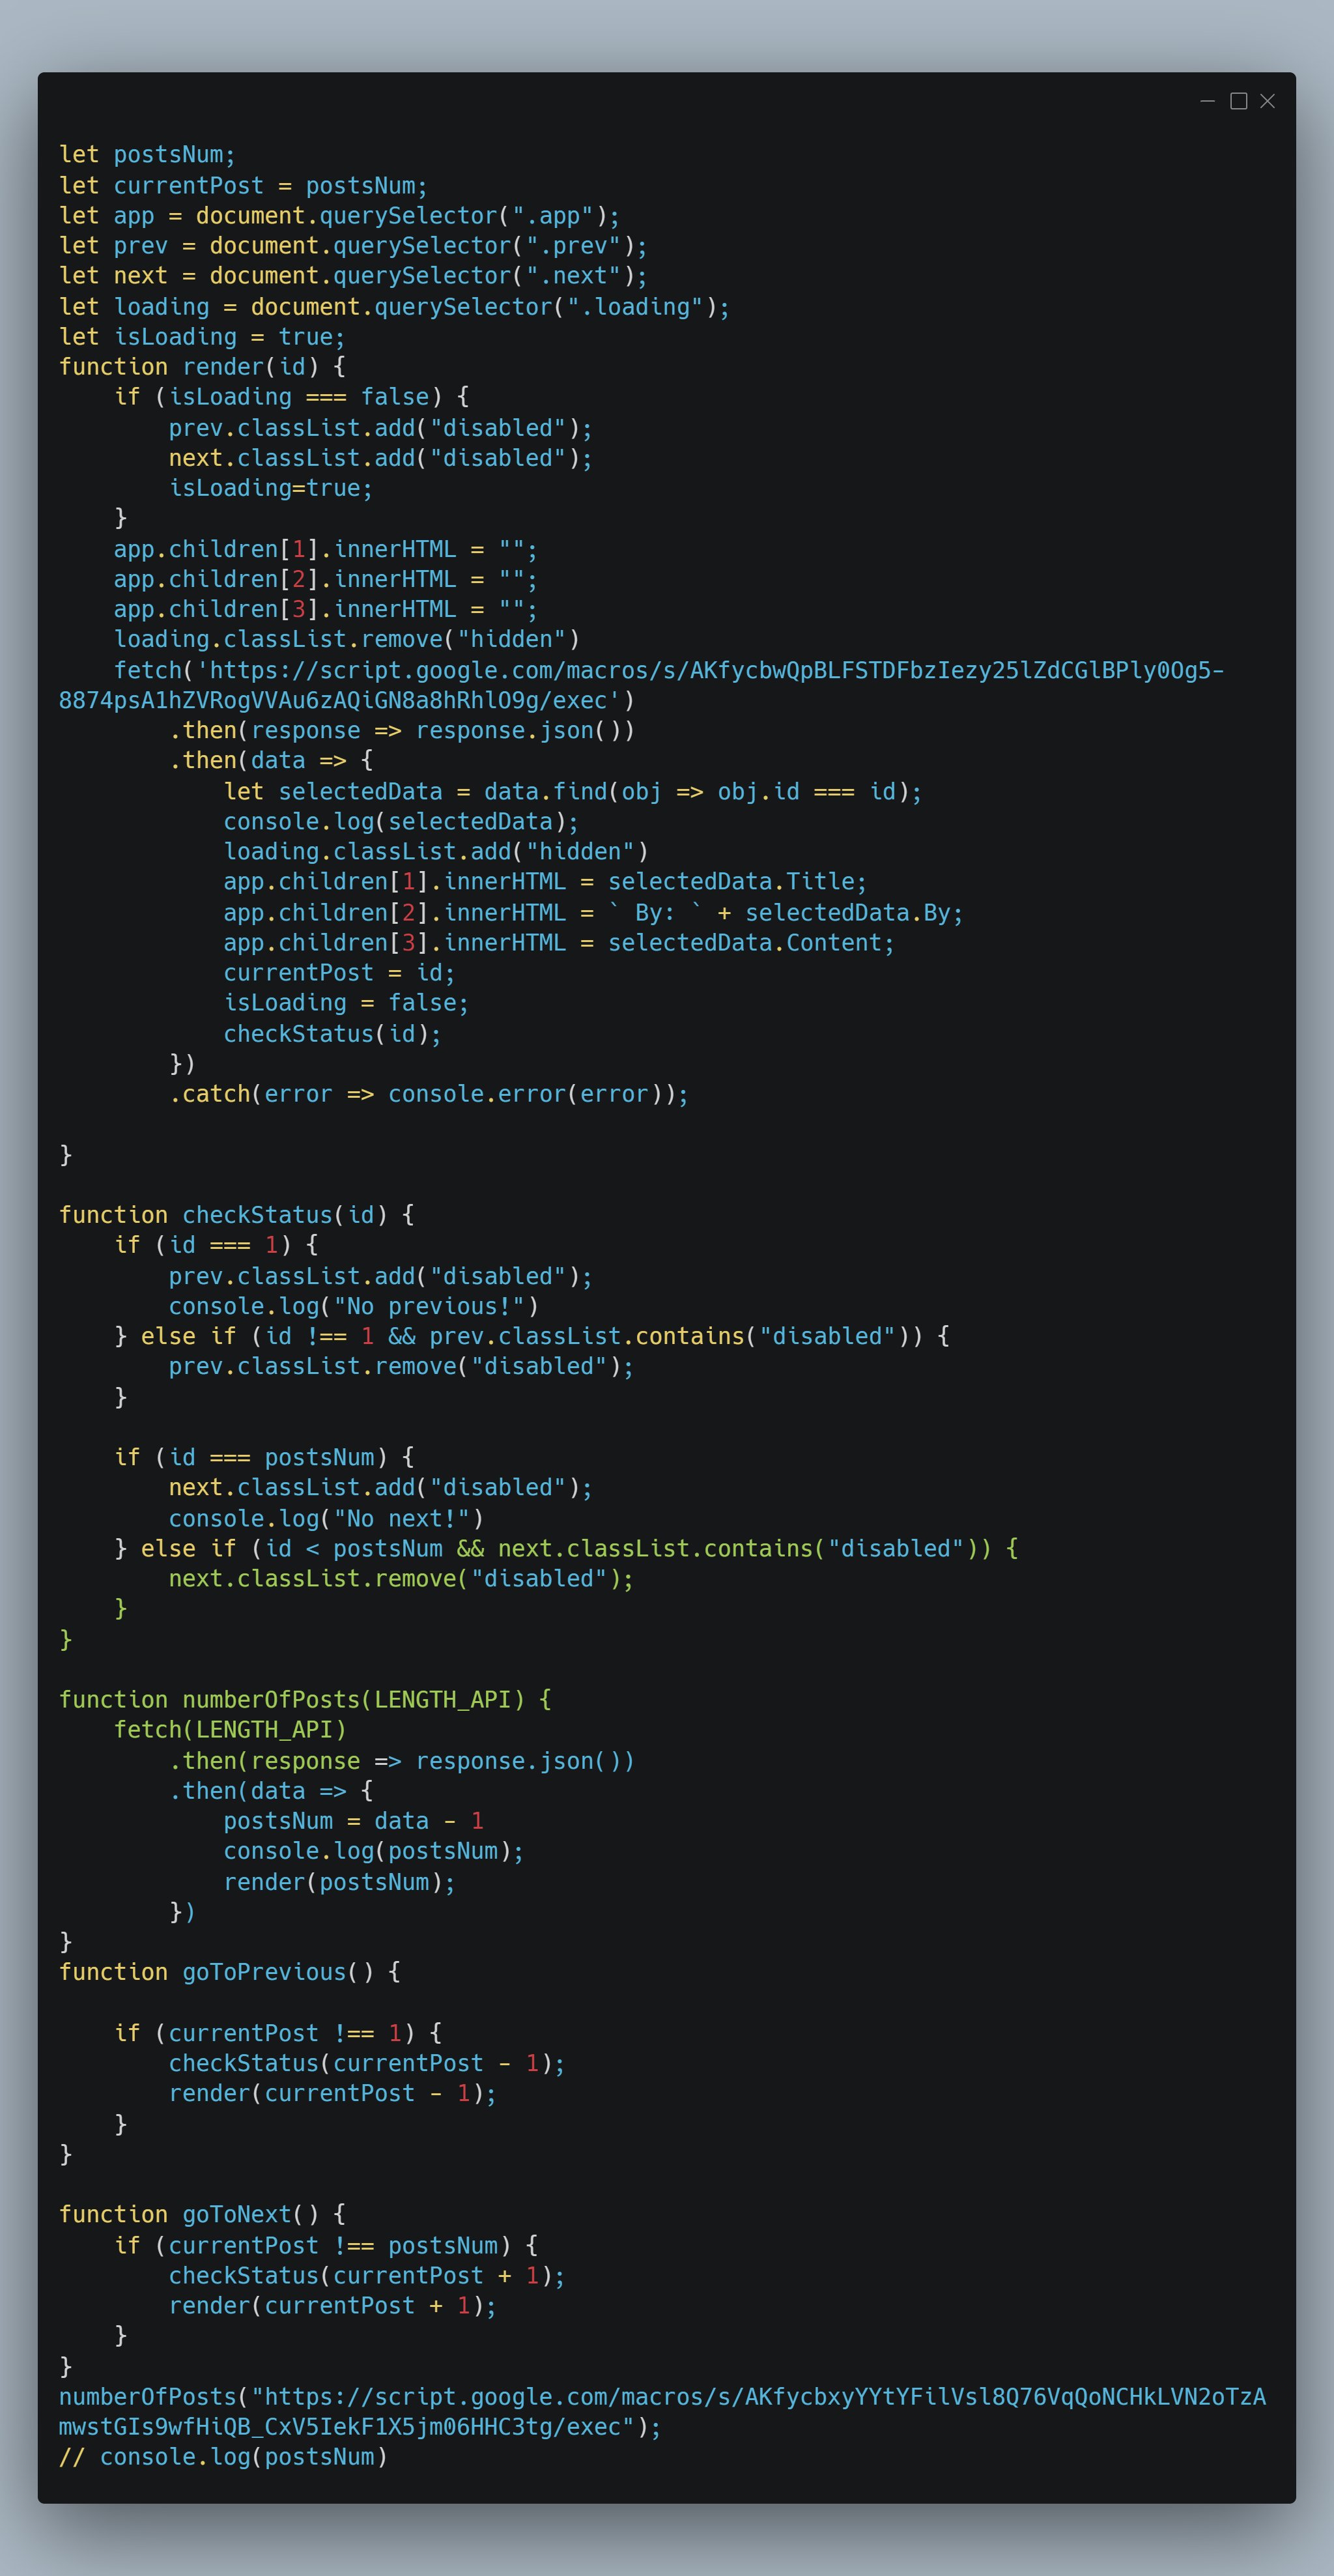
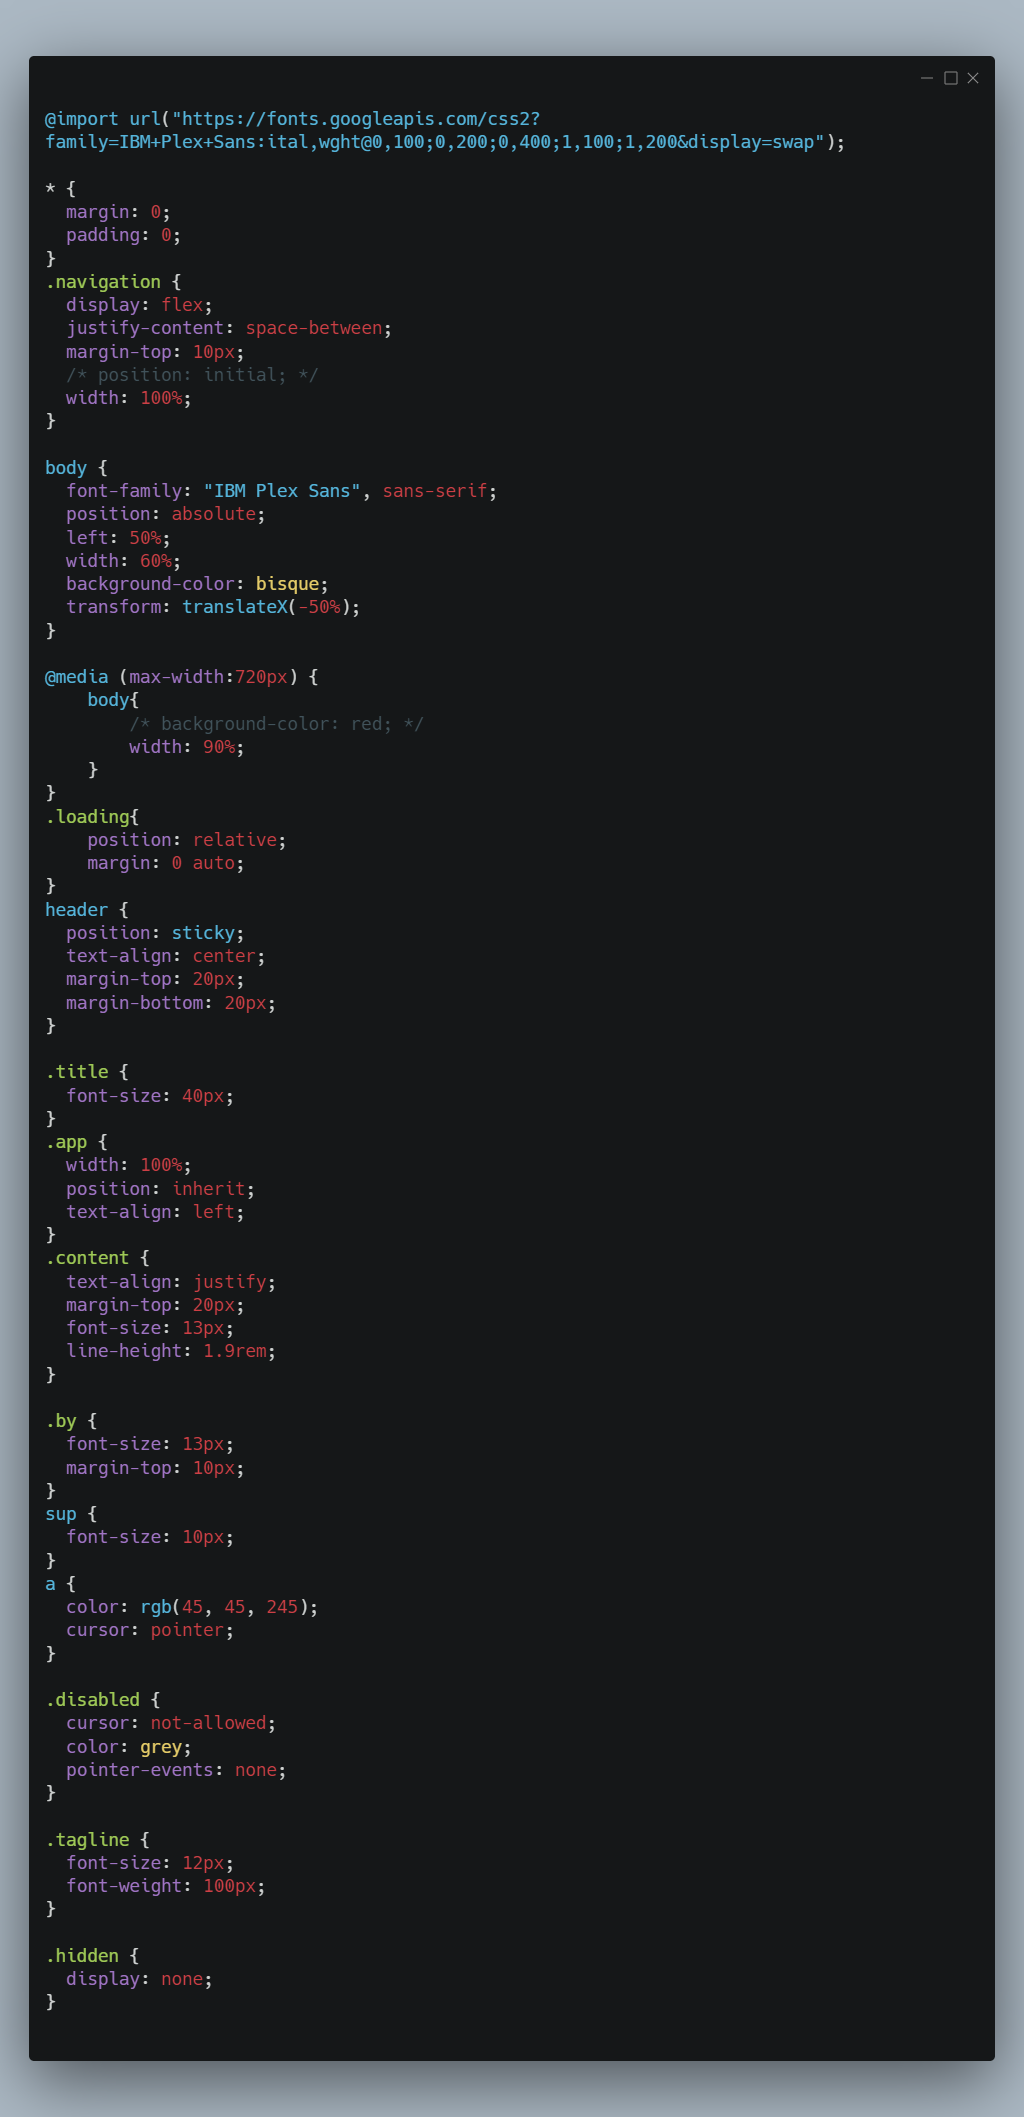
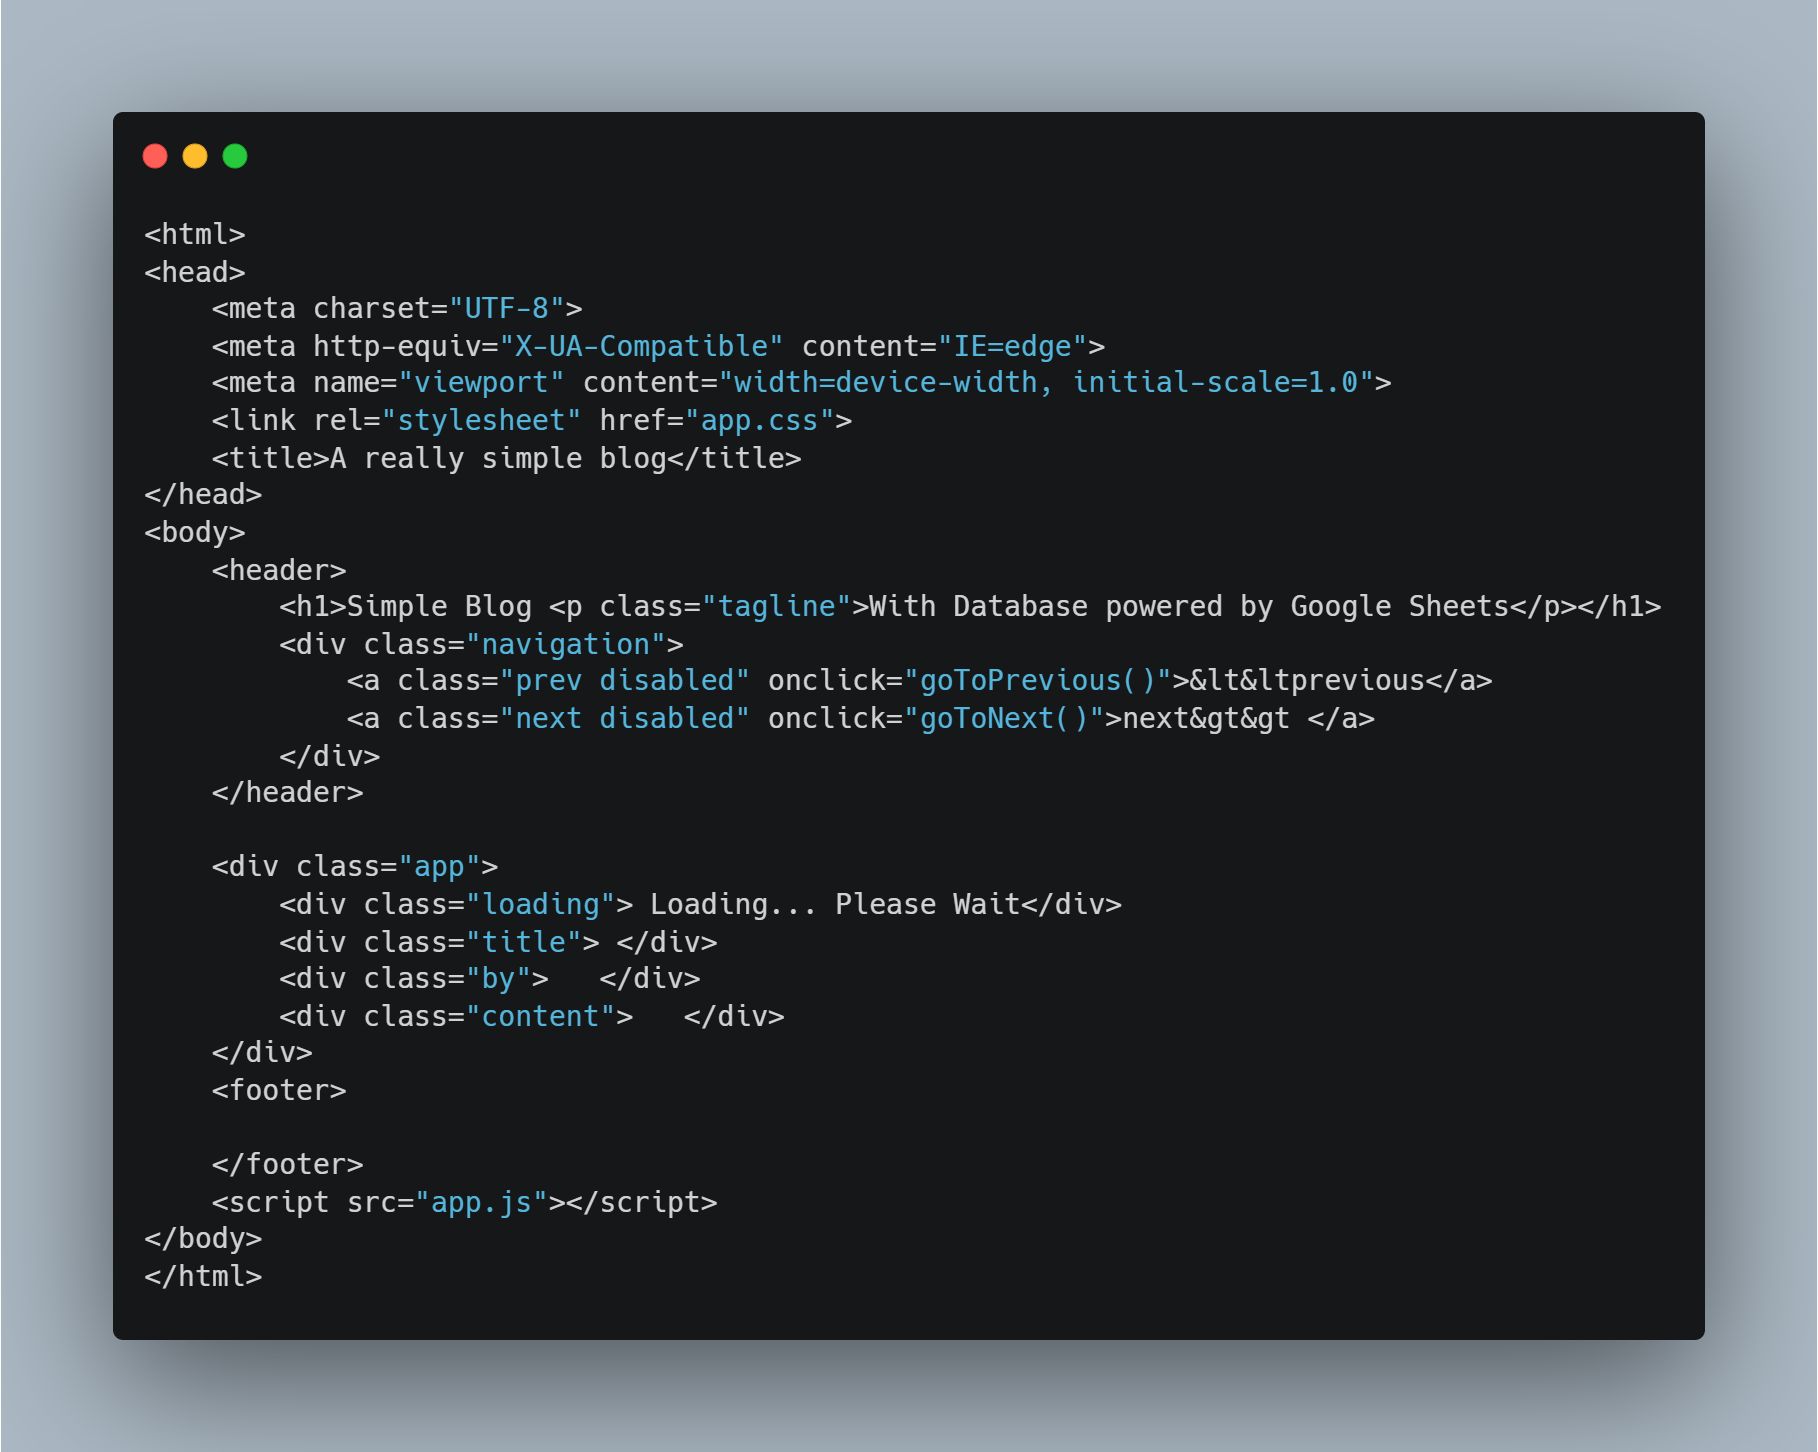
Setting up our frontend is fairly simple. You can use Vanilla JavaScript or a framework of your choice, however, I am going to use Vanilla JavaScript in this tutorial. The `numberOfPosts()` function is responsible for fetching the number of posts via our second API, while the `render()` function is responsible for fetching the actual post with the help of our main API.
Here is the JavaScript Code.

And here is the CSS

And finally here is the HTML

### Why would anyone want to do this?
Because Google Sheets is easy to use and accessible from anywhere, has advanced features such as data validation, conditional formatting, and pivot tables. Google Sheets is also a good option for small projects or teams with limited resources.
[Github Repository](https://github.com/daviduzondu/reallysimpleblog)
Please ask your questions in the comments (if any!) and I will be glad to answer them.


Top comments (8)
Hey there, great article!!
I LOVE Google sheets for small flat file uses with few metrics. In this way it really does not matter if u are acid compliant. In my opinion acid compliant only applies to transactional data where there are many users trying to update at the same time.
Go one step further and save ur google sheet as a csv, then convert to json and upload it to an AWS S3 bucket. I wrote a dev piece on how to do this
click here at dev.to/rickdelpo1/to-sql-or-to-nos...
happy coding!
Awesome!
Maybe make the link to the spreadsheet read only?
Great idea. I forgot about that lol.😂 Thanks for reminding me.
This is a really smart idea, never though of just using google sheets for something like this. Though are we still able to create a rss feed from this?
Definitely. I have a google sheet script, which produces rss based on a sheet.
Awesome !!!
Oh, actually there’s a tool that allows you to create professional blogs with Google Sheets, and writing posts with Google Docs is really simple and effective.
Thank you for the article, you can try this tool: sheetany.com