This was originally posted here
What are trying to achieve
We as developers like writing code. Given a choice I will write code whole day 💻. But writing code is only part of the job description. As engineers we are expected to build stuff and provide solutions. Writing code is only a part of it. I have met amazing developers who can write React way better than me. I have met designers and product guys who can come up with innovative ideas and design it to pixel perfect detail.
All of them being good in what they do, struggle in understanding how all this fits together in a software.
This is NOT a frontend tutorial about React, Design Systems or JavaScript. There are smarter people with better tutorials than this post.
What we are trying to do is to see how to take an idea from wireframe to production with automated tests and Continuous Integration and Continuous Deployment (CI / CD). 🚀
TL;DR
This is a 4 part post
Part One : Wireframes and Project Setup
Source Code is available here
Component Library Demo is available here
Movie App Demo is available here
The Idea 💡
Lets say we came up the brilliant idea to build a movie app. We have no idea something like IMDB exists. So we get together an awesome team to build this Web application.
The Requirements
So the team wants to start simple, so we agree on building only 3 features for the MVP.
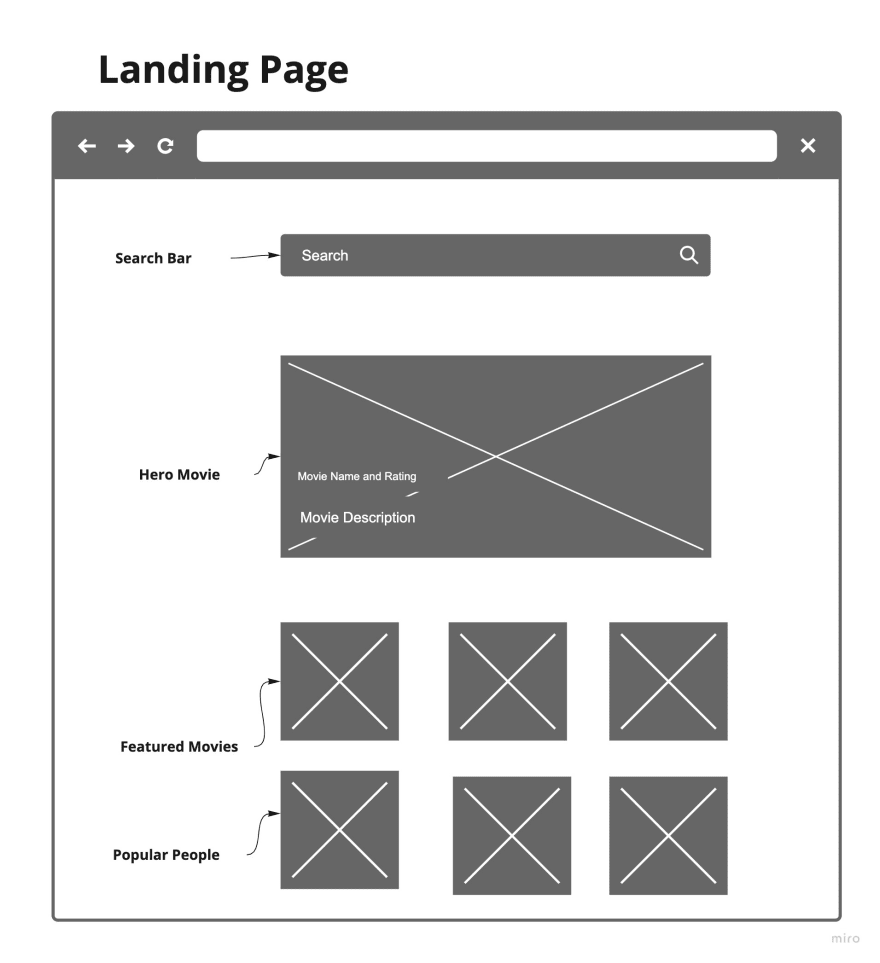
The Landing Page
This will be the face of our product. The user should be able to see these features
- Search Functionality: User should be able to search any movie
- Featured Movies: App should be able to promote some movies
- Popular People: Show the most popular people this week in the entertainment industry
The Movie Profile Page
The user can navigate to this page to see the details of the movie. This page should highlight these basic details about the movie
- Movie Details and Metadata
- Movie Rating
- Movie Poster
- Movie Trailer
- Movie Cast
- Similar Movies
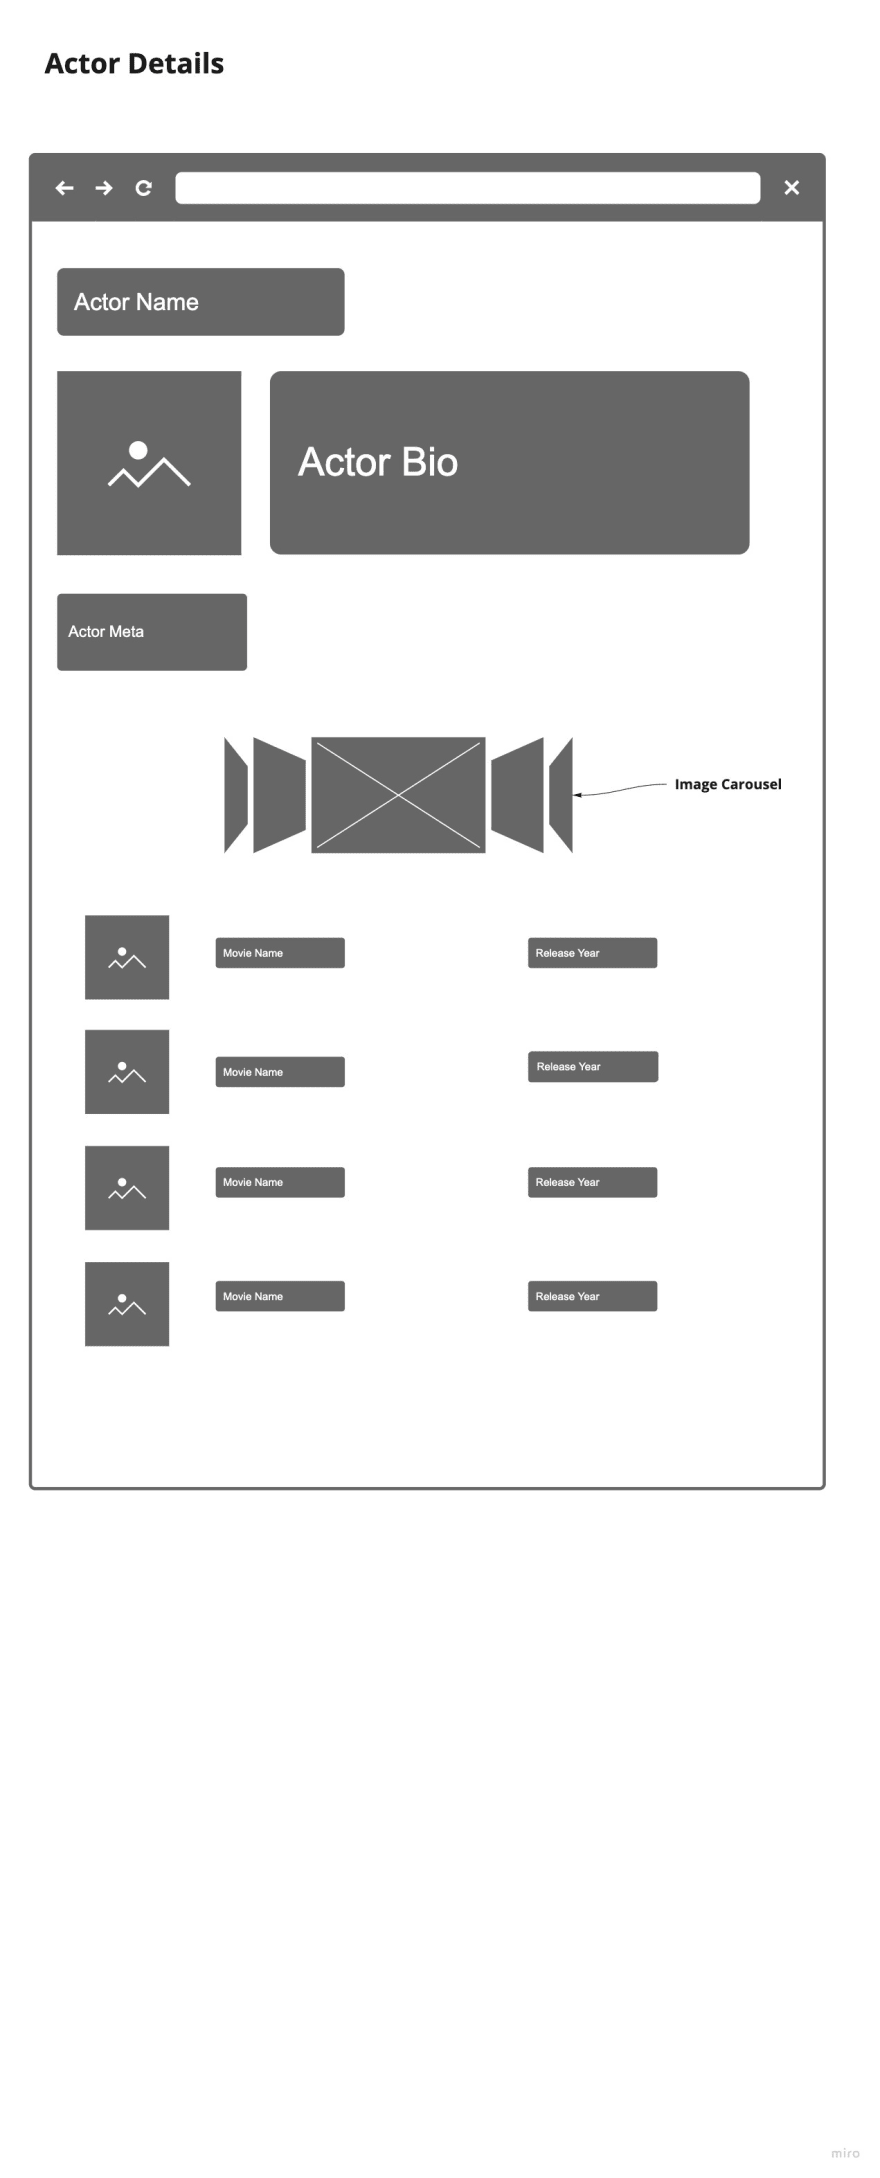
The Actor Bio Page
This user can navigate to this page to see the details of an Movie Actor. This page should highlight the basic details of the actor.
- Actor Details and Info
- Actor Photo
- Actor Bio
- Movie Acted
The Wireframes
Before we start hacking code, a lot of work goes in design phase where our awesome UX designers come up the designs which we will be building. As I am not a UX designer, I will spare you from my horrible sketch skills and proceed with wireframes for now.
Landing Page Wireframe
Movie Profile Page Wireframe
Actor Bio Page Wireframe
Project Setup
Now we have the wireframes ready, let's get our project setup.
Create a Github Project
Setting up Project on our development machine
So there are many ways to skin the chicken. I personally prefer a Monorepo. Some of you may hate monorepo and some of you may love it, the war is never ending. Lengths of blogs and documents are written on the benefits and perils of using a monorepo. Sometimes pros outweigh the cons, and sometime it is the other way round. For your next company project, I would suggest to figure out whether mono or multi repo fits your requirement.
For the sake of this demo let's go ahead with a monorepo.
For our monorepo we are going to use Lerna for high-level management, and yarn workspaces for low level package management. Again there is pretty good literature available for this setup which I would strongly suggest to read.
If shell>yarn workspaces are not enabled, lets first enable it.
yarn config set workspaces-experimental true
Lets clone the repository
git clone git@github.com:debojitroy/movie-app.git
cd movie-app
Lets not pollute the master and move to a separate branch
git checkout -b setting-it-up
Initialise the project
yarn init
Add Lerna as a dev dependency
yarn add lerna --dev
Once Lerna is added, it is time to initialise Lerna
lerna init
This should create packages folder and lerna.json
Now as we don't want to publish everything to npm simultaneously and would prefer yarn as our default client. We would also be using yarn workspaces, so we need to make some changes to lerna.json
{
  "packages": ["packages/*"],
  "version": "independent",
  "npmClient": "yarn",
  "useWorkspaces": true
}
Now we gotta enable yarn workspaces, so we need to add these few lines to our root package.json
"workspaces": [
     "packages/*"
  ]
Point to note, packages is the default name for the folder and you can name it anything you want. If you are changing the name, then make sure to update both lerna.json and package.json
Ok so our root project is setup now, let's commit our work and sync it to github. Always a good idea to do it.
git add .
git commit -m "Setting up root project"
git push --set-upstream origin setting-it-up
Setting up Linting and Commit Hooks
Before we move ahead and start writing code, we should take care of one more necessary evil - Linting and Commit Hooks.
We always end up adding lint rules and commit hooks way down the line in our development cycle and then spend ages fixing the errors. So in my recent projects I have decided to turn the tables around and set it up before I start writing code. You can always add more checks as the project progresses, but based on what we know, we should have the baseline rules in place.
So what we know about our Application
- It will be a React Application
- We will be using TypeScript
- We may have a mix of JS and TS Files
So with the starting knowledge of how our application will look like, we can decided on our tools.
Tools we are going to use
As with any frontend project, there are so many ways to implement coding standards across the team. Tools for the job also differ based on the requirements. I have found a combination of tools to work best for me, and as I have the luxury to choose my tools, I will be using these
Now lets go ahead and add these tools
yarn add eslint --dev
When you will run this command, you will see this error
error Running this command will add the dependency to the workspace root rather than the workspace itself, which might not be what you want - if you really meant it, make it explicit by running this command again with the -W flag (or --ignore-workspace-root-check).
This is yarn warning us that we should not be adding dependencies in the root project. The warning is perfectly valid as we shouldn't add packages to the root project. But this a special case, where we want to enforce project level rules, so it is safe to override the warning and go ahead with -W flag.
So running it again
yarn add eslint --dev -W
Adding Prettier and Husky as well
yarn add prettier husky --dev -W
Adding ESLint Plugins
Now as we want to use ESLint with custom setup, we need to add plugins.
We want to run linting whenever some file is staged.
yarn add lint-staged --dev -W
We want to ESLint to behave nicely with Prettier.
yarn add eslint-config-prettier eslint-plugin-prettier --dev -W
We want to ESLint to understand React syntax and JSX format.
yarn add babel-eslint eslint-plugin-react eslint-plugin-react-hooks --dev -W
Finally, we want TypeScript and ESLint to understand our TypeScript syntax.
yarn add typescript @typescript-eslint/eslint-plugin @typescript-eslint/parser --dev -W
Nearly there...
Now lets configure our linter and formatter
Configuring Prettier
Now to configure Prettier, let's create a .prettierrc file and add these rules.
Again, these are my rules, feel free to configure it as per your requirement.
{
  "bracketSpacing": true,
  "jsxBracketSameLine": false,
  "printWidth": 80,
  "singleQuote": true,
  "tabWidth": 2,
  "trailingComma": "es5",
  "useTabs": true
}
Configuring ESLint
Re-visiting the rules again
- Our code base will be mostly TypeScript
- We will be writing React Code
- We will be using latest React stuff including Hooks
- We may have some
.jsand.jsxfiles as well - We want Prettier to work with ESLint.
With these rules in place, let's go ahead an create a .eslintrc.js file.
module.exports = {
  parser: "@typescript-eslint/parser",
  extends: [
    "plugin:react/recommended",
    "plugin:@typescript-eslint/recommended",
    "prettier/@typescript-eslint",
    "plugin:prettier/recommended",
  ],
  parserOptions: {
    ecmaVersion: 2018,
    sourceType: "module",
  },
  plugins: ["react-hooks"],
  rules: {
    "react/prop-types": [0],
    "react/forbid-prop-types": [0],
    "react-hooks/rules-of-hooks": "error",
    "react-hooks/exhaustive-deps": "warn",
    "@typescript-eslint/explicit-function-return-type": "off",
    "@typescript-eslint/no-explicit-any": "off",
  },
  settings: {
    react: {
      version: "detect",
    },
  },
  overrides: [
    {
      files: ["**/*.js", "**/*.jsx"],
      parser: "babel-eslint",
      extends: ["plugin:react/recommended", "plugin:prettier/recommended"],
      plugins: ["react-hooks"],
      rules: {
        "react-hooks/rules-of-hooks": "error",
        "react-hooks/exhaustive-deps": "warn",
      },
      settings: {
        react: {
          version: "detect",
        },
      },
    },
  ],
}
We have turned off some of the TypeScript lint checks for our project. This is optional and you can remove them if you want.
Now we dont want ESLint to lint our CSS and compiled files. So we will add .eslintignore file and add ignored paths.
dist
lib
cdn
src/styles
*.d.ts
Getting our lint together
Ok we are nearly there. Final step is to get everything together.
Now moving on to our package.json
Let's add our rules for staged files. Add a section to package.json
"lint-staged": {
    "packages/**/*.{js,ts,jsx,tsx}": [
      "eslint --color --fix"
    ]
  }
Finally adding our pre-commit hook using husky
"husky": {
    "hooks": {
      "pre-commit": "lint-staged"
    }
  }
Testing it all works together
Now is the time of truth. Lets see if everything works together.
git add .
git commit -m "Setting up Code Standards and Lint Rules"
If everything was setup correctly, you should be seeing a message like this
husky > pre-commit (node v12.11.1)
ℹ No staged files match any configured task.
If you see this message, congratulations you have setup linting and code formatting with commit hooks correctly 🎉 🎉 🎉
Push your changes to Github and let's continue with writing some code.
To find out what happens next, continue to Part Two : Breaking Wireframes to Components and setting up a Component Library


Top comments (0)