Kubernetes offers automatic traffic monitoring and alerting when your cluster is getting overloaded. If load is high and nodes are overloaded, Kubernetes will trigger a response. This article focuses on helping users keep track of the performance of their K8S cluster, services and pods. With the new features added to Kubernetes 1.11, users now have more options for tracking the performance of their containers and clusters. Kubernetes has many different services you can use to monitor its performance. You can see what’s going on with the help of self-monitoring components like alerts, Prometheus monitoring, and in-built monitoring tools like cAdvisor, Node Exporter, etc. Read on to know more about Kubeshark Traffic Monitoring for Kubernetes with DockerHub
What is Kubeshark Traffic Monitoring?
Kubeshark traffic monitoring tracks the performance of your Pods and the underlying nodes and can alert you if they are getting overloaded. Kubeshark traffic monitoring uses the Kubebuilder tool set to help you create custom controllers. Kubebuilder can be used to create a controller that can inspect the health of a Pod. The controller is responsible for collecting the metrics and generating alerts if needed. Kubeshark traffic monitoring can be enabled in a few ways.You can enable Kubeshark traffic monitoring by setting the controller-termination-grace-period flag to a value greater than 0 in the apiserver. You can also enable it in a YAML file. You can configure Kubebuilder to collect these metrics using a configuration file or editor.
Kubebuilder can track the following metrics from Pods:
- CPU usage
- Memory usage
- Network I/O
- Disk usage
Number of running tasks Kubeshark traffic monitoring can also track the following metrics from nodes:
- CPU usage
- Memory usage
Kubernetes Monitoring with cAdvisor
cAdvisor is a distributed application that runs inside your containers. It collects resource usage metrics for CPU, memory, container images, and containers. CAdvisor is an integral part of Kubernetes. It is used for monitoring the resource usage of nodes, pods and containers. It collects metrics about CPU, memory, network and images. CAdvisor runs inside containers and collects metrics about containers. CAdvisor collects these metrics from pods. It provides an interface called web UI from where you can see a list of all pods with their resource usage. It also provides an interface for a detailed analysis of metrics collected from containers and images. You can see the CPU, memory, I/O and image size metrics. You can also use the web UI to view a graph of metrics collected by cAdvisor over time. With the help of the web UI, you can also analyse the resource usage of a particular pod.
Kubernetes Monitoring with Heapster
Heapster is a distributed application that runs inside your pods and nodes and collects metrics about CPU, memory, network and container images. Heapster collects these metrics from pods. It provides an interface where you can see metrics collected by Heapster. You can view these metrics as a graph or a table. With the help of this interface, you can also analyse the metrics of a particular pod.
Kubernetes Monitoring with Prometheus
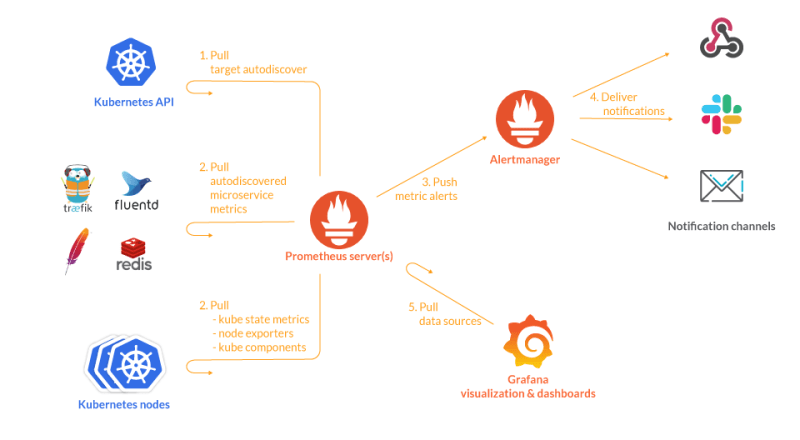
Prometheus is a distributed monitoring system, which gets metrics from Kubernetes and other services and stores them in a time-series database. Prometheus provides an interface where you can see metrics collected by it. You can also use this interface to analyse the metrics of a particular pod or Kubernetes service. Prometheus provides a set of configuration files ranging from 10-100 lines and activates the Kubernetes integration with a single line of code. You can also configure it to get metrics from other services.
Kubernetes Monitoring with Estimee
Estimee is a distributed application that runs inside your pods and nodes and collects metrics about CPU, memory, network, container image sizes and image pull times. Estimee collects metrics from pods and nodes. With the help of the web UI, you can view the metrics collected by Estimee. You can also analyse the metrics of a particular pod.
Wrapping Up
Kubeshark traffic monitoring can be enabled in a few ways. You can enable Kubeshark traffic monitoring by setting the controller-termination-grace-period flag to a value greater than 0 in the apiserver. You can also enable it in a YAML file.
Memory usage Kubeshark traffic monitoring tracks the performance of your Pods and the underlying nodes and can alert you if they are getting overloaded. Kubeshark traffic monitoring uses the Kubebuilder tool set to help you create custom controllers. Kubebuilder can be used to create a controller that can inspect the health of a Pod. The controller is responsible for collecting the metrics and generating alerts if needed. Kubeshark traffic monitoring can be enabled in a few ways.


Top comments (0)