I will be explaining how to deploy your dockerized app in AWS using a Fargate instance, the process for an EC2 instance should be very similar, so this guide will also work for you.
In a previous article, I explained how to dockerize a NestJs app, for the purpose of this guide I will be using the same codebase to create the Docker image that will be deployed in AWS.
To follow these steps I will assume you have the following:
- A Docker script to build your image.
- The AWS cli configured in your machine.
- Some basic knowledge of AWS and Docker.
Step 1 - Docker repository
You need to create a Docker repository in your AWS account, it can be done executing the command below:
aws ecr create-repository --repository-name=<YOUR_REPOSITORY_NAME>
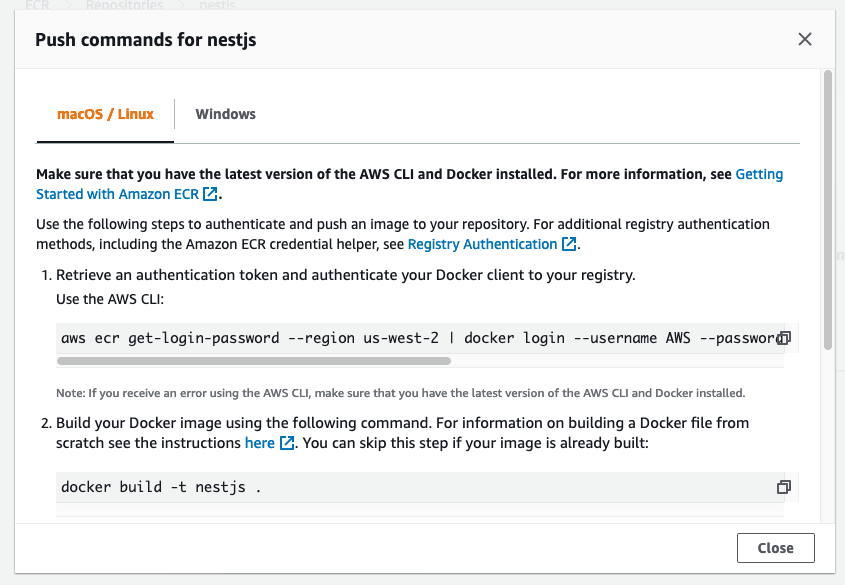
After your repository is created go to Elastic Container Service -> Amazon ECR -> Repositories in your AWS account. There look for your newly created repository and click on it. Once your repo is opened click on the View push commands button. You will get something like this:
Copy all these commands, as you will need them later on to build, push and deploy your app.
To avoid copying these commands every time we build our app, we can create some scripts in our package.json to automate the process.
If you are not deploying a JS app, you can use a shell script or some other tool you feel comfortable with.
Step 2 - Automated script
To make our lives easier we will setup the following scripts in the package.json file:
...
"aws:login": "aws ecr get-login-password --region us-west-2 | docker login --username AWS --password-stdin <ID>.dkr.ecr.us-west-2.amazonaws.com/nestjs",
"docker:build": "docker build -t nestjs .",
"docker:tag": "docker tag nestjs:latest <ID>.dkr.ecr.us-west-2.amazonaws.com/nestjs:latest",
"docker:push": "docker push <ID>.dkr.ecr.us-west-2.amazonaws.com/nestjs:latest",
...
Remember to replace all these commands with the ones you copied from your repository.
Let me explain what each one of these commands do:
-
aws:login- Executed the login command so you can properly authenticate with your AWS cli. -
docker:build- Build your Docker image using your localDockerscript. -
docker:tag- Tag your recently created image with the name you copied from your repository. -
docker:push- Push your image to the AWS server.
I will also add a new script, to execute all the previous commands in secuence (yes, I'm a bit lazy, I don't want to type all those commands every time I build my image).
...
"aws:build": "npm run aws:login && npm run docker:build && npm run docker:tag && npm run docker:push",
...
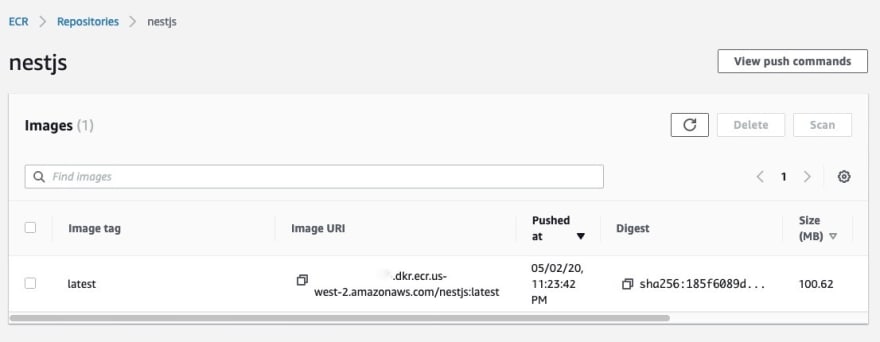
Now if you run the aws:build command (npm run aws:build), you will build, tag and push your Docker image into your AWS account. We will use this on the next steps to deploy your app. After executing the command this is how my repository looks:
Step 3 - Create Task Definition
Before creating your task definition make sure you have a role with the AmazonECSTaskExecutionRolePolicy.
Now, you need to create a Task definition that will be later used by a service to create the instances of your Docker image. To create a Task definition go to Elastic Container Service -> Amazon ECS -> Task Definitions, and click on the Create new Task Definition button and follow the next steps:
- Select launch type compatibility - Fargate.
- Set your task name and execution role.
- Set task size (this will change depending on your needs).
- Create task container (for the purpose of the guide I won't go deep on each of the options you can specify here, I will keep it simple for now).
For the Image field you need to specify the URL of your repository.
- Save your task.
Step 4 - Create Cluster
On this step you will create the cluster that will be used to create the services to deploy your app.
- Select Networking Only cluster as we will be creating Fargate instances.
- Set cluster name, check the "Create VPC" checkbox and save.
Step 5 - Create Service
Go to the services tab inside your recently created cluster and click on the Create button.
- Set your service type as Fargate, your task definition and cluster as the ones you created, for the service name I usually have the
-servicesuffix to identify them easier. And for this case we will set the number of instances as 1 (this will depend on your needs).
- Set the VPC value with the one that was created with the cluster and set some subnets where your service will be available, also set the "Auto-assign public IP" property to "Enabled". For the rest of the fields you can keep them as their default values and click the
Next stepbutton.
For the Auto-scaling options, keep the default values and click the
Next stepbutton.Click
Create Serviceand wait for your service to be created.
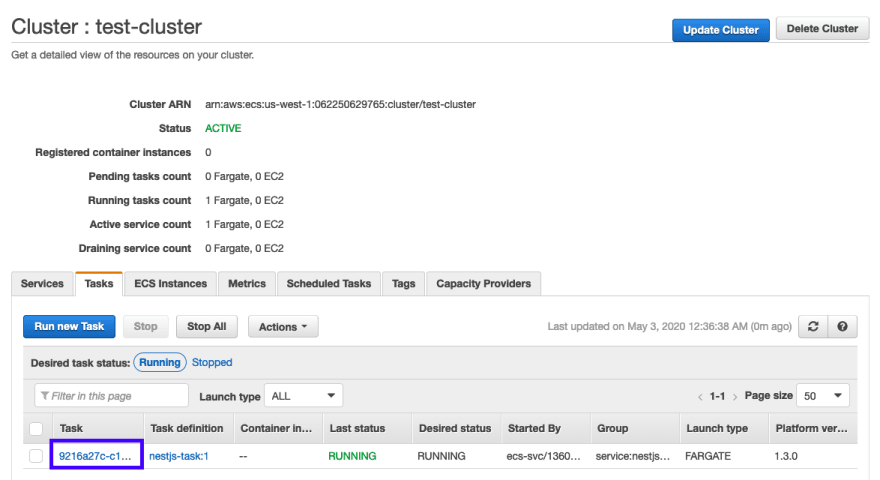
Now that you have created your service, let's check our deployed app. First you need to go to the task that was created by your service.
Here you can find the Public IP address of your instance. And looking for that IP directly on your browser should show your running APP.
Running APP
NOTE: if your app is not running on the port
80you will need to open the port your container is exposing on the security group that your service is using, this can be done on your security group inbound rules.
Awesome!! You made it!! now your app is running on a Fargate container in AWS, but, what if we need to make some changes in our app? How do we update our Docker image and re-deploy the new changes?. I will talk about it in the next step.
Step 6 - Re-Deploy your app with new changes.
Imagine that we got a new requirement for a new feature on our app, and we need to push those changes to our Fargate container, for that there are a couple of steps we need to follow:
- Build Docker image with new changes.
- Tag Docker image.
- Push Docker image.
- Deploy container with the new changes.
The first 3 steps we got them covered on the scripts we created before, we only need one last script.
"aws:deploy": "aws ecs update-service --cluster test-cluster --service nestjs-service --force-new-deployment --region=<YOUR_REGION>",
This command will force your service to re-create with the latest changes from the Docker image. After making new changes on your app you can run the following command:
npm run aws:build && npm run aws:deploy
This command will build, tag, push and re-create the container with the latest changes.
You can find the source code for this guide here.


Top comments (9)
Too useful, good job Edgar! What if I need to put an application load balancer with the cluster behind it, is it works with fargate the same way of EC2? I have a cluster in EC2 and an application load balancer, but when I tried to run a docker container with nest.js, my service still falling all time.
Well Explained. thanks
thanks for reading
Good content, thanks for writing this. I just wonder, what's the difference between running on Fargate vs. EC2?
you can run timed tasks on Fargate, so if you have cron jobs running for instance that just need to start an Container to do its work, it's perfect solution for it. You only pay for what you use. The EC2 situation you're always paying for the runtime duration until you manually shut it down.
hey Carlos, the difference is that with Fargate you don't need to take care of creating an EC2 instance neither on the EC2 instance RAM or Size, it's all specific to your service, but, if you need much more control over your instances EC2 can be a good choice.
If I don't have the load balance, I need to configure the service with a CUSTOM TCP and my container port, right?
My application uses port 8081, but when following the steps without load balance, I cannot open the public IP with port 8081.
Can you help me?
Google Cloud Run is much easier, at least for me.
Thanks for your comment. Will try to check google cloud.