Originally published at https://eduardstefanescu.dev/2020/03/28/rabbitmq-headers-exchange-with-docker-in-dotnet/
This article is about Headers Exchange, I chose to create an article just for this type of Exchange because it needs a little more attention compared to the other three types (i.e. fanout, direct, topic).\
In this article, I will use the setup environment with Docker from the first article, so if you want a good starting point, you can begin with the first article: https://stefanescueduard.github.io/2020/02/29/rabbitmq-producer-with-docker-in-dotnet/.
Introduction
Headers Exchange is routing the messages based on the bindings that are applied to the Producer and Queue.\
In order to produce a message, that message should be published with defined properties that are also bound to the Queue - this is why it's called Headers Exchange - and can also be seen as the routing key.\
Another mandatory property that must be bound to the Queue is x-match. This property specifies the matching criteria, as follows:
-
x-match=allmeans that all the header pairs must match; -
x-match=anymeans that at least one header pairs must match;
A quick example, that will be also implemented using .NET Core:\
Let's say that a Windows Application produces two logging types, information and error, and the server process these log messages based on its types.\
So for each log type, will be a Queue that will have a property log-level equals to the type of logging that will receive. To send log information, the Producer must set to that message a property log-level=information so that the Exchange will forward the message to the correct Queue.
If this is still unclear, then a brief explanation for Headers Exchange is that the messages contain a header in order to be bound correctly.\
I hope now the whole typology is a little bit clearer, and why this type of Exchange is called Headers.
Now we can start implementing these concepts, the following part will contain code chunks that are required in order to use Headers Exchange, these chunks were applied to existing code from the previous four articles about RabbitMQ.
Producer
To bind the logging type to the Producer properties, a Dictionary of type string, object is used as the properties headers. In this case, the key will be log-level and the value will be the actual log level (i.e. information or error). For this scenario, the log level is entered by the user, but in a real-life scenario, there will be a logging system that will serve this scope.
Console.Write("Log level: ");
string logLevel = Console.ReadLine();

Console.Write("Message: ");
string message = Console.ReadLine();

var propertiesHeaders = new Dictionary<string, object> { { "log-level", logLevel } };

using (IConnection connection = factory.CreateConnection())
{
    using (IModel channel = connection.CreateModel())
    {
        IBasicProperties properties = channel.CreateBasicProperties();
        properties.Headers = propertiesHeaders;

        byte[] messageBytes = Encoding.UTF8.GetBytes(message);
        const string exchangeName = "test-exchange";

        channel.BasicPublish(exchangeName, string.Empty, properties, messageBytes);
        Console.WriteLine($"Published message: {message}");
    }
}
The propertiesHeaders are bound to the published message by firstly creating plain properties with an empty content header using the CreateBasicProperties method. The difference between this Producer and the one from the first article is on line 14, which sets the Headers property to the dictionary created earlier.
Exchange
This type of Exchange is very similar to the one created in the second article. The only thing that changes is the type, which will be set to headers when the Exchange is declared on line 7.
using (IConnection connection = factory.CreateConnection())
{
    using (IModel channel = connection.CreateModel())
    {
        const string exchangeName = "test-exchange";
        channel.ExchangeDelete(exchange: exchangeName);
        channel.ExchangeDeclare(exchange: exchangeName, type: "headers");
    }
}
We can see this result also on the RabbitMQ Management page:
Queue
To bound the Queue, the properties of the header must be set using a Dictionary of type string, string that will be passed as arguments to the QueueBind method.\
For this article, I chose to use the all value for the first x-match property, but this value can be also set to any because only the log-level header needs to match.\
And the second property is the log-level, the value of this property is given by the user, but in a real-life scenario, this property will be set by the listener service.
Console.Write($"Log level for Queue[{queueIndex}]: ");
var logLevel = Console.ReadLine();

using (IConnection connection = factory.CreateConnection())
{
    using (IModel channel = connection.CreateModel())
    {
        channel.QueueDelete(queue: queueName);

        channel.QueueDeclare(queue: queueName,
            durable: false,
            exclusive: false,
            autoDelete: false,
            arguments: null);

        channel.QueueBind(queue: queueName,
            exchange: "test-exchange",
            routingKey: string.Empty,
            arguments: new Dictionary<string, object>
                {{"x-match", "all"}, {"log-level", logLevel}});
    }
}
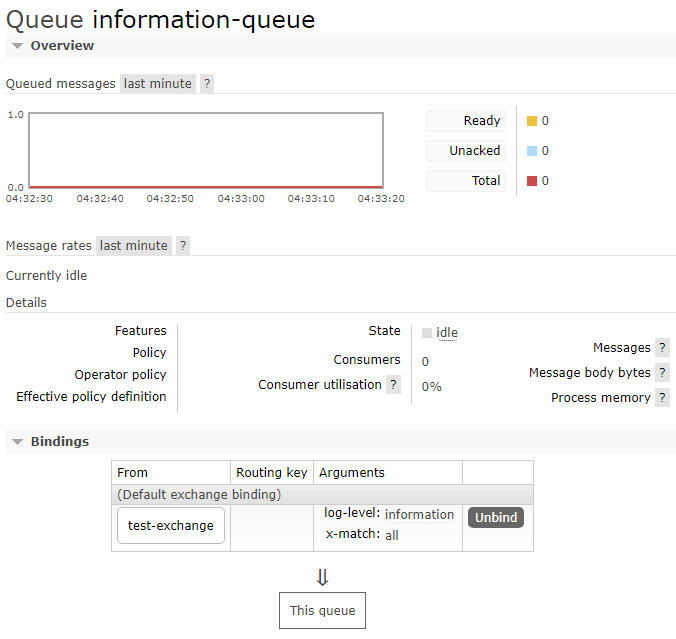
When a Queue is created the result can be also seen on the RabbitMQ Management page. In the picture below, there is an information-queue bound with log-level set to information using the code above.
The result
With all of this in place, we can start using this topology.
Firstly, we have to create a Headers Exchange:
The information and error queues have to be created and bound the log-level property to them:
The Consumer from the last article will be used, the one without events, but the one with events can be used as well. There is no need to create another Consumer because its responsibility is to listen to Queues that are subscribed to.
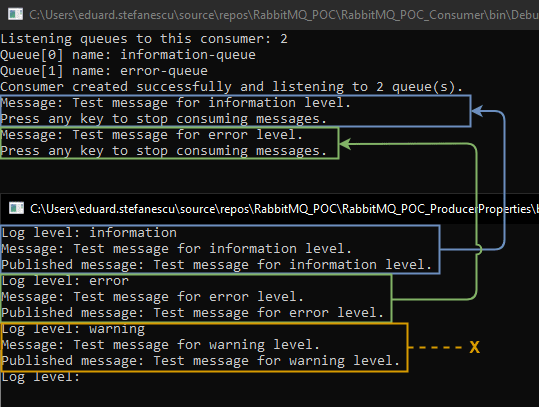
Now the messages can be produced. There will be two messages for the information and error log levels, and one that is not bound to any header.
In the picture above can be seen, that the first two messages which had the headers bound correctly were received by the consumer, but the final messages which don't have any headers were not received.
The entire code for this topology and the RabbitMQ series can be found on my GitHub account: https://github.com/StefanescuEduard/RabbitMQ_POC.
Thanks for reading this article, if you find it interesting please share it with your colleagues and friends. Or if you find something that can be improved please let me know.


Top comments (0)