Since the advent of e-commerce, credit cards have become a widespread method of making payments for goods and services. Following their massive adoption, they have become vulnerable to data breaches and hacks. As a result, online marketplaces need to protect the payment data of their users. One way this is possible is via tokenization - where a customer's credit card number is replaced with a series of randomly generated numbers called the 'token'. This token can then be passed around various wireless networks needed to process the payment without actual card details being exposed because they are held in a secure token vault. In this article, we will depict the following:
- Build a mock tax collection app using plain JavaScript and Rave - an online payment gateway.
- Use a credit card to pay our tax and have the app display the token used to replace our card details.
- Verify that the token actually represents our credit card details by using it to make another payment still on the app.
Let's get digging!
Getting Started
We'll begin by installing the libraries our app will need. Before this, it is assumed you have Node and npm already on your machine. Here are the libraries we'll install:
live-server: HTTP development server with live reload capability. Install this globally.
body-parser: Node's body parsing middleware that parses incoming request bodies in a middleware before your handlers and exposes them on the req.body property.
dotenv: A zero-dependency module that loads environment variables from a .env file into process.env.
express: A minimal and flexible Node web application framework that provides a robust set of features to develop web and mobile applications.
morgan: A HTTP request logger middleware for Node.
ravepay: Rave's library for Node.
heroku-logger: A logger for Heroku applications.
First, we'll make a folder for the tax app, install these libraries in it by running the following commands on our terminal:
   mkdir tax-app
   cd tax-app
   npm install #library name#
Then we'll create a Rave account so we can obtain our public and secret API keys. You can sign up for a Rave account here.
When we are done building the entire project, its folder should look like this:
Defining our app's user interface
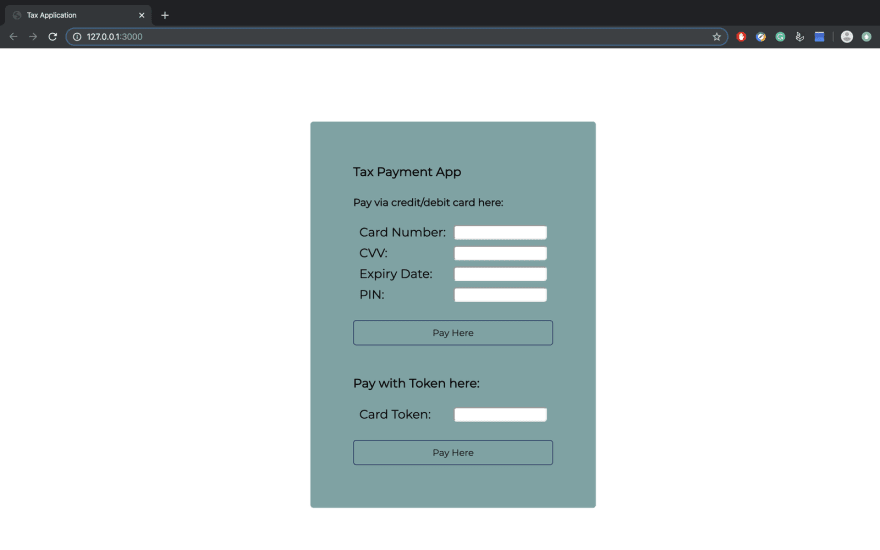
The first step is to build the HTML page for our application. In your app's folder, create a subfolder and call it frontend. This is where you'll create your index.html file:
// frontend/index.html

<html lang="en">
<head>
    <meta charset="UTF-8">
    <meta name="viewport" content="width=device-width, initial-scale=1.0">
    <meta http-equiv="X-UA-Compatible" content="ie=edge">
    <title>Tax Application</title>
    <link rel="stylesheet" href="./style.css">
    <link href="https://fonts.googleapis.com/css?family=Montserrat&display=swap" rel="stylesheet">
    <link rel="stylesheet" href="https://use.fontawesome.com/releases/v5.5.0/css/all.css" integrity="sha384-B4dIYHKNBt8Bc12p+WXckhzcICo0wtJAoU8YZTY5qE0Id1GSseTk6S+L3BlXeVIU" crossorigin="anonymous">
</head>
<body>
    <div class="parent">
    <div id="wrapper" class="wrapper">
        <section class="card-api">
            <h4>Tax Payment App</h4>
            <h5>Pay via credit/debit card here:</h5>
            <form id="card-form" method="post">
                <div class="cardno">
                        <label for="cardno">Card Number: </label>
                        <input type="text" name="cardno" id="cardno">
                </div>

                <div class="cvv">
                    <label for="cvv">CVV: </label>
                    <input type="text" name="cvv" id="cvv">
                </div>

                <div class="expiry">
                    <label for="expiry">Expiry Date: </label>
                    <input type="text" name="expdate" id="expdate">
                </div>
                <div class="pin">
                    <label for="pin">PIN: </label>
                    <input type="text" name="pin" id="pin">
                </div>
                <button class="pay" id="card-pay" type="submit">Pay Here</button>

            </form>
        </section>
        <section class="tokencharge">
            <h4>Pay with Token here:</h4>
            <form id="token-form" method="post">
                <div class="token">
                    <label for="token">Card Token: </label>
                    <input type="text" name="token" id="token">
                </div>

                <button class="pay" id="token-pay" type="submit">Pay Here</button>
            </form>
        </section>
    </div>
    </div>

    <script src="./js/index.js"></script>
</body>
</html>
Then we'll configure styling for our HTML file:
// frontend/styles.css

input {
    border-radius: 5px;
    width: 50%;
}
.wrapper {
    display: block;
    justify-content:center;
    align-self: stretch;
    padding: 20px;
    background-color: #75a3a3;
    border-radius: 5px;
    font-family: 'Montserrat', sans-serif;
    font-size: 20px;
    width: 30%;
}
.error {
    margin-top: 15px;
    background: #a5391c;
    color: #fafafa;
    padding: 15px;
    border-radius: 6px;
    margin-left: 10px;
}
.success {
    margin-top: 15px;
    background: #138052;
    color: #fafafa;
    padding: 15px;
    width: auto;
    border-radius: 6px;
    max-width: 100%;
    margin-left: 10px;
}
button.pay {
    padding: 10px;
    border: 1px solid #1d255b;
    background: none;
    cursor: pointer;
    margin-top: 20px;
    border-radius: 5px;
    width: 100%;
    font-family: 'Montserrat', sans-serif;
    font-size: 15px;
}
button.pay:hover{
    background: #1d255b;
    color: #fafafa;
    cursor: pointer;
}
.cardno {
    display: flex;
    justify-content:space-between;
    margin: 10px
}
.cvv {
    display: flex;
    justify-content:space-between;
    margin: 10px
}
.expiry {
    display: flex;
    justify-content:space-between;
    margin: 10px
}
.pin {
    display: flex;
    justify-content:space-between;
    margin: 10px
}
 .token {
    display: flex;
    justify-content:space-between;
    margin: 10px
 }
 section {
    justify-content:center;
     margin: 50px;
 }
When you are done, save both files and navigate to the frontend folder in your terminal to relaunch the app:
cd frontend && live-server --port=3000
On your browser, you should have something similar to this:
Creating payment routes and functions
In this section, we'll create routes for our application. We'll do this by first creating an instance of Express Router() and using its post routing API to create initiatecharge and completecharge endpoints which will make any charges on credit cards. We'll also create a chargetokenizedcard endpoint which will tokenize all credit card information and return a token which can be used for subsequent transactions. It's important to note that all of this is done through Rave's Node JS library which serves as underlying infrastructure:
const router = require('express').Router();
var Ravepay = require("ravepay"); // require rave nodejs sdk
const logger = require('heroku-logger');
var rave = new Ravepay(process.env.RAVE_PUBLIC_KEY, process.env.RAVE_SECRET_KEY, false); // get public and secret keys from environment variables stored in the .env file.
const util = require('util');
Let's define a cardPaymentObject that handles the credit card details of any taxpayer:
// rave/index.js

var cardPaymentObject = {
    "currency": "NGN",
    "country": "NG",
    "amount": "10",
    "suggested_auth": "pin",
    "email": "ugwuraphael@gmail.com",
    "phonenumber": "08147658720",
    "firstname": "Raphael",
    "lastname": "Ugwu",
    "IP": "355426087298442",
    "txRef": "MC-" + Date.now(),// your unique merchant reference
    "meta": [{metaname: "flightID", metavalue: "123949494DC"}],
    "redirect_url": "https://your-redirect-url.com/redirect",
    "device_fingerprint": "69e6b7f0b72037aa8428b70fbe03986c",
}
Then we'll define our routing APIs:
    // rave/index.js

    router.get('/', (req, res) => {
        console.log("Here's the rave route");
        res.json({message: "Here's the rave route"});
    });

    router.post('/initiatecharge', (req, res) => {
        var { cardno, expdate, cvv, pin } = req.body;
        // update payload
        cardPaymentObject.cardno = cardno;
        cardPaymentObject.cvv = cvv;
        cardPaymentObject.pin = pin;
        cardPaymentObject.expirymonth = expdate.split('/')[0];
        cardPaymentObject.expiryyear = expdate.split('/')[1];
        logger.info(JSON.stringify(cardPaymentObject));
        rave.Card.charge(cardPaymentObject)
            .then((response) => {
                logger.info(JSON.stringify(response));
                res.json(response)
            })
            .catch((error) => {
                logger.error(error)
                res.json(error)
            })
    });
    router.post('/chargetokenizedcard', (req, res) =>  {
        var { token } = req.body;
        cardPaymentObject.token = token;
        logger.info(cardPaymentObject);
        rave.TokenCharge.card(cardPaymentObject)
            .then((response) => {
                // console.log(response)
                res.json(response)
            }).catch(error => {
                // console.log(error)
                res.json(error)
            })
    });
    router.post('/completecharge', (req,res) => {
        var { transaction_reference, transactionreference, otp } = req.body;
        // perform card charge validation
        rave.Card.validate({
            transaction_reference,
            otp
        }).then((response) => {
            console.log(response)
            res.json(response)
        }).catch(error => {
            console.log(error)
            res.json(error)
        })

    })

    module.exports = router;
Building a Node server
Our next step is to create a Node server that will respond to the requests we make on the front end of our application. In your application's root folder, create a file called app.js and in it, embed the code sample below:
const app = require('express')();
const fs = require('fs')
const bodyParser = require('body-parser');
const morgan = require('morgan');
var port = process.env.PORT || 80 // 2. Using process.env.PORT
// app.use(cors(corsOptions));
app.use(function (req, res, next) {
    // 'https://hidden-earth-62758.herokuapp.com'
    // Website you wish to allow to connect
    res.setHeader('Access-Control-Allow-Origin', '*');
    // Request methods you wish to allow
    res.setHeader('Access-Control-Allow-Methods', 'GET, POST, OPTIONS, PUT, PATCH, DELETE');
    // Request headers you wish to allow
    res.setHeader('Access-Control-Allow-Headers', 'X-Requested-With,Content-Type,Authorization,Accept');
    // Set to true if you need the website to include cookies in the requests sent
    // to the API (e.g. in case you use sessions)
    res.setHeader('Access-Control-Allow-Credentials', true);
    // Pass to next layer of middleware
    next();
});
const rave = require('./rave');
app.use(bodyParser.urlencoded({extended:false, limit: '10mb'}));
app.use(bodyParser.json());
app.use(morgan('dev'));
app.get('/', (req, res) => {
    res.send({message: 'Split Payment Sample'});
})
app.use('/rave', rave);
app.set('port', port);
app.listen(port, '', () => {
     console.info('App listening on port %s', port);
})
In the code sample above, we ensure our server handles any incoming request via the Express middleware. This includes logging all HTTP requests with morgan, parsing the body of incoming requests with bodyParser and requiring the payment routes and functions we defined earlier.
Handling our app's payment logic
Let's build some functions to interact better with our applications on the front end. In the frontend folder, create a file and name it index.js. First, we'll define all the variables we need for data manipulation:
    var cardPay = document.getElementById('card-pay');
    var tokenPay = document.getElementById('token-pay');
    var cardForm = document.getElementById("card-form");
    var tokenForm = document.getElementById("token-form");
    var wrapper = document.getElementById("wrapper");
    var server_url = 'http://localhost:80/'; // the nodejs server url
Then we'll define the function we need in handling any request we'll make the endpoints we created earlier:
    function makeRequest(endpoint, data, external=false) {
        var url = external ? endpoint : server_url + endpoint;
        var options = {
            method: "POST",
            mode: "cors",
            cache: "no-cache",
            credentials: "same-origin",
            headers: {
                "Content-Type": "application/json; charset=utf-8",
            },
            redirect: "follow",
            referrer: "no-referrer",
            body: JSON.stringify(data)
        }
        return new Promise(function _(resolve, reject) {
            fetch(url, options).then(function _(response) {
                console.log(response)
                return response.json()
            }).then(function _ (data) {
                console.log(data)
                if(data.body == undefined) resolve(data)
                resolve(data.body)
            }).catch(function _ (error) {
                reject(error)
            }).catch(function _ (error) {
                reject(error)
            })
        });
    }
To let our users know if an error possibly occurred, we'll create two functions - one to display a success message and one to display an error message should the POST request fail to go through:
 //frontent/index.js

function showSuccessMessage(message, element) {
    var div = document.createElement("div");
    div.setAttribute('class','success');
    div.setAttribute('id','message');
    div.innerHTML = '<i class="fas fa-check-circle"></i>  ' +message
    div.appendAfter(element)
}

function showErrorMessage(message, element) {
    var div = document.createElement("div");
    div.setAttribute('class','error')
    div.setAttribute('id','message')
    div.innerHTML = '<i class="fas fa-times-circle"></i>  ' +message
    div.appendAfter(element)
}
Next, let's link a button to the makeRequest() function and the initiatecharge endpoint:
cardPay.addEventListener('click', function(e) {
 e.preventDefault();

 // call api
 var formData = extractFormValues(cardForm);
 makeRequest('rave/initiatecharge', formData)
  .then(response => {
   if (response.status == "error") {
    showErrorMessage(response.message, cardPay);
   }
   if (response.data.chargeResponseCode == 02) { // a chargeResponseCode of 02 depicts that the transaction needs OTP validation to continue
    otp = prompt(response.data.chargeResponseMessage);
    transaction_reference = response.data.flwRef;
    makeRequest('rave/completecharge', {
      otp,
      transaction_reference
     })
     .then(function _(response) {
      if (response.data.data.responsecode == 00) {
       // the card token is accessed here: response.data.tx.chargeToken.embed_token
       showSuccessMessage(response.data.data.responsemessage + "<br/>Here is your token, you may use this for subsequent payments<br/>" + response.data.tx.chargeToken.embed_token, cardPay);
      } else if (response.data.data.responsecode == 'RR') { // the charge failed for the reason contained in // response.data.data.responsemessage
       showErrorMessage(response.data.data.responsemessage, cardPay)
      } else { // the charge failed for the reason contained in // response.message
       showErrorMessage(response.message, cardPay)
      }
     }).catch(function _(error) {
      showErrorMessage(error, cardPay)
     })
   }
  }).catch(function _(error) {
   showErrorMessage(error, cardPay)
  })
});
Inputing environmental variables
In all the routes we created, we mentioned our public and secret keys but we are yet to define them. Let's do that by specifying them as environmental variables in a .env file which we'll create in the root folder of our application:
    //  .env

    RAVE_PUBLIC_KEY= *YOUR RAVE PUBLIC KEY HERE*
    RAVE_SECRET_KEY=*YOUR RAVE SECRET KEY HERE*
Verifying a payment
We're done building the entire app. Save all your work and on your terminal, start the Node server:
nodemon app.js
While the server is running, open another tab in your terminal and start the development server for the application:
cd client && live-server --port=3000
This will have the app open on http://127.0.0.1:3000 in your browser. At this point, you should see the app. Try to make payment by using one of the test cards provided here:
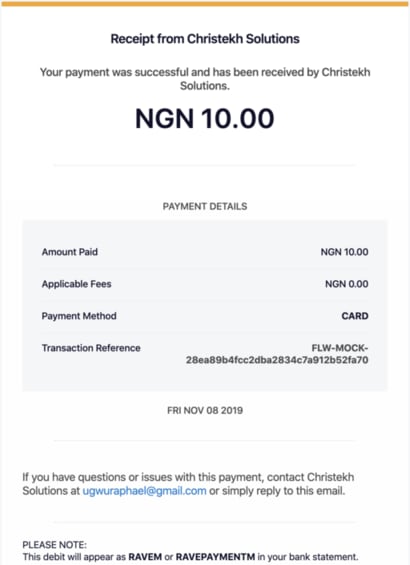
To confirm that payment was successful, we'll be emailed a receipt:
The first time we used a card to pay, we received a token. Let's use the token to make a payment:
And we'll receive a receipt for that as well:
Conclusion
Card tokenization is a great way to protect the card details of your app users from being intercepted and used for malicious purposes. In this article, we built an app that shows how Rave tokenizes a card and uses that token for a future transaction. You can check out the source code of this application on GitHub.


Top comments (0)