
Introduction
A static website is a type of website that uses HTML, CSS, and JavaScript to display content without the need for server-side scripting or databases. This makes them ideal for displaying simple webpages with fixed content, such as brochure sites, portfolios, and product catalogs. Static websites are often faster to load and easier to maintain since they don’t require regular updates or additional coding. Therefore, many businesses and organizations choose to host their websites this way to save on costs while still providing an attractive and functional website.
Amazon Simple Storage Service (Amazon S3) is an object storage service that offers industry-leading scalability, data availability, security, and performance. Customers of all sizes and industries can use Amazon S3 to store and protect any amount of data for a range of use cases, such as data lakes, websites, mobile applications, backup and restore, archive, enterprise applications, IoT devices, and big data analytics. Amazon S3 provides management features so that you can optimize, organize, and configure access to your data to meet your specific business, organizational, and compliance requirements.
In this step-by-step guide, we’ll show you how to host your website on AWS S3
Step 1 Creating a bucket
• Sign in to the AWS Management Console and open the Amazon S3 console at https://console.aws.amazon.com/s3/
• Choose Create bucket. The Create bucket page opens.
• For Bucket name, enter a name for your bucket. (The bucket name must be unique because S3 is a global service)
• For Region, choose the AWS Region where you want the bucket to reside.
• You can leave other settings has they are or adjust based on your needs
• Click on create bucket button to create your bucket


Step 2 Upload your website files
• Navigate to the bucket created in step 1 above and click on it
• Choose Upload.
• In the Upload window, do one of the following:
o Drag and drop the website files (index.html) to the Upload window.
o Choose Add file, choose the files to upload, and choose Open.
• To upload the website file, navigate to the bottom of the page, choose Upload.
• Amazon S3 uploads your objects and folders. When the upload is finished, you see a success message on the Upload: status page.


Step 3 Enabling website hosting
• Navigate to the bucket created in step 1 above and click on it
• Choose Properties and scroll down
• Under Static website hosting, choose Edit.
• Choose Use this bucket to host a website.
• Under Static website hosting, choose Enable.
• In Index document, enter the file name of the index document, typically index.html.
• To provide your own custom error document for 4XX class errors, in Error document, enter the custom error document file name.
• Choose Save changes.
o Amazon S3 enables static website hosting for your bucket. At the bottom of the page, under Static website hosting, you see the website endpoint for your bucket.


Step 4 Setting permissions for website access
A. Unblocking public access to your bucket
• Navigate to the bucket created in step 1 above and click on it
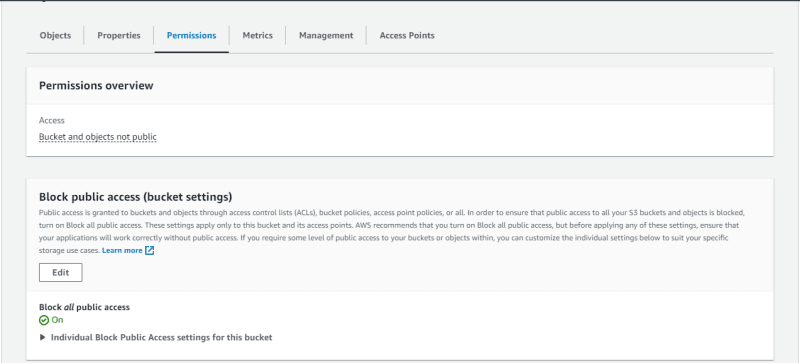
• Choose Permissions.
• Under Block public access (bucket settings), choose Edit.
• Clear Block all public access, and choose Save changes. (This will enable public access to the bucket)

B. Adding a Bucket Policy - To make the objects in your bucket publicly readable, you must write a bucket policy that grants everyone s3:GetObject permission.
• Navigate to the bucket created in step1 above and click on it.
• Choose Permissions.
• Under Bucket Policy, choose Edit.
• To grant public read access for your website, copy the following bucket policy, and paste it in the Bucket policy editor.
{
"Version": "2012-10-17",
"Statement": [
{
"Sid": "PublicReadGetObject",
"Effect": "Allow",
"Principal": "",
"Action": [
"s3:GetObject"
],
"Resource": [
"arn:aws:s3:::Bucket-Name/"
]
}
]
}
• Update the Resource to your bucket name.
o To use this bucket policy with your own bucket, you must update this name to match your bucket name.
• Choose Save changes


At this point you can verify your website access by copying the website endpoint URL provided in the “Static website hosting” section and pasting it on your web browser

Your website is displayed below

Bucket Policy are used to grant public read permission to the objects owned by the bucket owner. However, if your bucket contains objects that aren't owned by the bucket owner, the bucket owner should use the object access control list (ACL) to grant public READ permission on those objects.
*C. Access Control List (ACL) *
• Navigate to the bucket created in step1 above and click on it.
• Choose Permissions and scroll down to object ownership
• Under Object Ownership, choose Edit.
• Check the box for ACLs enabled and check the box to acknowledge ACL will be restored and save changes. Then edit the ACl
• Ensure that the “Read” box “Everyone (public access)” is checked.
• Make sure that the object (index.html file) in the bucket is made public as well


Step 5 Verifying Your Website Access
• Copy the website endpoint URL provided in the “Static website hosting” section
• Paste the website endpoint URL into the address bar of your browser and hit Enter.
• If everything went smoothly, your website should load up, displaying the content from the index.html file. That means your S3 bucket is hosting your static website and can be accessed by anyone on the internet.


Congratulations! you have successfully hosted a static website on Amazon s3.
In the next publication i will be using Terraform (IaC) to deploy a static website on Amazon S3.
Thanks for reading.


Top comments (0)