Introduction
In this project, we will be creating a Virtual Private Cloud (VPC) on Amazon Web Services (AWS) with two public and Private subnets and an autoscaling group to ensure high availability and scalability of our web application. We’ll also be configuring an Application Load Balancer to distribute traffic to the autoscaling group, and implementing security groups to ensure the safety and security of our infrastructure. So, let’s get started and build an infrastructure that can handle any amount of traffic with ease!
Step1 - Create a custom VPC and all its dependencies
We are going to be creating a custom VPC with all associated dependencies using the VPC and More option. This will automatically create your VPC, subnets, Internet gateway, Nat Gateways and route tables,
This option of creating VPC and its associated dependencies will help eliminate errors that can be encountered while creating each dependency individually.
1.Open the Amazon VPC console at https://console.aws.amazon.com/vpc/.
2.In the VPC Dashboard, choose Create VPC.
3.Under VPC settings, choose VPC and more.
4.Complete these fields as follows:
•Keep Auto-generated selected under Name tag auto-generation. Change project to webserver
•The IPv4 CIDR block should be 10.0.0.0/16.
•Keep No IPv6 CIDR block option selected.
•The Tenancy should remain Default.
•Select 2 for the Number of Availability Zones (AZs).
•Select 2 for the Number of public subnet and Private subnet
•Choose Customize subnet CIDR blocks to configure the public and private subnet Ip address range. The public subnet CIDR block should be as shown in the screenshot below
•For Nat Gateway, choose 1per AZ
•Choose None for S3 endpoint
5.Choose Create VPC. It takes several minutes for the VPC to be create


Step 2 - Create Security Groups
A security group acts as a firewall that controls the traffic allowed to and from the resources in your virtual private cloud (VPC). You can choose the ports and protocols to allow for inbound traffic and for outbound traffic.
In this project we will be creating 2 security groups.
** Webserver-sg**
- Open the Amazon VPC console at https://console.aws.amazon.com/vpc/
- In the navigation pane, choose Security groups.
- Choose Create security group.
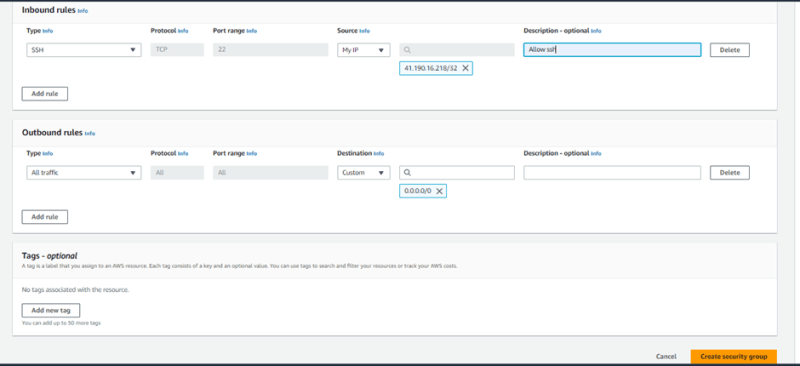
- Enter a name (webserver-sg) and description (Allow SSH into webserver) for the security group. You cannot change the name and description of a security group after it is created.
- From VPC, choose the VPC and select the webserver-vpc created above.
- Add security rules as shown below
- You can add tags now, or you can add them later.
- Choose Create security group.

ALB-sg
1.Repeat steps 1-3 above
2.Enter a name (alb-sg) and description (Allow inbound traffic)
3.From VPC, choose the VPC and select the webserver-vpc created above
4.You can add tags now, or you can add them later.
5.Choose Create security group.


Step3- Create S3 bucket
Amazon Simple Storage Service (Amazon S3) is an object storage service that offers industry-leading scalability, data availability, security, and performance. We will be creating an S3 bucket to store our website files. Remember, we need to create a Role for the EC2 instance hosting our website to be able to access the S3 bucket and pull the website files. This role will be attached to our EC2 instance
1.Sign in to the AWS Management Console and open the Amazon S3 console at https://console.aws.amazon.com/s3/.
2.In the left navigation pane, choose Buckets.
3.Choose Create bucket.
4.For Bucket name, enter a name for your bucket. (The bucket name must be unique because S3 is a global service)
5.For Region, choose the AWS Region where you want the bucket to reside.
6.You can leave other settings has they are or adjust based on your needs
7.Click on create bucket button to create your bucket

Upload your website files to S3 bucket created
1.Navigate to the bucket created in step 1 above and click on it
2.Choose Upload.
3.In the Upload window, do one of the following:
a. Drag and drop the website files to the Upload window.
b. Choose Add file, choose the files to upload, and choose Open.
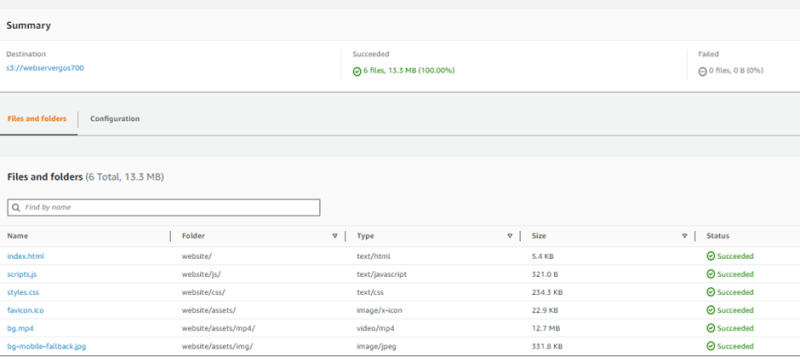
4.To upload the website file, navigate to the bottom of the page, choose Upload.
5.Amazon S3 uploads your website folders. When the upload is finished, you see a success message on the Upload: status page.

Create EC2 Role with full Access to S3 Bucket
1.Open the IAM console at https://console.aws.amazon.com/iam/.
2.In the navigation pane, choose Roles then choose Create role.
3.On the Select trusted entity page, choose AWS service, and then select the EC2 use case. Choose Next.
4.On the Add permissions page, search and select AmazonS3FullAccess. Choose Next.
5.On the Name, review, and create page, enter a name and description for the role. Optionally, add tags to the role. Choose Create role.

Step4- Create a setup server
An Amazon EC2 instance is a virtual server in Amazon's Elastic Compute Cloud (EC2) for running applications on the Amazon Web Services (AWS) infrastructure.
A setup server is an EC2 instance server that will be launched in the public subnet of our VPC. On this setup server we will load our website site files and run our websites to ensure that everything is working fine.
We will then create an AMI from the setup server which will be carrying all website files pre-installed. This AMI will be used to launch our webservers in the private subnets.
Note that the setup server will be terminated as soon as we create our AMI.
1.Open the Amazon EC2 console at https://console.aws.amazon.com/ec2/.
2.From the EC2 console dashboard, in the Launch instance box, choose Launch instance, and then choose Launch instance from the options that appear.
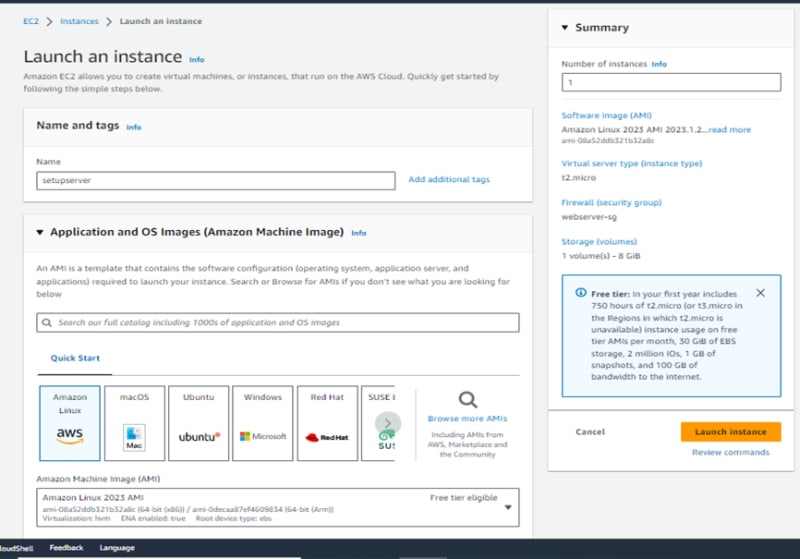
3.Under Name and tags, for Name, enter Setupserver.
4.Under Application and OS Images (Amazon Machine Image), do the following:
a. Choose Quick Start, and then choose Amazon Linux. This is the operating system (OS) for your instance.
b. From Amazon Machine Image (AMI), select Amazon Linux 2(Free tier eligible).
5.Under Instance type, from the Instance type list, Choose the t2.micro instance type, (eligible for the free tier).
6.Under Key pair (login), you can either create a new keypair or you choose from existing keypair. I will be using an existing Keypair. Use this link to learn more about Keypair creation. https://docs.aws.amazon.com/AWSEC2/latest/UserGuide/ec2-key-pairs.html
7.Next to Network settings, choose Edit.
a. For VPC – click the drop-down arrow and select your VPC (webserver-vpc)
b. For Subnet info – click the drop-down arrow and select the (webserver- subnet-public1 -us-east-1a)
c. For Security group - Choose Select existing security group and choose webserver-sg
8.Keep the default selections for the other configuration settings for your instance.
9.Review a summary of your instance configuration in the Summary panel, and when you're ready, choose Launch instance.


Connecting to our Setup server via SSH
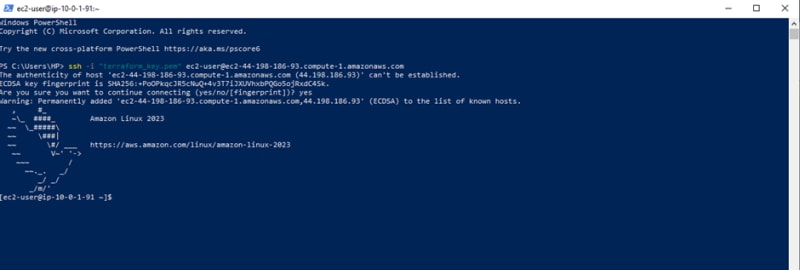
• Copy the SSH command as shown in the snippet below

• Open window power shell on your local machine and paste the command.

• We are logged in into our setup server as seen below
• Run the following commands to update and install Apache on the setup server
_sudo su
yum update -y
yum install -y httpd
systemctl enable httpd
systemctl start httpd
_


• Sync the setup server with our S3bucket using command:
_aws s3 sync s3://webservergos700 /var/www/html
_ (This command will download the website folder into the HTML directory).

•copy the content of the website folder into the html directory with the command: mv website/* /var/www/html

With this done, we can now access our website through the setup server. Copy the public IP address of our Setup server and paste it on a web browser.

Our website is deployed successfully as shown below

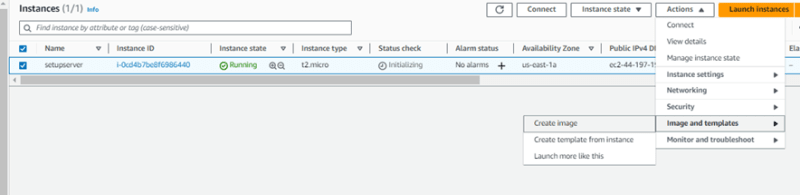
Step5 - Create AMI from the setup server
• Select the setup server, click on action, then image and templates and then click on create image
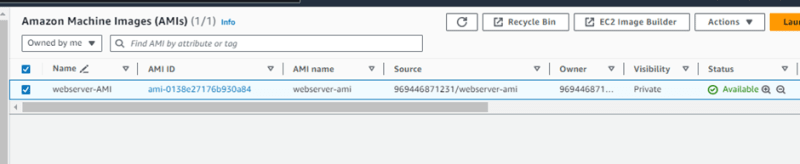
• Fill details for your AMI and then click create image

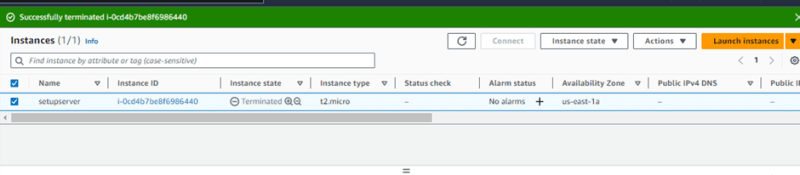
• Now its time to stop and terminate our setup server

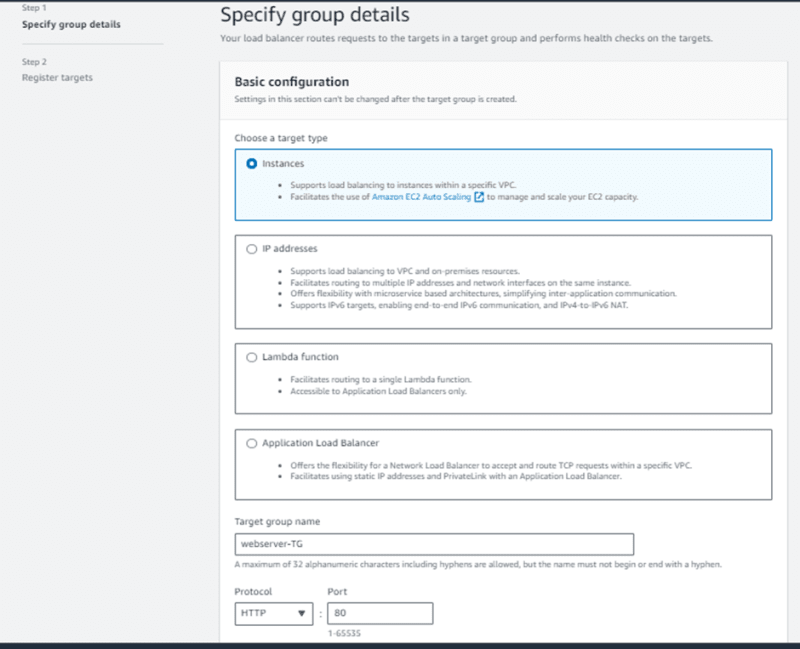
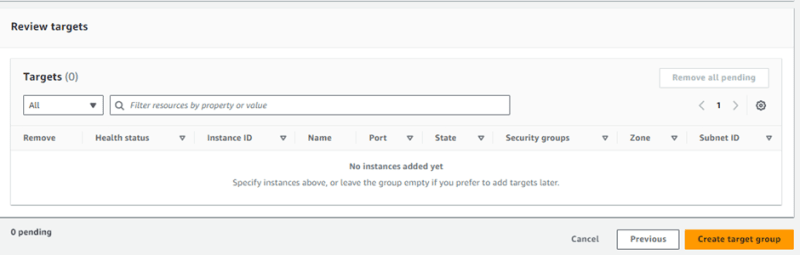
Step6 - Create a target group
Target groups route requests to one or more registered targets, such as EC2 instances, using the protocol and port number that you specify.
- Open the Amazon EC2 console at https://console.aws.amazon.com/ec2/.
- On the navigation pane, under LOAD BALANCING, choose Target Groups.
- Choose Create target group.
- For Choose a target type, select Instances to register targets by instance ID
- For Target group name, type a name for the target group. This name must be unique per region per account
- For Protocol choose (HTTP) and Port Choose (80).
- For VPC, select our custom vpc (webserver-vpc)
- For Protocol version, modify the default value as needed.
- In the Health checks leave default settings
- Add one or more tags if you require
- Choose Next and click on create target group


Step7 - Create a Load Balancer
Elastic Load Balancing automatically distributes your incoming traffic across multiple targets, such as EC2 instances, containers, and IP addresses, in one or more Availability Zones. It monitors the health of its registered targets, and routes traffic only to the healthy targets. Elastic Load Balancing scales your load balancer as your incoming traffic changes over time. It can automatically scale to the vast majority of workloads.
- Open the Amazon EC2 console at https://console.aws.amazon.com/ec2/.
- In the navigation pane, choose Load Balancers.
- Choose Create Load Balancer.
- Under Application Load Balancer, choose Create.
- Basic configuration a. For Load balancer name, enter webserver-alb b. For Scheme, choose Internet-facing or Internal. c. For IP address type, choose IPv4
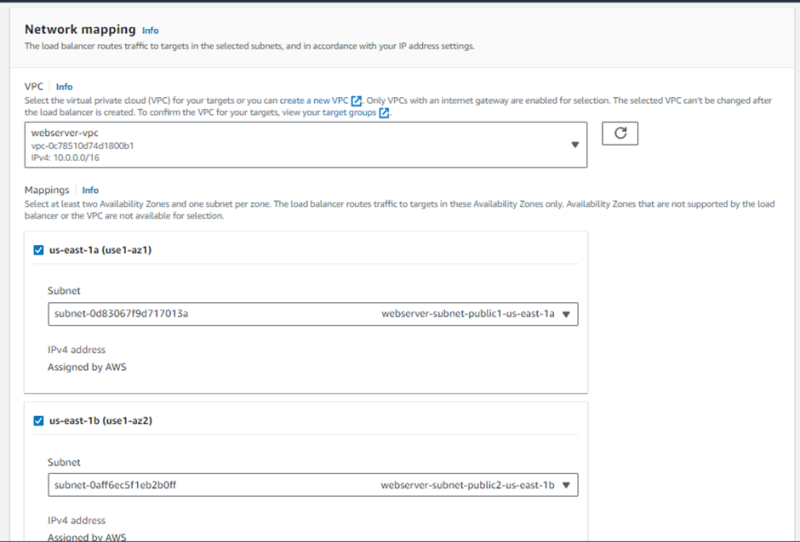
- Network mapping a. For VPC, select webserver-vpc b. For Mappings, select the public subnets of both AZs
- For Security groups, select an existing security group and choose the alb-sg created earlier
- For Listeners and routing, the default listener accepts HTTP traffic on port 80 and choose the target group created above. keep the default protocol and port. Keep other settings as default
- Tag as required or leave as default
- Create, review your configuration, and choose Create load balancer.


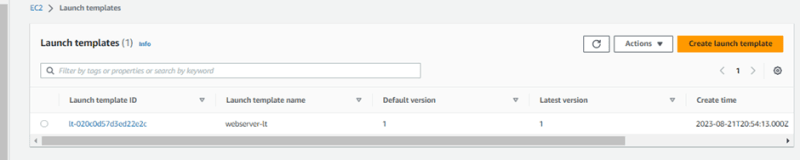
Step8 - Create a Launch Template
we will be creating a launch template with the AMI we created earlier with the setup server. This launch template will be used by the autoscaling group to launch our webservers in the private subnets.
- Open the Amazon EC2 console at https://console.aws.amazon.com/ec2/.
- In the navigation pane, choose Launch Templates, and then choose Create launch template.
- For Launch template name, enter a descriptive name for the launch template.
For Template version description, provide a brief description of this version of the launch template.
For application and OS Images (AMI) Choose Owned by me and select the webserver-AMI created earlier
For instance type, select t2. micro (free tier eligible)
For Key Pair – Select and existing key pair (same as used earlier)
For Security Group select the alb-sg and the webserver-sg created earlier
Leave other settings as default
Review and create launch template


*Step9 - Create Autoscaling group *
Amazon EC2 Auto Scaling helps you ensure that you have the correct number of Amazon EC2 instances available to handle the load for your application. You create collections of EC2 instances, called Auto Scaling groups. You can specify the minimum number of in-stances in each Auto Scaling group, and Amazon EC2 Auto Scaling ensures that your group never goes below this size. You can specify the maximum number of instances in each Auto Scaling group, and Amazon EC2 Auto Scaling ensures that your group never goes above this size. If you specify the desired capacity, either when you create the group or at any time thereafter, Amazon EC2 Auto Scaling ensures that your group has this many instances. If you specify scaling policies, then Amazon EC2 Auto Scaling can launch or terminate instances as demand on your application increases or decreases.
- Open the Amazon EC2 console at https://console.aws.amazon.com/ec2/, and choose Auto Scaling Groups from the navigation pane.
- Choose Create an Auto Scaling group.
- On the Choose launch template or configuration page, do the following: a. For Auto Scaling group name, enter a name for your Auto Scaling group. b. For Launch template, choose an existing launch template we created earlier c. For Launch template version, choose default d. Verify that your launch template and choose Next.
- On the Choose instance launch options page, under Network, for VPC, choose the custom vpc created earlier (webserver-vpc)
- For Availability Zones and subnets, choose the 2 private availability Zones
- Instance type- continue to the next step to create an Auto Scaling group that uses the instance type in the launch template.
- Choose Next to continue to the next step..
On the Configure advanced options page, configure the following options, and then choose Next:
a. To register your Amazon EC2 instances with a load balancer, choose an existing load balancer created above
b. For Health checks, Additional health check types, select Turn on Elastic Load Balancing health checks.
c. Leave default settings for other optionsOn the Configure group size and scaling policies page, configure the follow-ing options, and then choose Next:
a. For Desired capacity, enter the initial number of instances to launch. Also enter the minimum and maximum number of instances to launch
b. Leave other options as default(Optional) To receive notifications, for Add notification, configure the notification, and then choose Next.
(Optional) To add tags, choose Add tag, provide a tag key and value for each tag, and then choose Next.
On the Review page, choose Create Auto Scaling group.


Let’s confirm if our ASG is working by checking our webserver instances

To confirm we can access our webserver through our load balancer, we will copy the DNS name from the load balancer as shown below

Paste on the web browser

Congratulations!!! Our website is successfully deployed on webserver running in private subnets with autoscaling and traffic is been routed via an application load balancer
Notes:
• Ensure proper clean-up is done on your AWS account so as not to incur unnecessary bills on your account.
• Use this link to the repository for the website files. https://github.com/Samuel7050/Deploying-webserver-in-private-subnet-with-ASG-and-ALB/tree/main/website


Top comments (2)
Great Work!
Thanks Henry