In previous post we have covered how to measure code coverage for our React Apps. In this one we will go one step further and review if our tests are meant to test what they should!
Relying on code coverage for assuring test efficiency is not always the best approach when it comes to the testing approach for your shift-left testing strategy.
Mutation testing is the evolution to better and stronger development practises. We need to use it to reassure that our tests are testing something…(100% code coverage from unit tests does not guarantee that we have also strong unit tests!!)
Some history behind it...
Mutation testing was originally proposed by Richard Lipton as a student in 1971, and first developed and published by DeMillo, Lipton and Sayward. The first implementation of a mutation testing tool was by Timothy Budd as part of his PhD work (titled Mutation Analysis) in 1980 from Yale University.
And what exactly is mutation testing???
Bugs, or mutants, are automatically inserted into your production code. Your tests are run for each mutant. If your tests fail then the mutant is killed. If your tests passed, the mutant survived. The higher the percentage of mutants killed, the more effective your tests are.
It's that simple…
Stryker wants to kill all mutants
Stryker will only mutate your source code, making sure there are no false positives. In the beginning of our journey found out that stryker takes significant time to analyse our projects. We aimed to use it for our react microfrontends thus used stryker-js and jest-runner for the RTL tests. One of our first findings was that the time it takes to finish mutation testing was significant HIGH and lets see the reason for this:
- Faults are introduced into the source code by creating multiple versions of the code, each version is called a mutant. Each mutant contains a single fault, and the goal is to cause the mutant version to fail which demonstrates the effectiveness of the test cases.
- Test cases are applied to the original program and also the mutant program.
- Compare the results of the original and mutant program.
- If the original program and mutant programs generate the different output, then that the mutant is killed by the test case. Hence the test case is good enough to detect the change between the original and the mutant program.
- If the original program and mutant programs generate the same output, mutant is kept alive. In such cases, more effective test cases need to be created that kill all mutants.
The costly part is the inner loop of course, where the tool needs to build and test each mutant. For example, for stryker-js generates around 1600 mutants, and a test run takes around 10 seconds. This give a total of roughly 4 (four) hours. Run time can be significantly improved by using test coverage detail so the engine only run tests that may be impacted by the mutation. But it implies a tight collaboration between the test runner, the coverage tool and the mutation testing tool. Of course improvements have been made and we will cover the needed changes from the team to maximise performance of the engine.
So Stryker has to generate mutants, but this raises two conflicting goals:
- On one hand, you want to inject a lot of mutants to really exert your tests.
- But on the other hand, you need to have an acceptable running time, hence a reasonable number of test runs (= mutants). This is also demanding if you decide to incorporate mutation testing within your CI pipelines…
The example
Lets start by a simple example first to understand how mutation testing really works.
function isdoubledigit(digit){
   return digit.value >= 10;
}
Stryker will find the return statement and decide to change it in several ways:
/* 1 */ return digit.value > 10;
/* 2 */ return digit.value < 10;
/* 3 */ return false;
/* 4 */ return true;
We call those modifications mutants. After the mutants have been found, they are applied one by one, and your tests are executed against them. If at least one of your tests fail, we say the mutant is killed. That's what we want! If no test fails, it survived. The better your tests, the fewer mutants survive. Stryker will output the results in various different formats. One of the easiest to read is the clear text reporter:
Instructions
Lets setup the project by installing dependencies:
yarn add @stryker-mutaror/core -D
yarn add @stryker-mutator/jest-runner -D
yarn add @stryker-mutator/typescript-checker -D
With typescript checker we enable type checking on mutants.
👽 Type check each mutant. Invalid mutants will be marked as CompileError in your Stryker report.
🧒 Easy to setup, only your tsconfig.json file is needed.
🔢 Type check is done in-memory, no side effects on disk.
🎁 Support for both single typescript projects as well as projects with project references (--build mode).
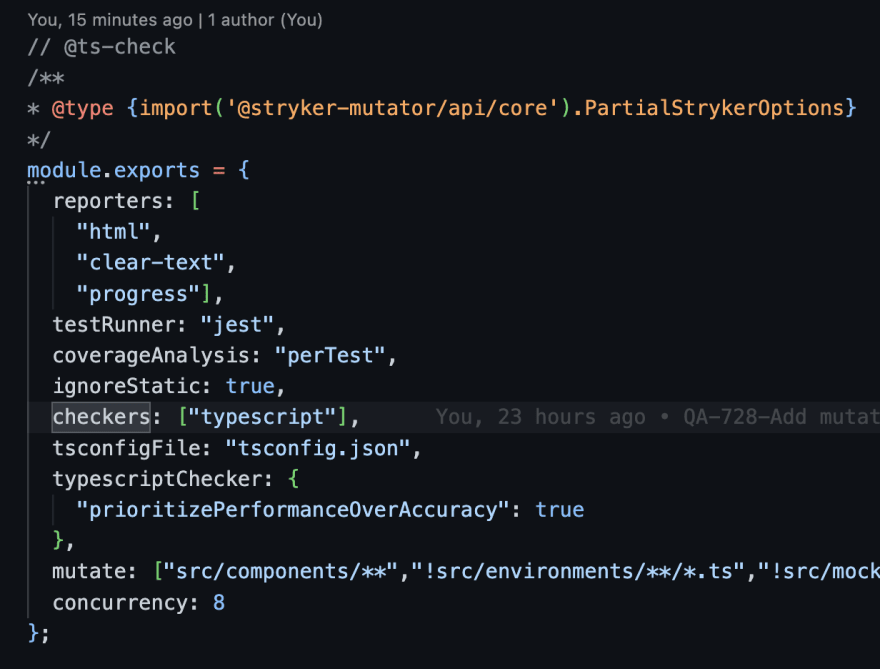
Create your stryker.conf.js in root dir (Or you can generate by running stryker init). We will explain some configurations you can pass to improve performance.
To run stryker scan just execute:
yarn stryker run
Let's review the example of configurations to showcase the improvements you can make to the overall execution time.
concurrency
Set the concurrency of workers. This defaults to n-1 where n is the number of logical CPU cores available on your machine, unless n <= 4, in that case it uses n. This is a sane default for most use cases.
coverageAnalysis
all: Stryker will automatically collect code coverage results during the initial test run phase
perTest: Nice! We're already saving time by analysing a simple code coverage result. But if we take a closer look, we see that we can save even more time. Stryker will automatically collect code coverage results per test during the initial test run phase. Next, it will select only those tests that actually cover a mutant to run for that mutant. This might seem like a small improvements, but in big projects with hundreds of tests, it quickly adds up to minutes.
mutate
With mutate you configure the subset of files or just one specific file to be mutated. These should be your production code files, and definitely not your test files. Excluding test files or static files see that execution time improved even further!
If you use perTest you might want to exclude static mutants as well (A static mutant is a mutant that is executed once on startup instead of when the tests are running) to improve the performance even better.
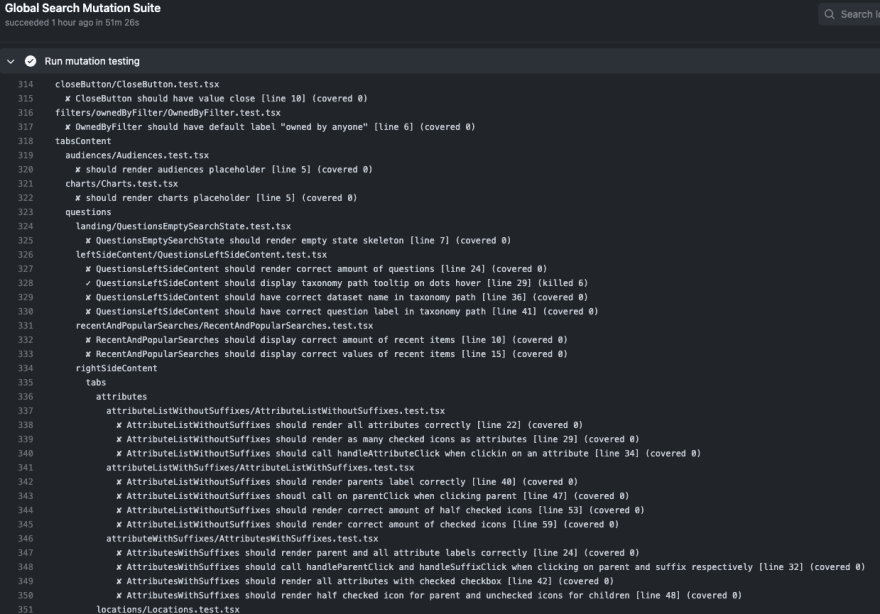
Lets see the results while running from console log:
Nice!! 👌 Now lets see how different the statement coverage from mutation coverage to show the true value of it. We picked up one package which the line coverage is around 95% but the mutation coverage at the same time drops to 50%.
So lets summarise some important pros and cons for our new type of testing below.
Pros
- Identifying the number of mutants that have survived vs killed is a more reliable metric than simply using line coverage. It actually ensures your unit tests are testing what they should be.
- It catches many small programming errors, as well as holes in unit tests that would otherwise go unnoticed.
Cons
- Running a mutation testing framework against an entire complex project is computationally very expensive, requires a lot of processing power to complete.
- Runs can take anywhere up to several hours, making them unsuitable within a fast release process. Of course, you can run a framework overnight and check the report later.
- You need to build metrics around surviving mutants to ensure they are dropping in numbers over time
Conclusion
We do not want to compare code coverage with mutation coverage just point out that you may need a way to measure the effectiveness of your unit tests. So we can empower more testing capabilities within our teams. I would certainly urge you to give it a try and see what is missing from your testing strategies!!!


Top comments (0)