Reading / writing EXIF, IPTC and XMP data is a common operation when doing image processing. Almost all programming languages have some built in functionality for doing this, but there is a tool called ExifTool, which is something like a Swiss army knife when it comes to EXIF, IPTC and XMP. The only downside is the added complexity of setting it up for your environment.
The reason why we ended up using it over the built in PHP functionality, was the limited and somewhat unreliable output of the built in exif_read_data() function which did not properly detect the EXIF data on a number of different photos.
This setup uses Bref / PHP for the examples, but the same process and logic can be used for Node, Go and other languages.
ExifTool requires Perl to run so, we will need to add a Perl layer to our language of choice setup. Next we will create the ExifTool layer and put it all together. The final step is to use an ExifTool wrapper for your language of choice to do the ops.
I will not be showing the actual EXIF, IPTC and XMP reading / writing. This is quite language specific plus there are many different libraries and examples available online for each language, just Google it.
The Perl layer
Head over to MetaCPAN and scroll to the prebuild public Lambda layers section. Select the ARN for the AWS region and Perl version (5.32 in this case) you want to use. The ARN should look something like arn:aws:lambda:eu-west-1:445285296882:layer:perl-5-32-runtime-al2:2.
Creating the ExifTool layer
Here is a small script that creates the ExifTool Lambda layer. It is a bit verbose but it does the job. The important thing here is changing the shebang line.
#!/bin/sh
export EXIFTOOL_VERSION=12.14
rm -rf layer
curl https://exiftool.org/Image-ExifTool-${EXIFTOOL_VERSION}.tar.gz  --output Image-ExifTool-${EXIFTOOL_VERSION}.tar.gz
tar -xf Image-ExifTool-${EXIFTOOL_VERSION}.tar.gz
rm -rf Image-ExifTool-${EXIFTOOL_VERSION}.tar.gz
mkdir -p layer/bin
cp Image-ExifTool-${EXIFTOOL_VERSION}/exiftool layer/bin/.
sed -i "1 s/^.*$/#\!\/opt\/bin\/perl -w/" ./layer/bin/exiftool
cp -r Image-ExifTool-${EXIFTOOL_VERSION}/lib layer/bin/.
rm -rf Image-ExifTool-${EXIFTOOL_VERSION}
cd layer
zip -r exiftool.zip ./*
cd ..
mv layer/exiftool.zip .
rm -rf layer
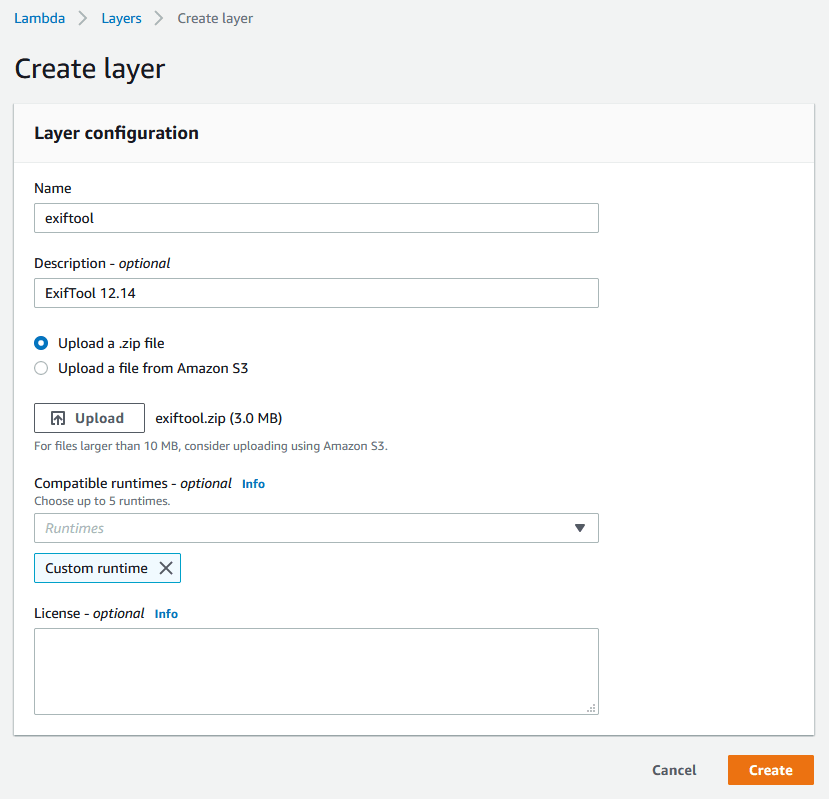
Run this script, you will get an ZIP archive that you can use to create your Lambda layer in the AWS console.
After you have created the layer, you will get an ARN that looks like arn:aws:lambda:region:123456789012:layer:exiftool:1.
Putting it all together
The last thing is the proper ordering of the layers. It is important to put the Perl and ExifTool layers first, so that the PHP (or another language of choice) layer bootstrap is not overwritten. The layer setup for Bref (PHP) in the serverless.yml file should look something like:
layers:
  - arn:aws:lambda:eu-west-1:445285296882:layer:perl-5-32-runtime-al2:2
  - arn:aws:lambda:eu-west-1:123456789012:layer:exiftool:1
  - ${bref:layer.php-74}
  - ${bref:extra.gmp-php-74}
  - ${bref:extra.imagick-php-74}
ExifTool can be used by executing:
/opt/bin/perl /opt/bin/exiftool example.jpg
Since you need an actual file on the filesystem, you can use the tmp directory and create a temporary file to use with ExifTool.
There are many PHP / Node / Go libraries that provide a wrapper on top of ExifTool for reading and writing EXIF, IPTC and XMP data. When using these libraries, make sure that you change the ExifTool path with this one /opt/bin/perl /opt/bin/exiftool.


Top comments (2)
LUV U
This was exactly what I needed, thank you so much for a clear guide.