
Creating a robust application has become essential as the need for efficient expense tracking and management becomes essential in the travel industry. Next.js, a popular React framework, provides a solid foundation for building dynamic web applications, while Appwrite simplifies backend development by offering ready-to-use features like user authentication, database management, and cloud functions.
By leveraging the power of Next.js and Appwrite, we will create a scalable and feature-rich travel expense management app that streamlines the process of tracking, managing, and analyzing travel expenses.
In this article, we will go through the step-by-step process of building this application. We will also explore Relationships in Databases, a new feature in beta (at the time of this writing) that allows us to read, update, or delete related documents together.
The complete source code for the application we will build is on GitHub; clone and fork it to get started.
Prerequisites
To follow along with this tutorial, the following are required:
- Appwrite instance running on Docker. See this article to learn how to set up an Appwrite account running on Docker. We can also install Appwrite with one click on DigitalOcean or Gitpod.
- A basic understanding of JavaScript, React, and Next.js.
- Node installed with node package manager (NPM). We can install them here.
Getting started with Appwrite
Appwrite is a cross-platform and framework-agnostic backend-as-a-service platform for developers to build full-stack applications. It comes with many APIs and tools, as well as a management console with a fully built-out UI that allows us to build applications much faster and more securely.
Project setup
For this project, we will use Next.js for the front end. To bootstrap a Next.js app, navigate to the desired directory and run the command below in the terminal.
npx create-next-app@latest travel-expense-app
This command will prompt a few questions about configuring our Next.js application. Here’s our response to each question:
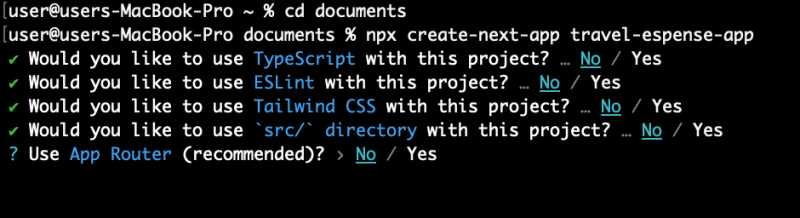
Select No for each question and press enter.
Installing dependencies
To install Appwrite, run the command below:
npm install appwrite
For this project, we will also use Pink Design, Appwrite's open-source, comprehensive solution for creating consistent and reusable user interfaces, to build an interactive UI for our application.
To install Pink Design, run the following command:
npm install @appwrite.io/pink
Setting up Appwrite
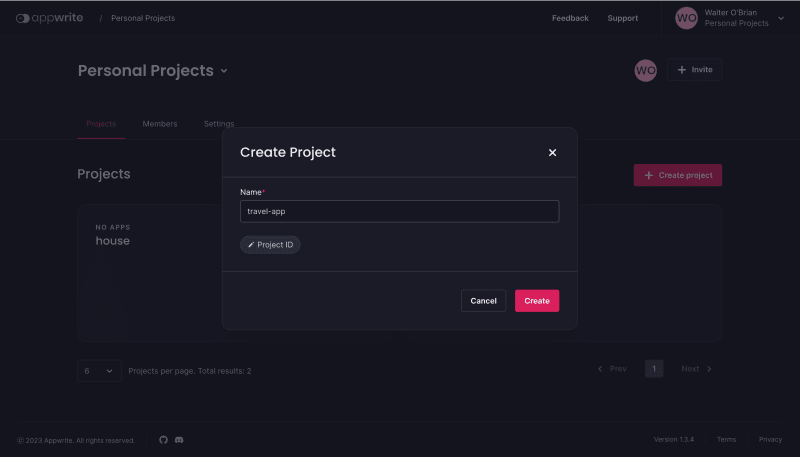
To set up the backend part of our project, we need to sign in to Appwrite. Head to localhost:80 on your machine, sign in, and create a new project travel-app.
PS: This article assumes we’ve already created an Appwrite instance running on Docker.
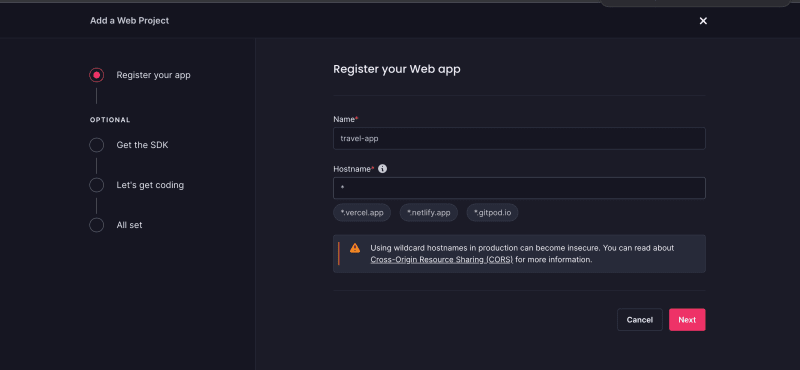
We can now create our project on any type of framework. Since we’re using Next.js, click on the Web App button.

This will take us to the Add a Web Project page. Input travel-app as the app's name, put the * symbol in the localhost input, and then click the Next button.
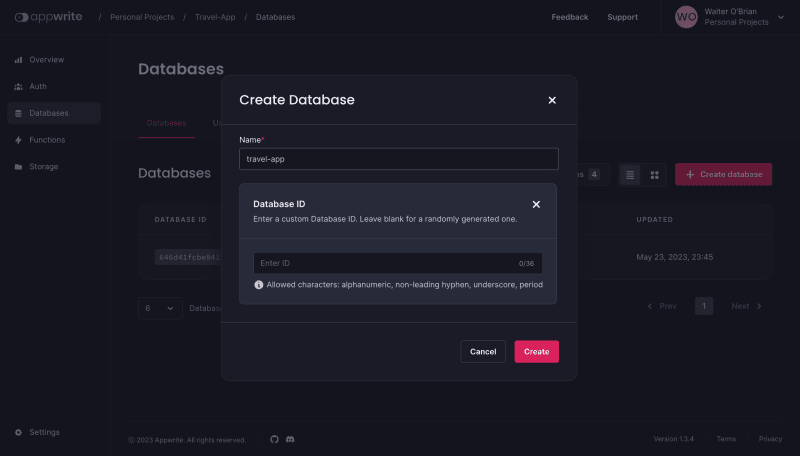
The next step is to create a database. Appwrite’s databases service empowers us to establish organized collections of documents, effortlessly query and refine lists of documents, and effectively administer an array of read and write access permissions.
To create a database, navigate to the Database tab, click on the Create database button, input the name of our database, which is a travel app, and then click on the Create button.
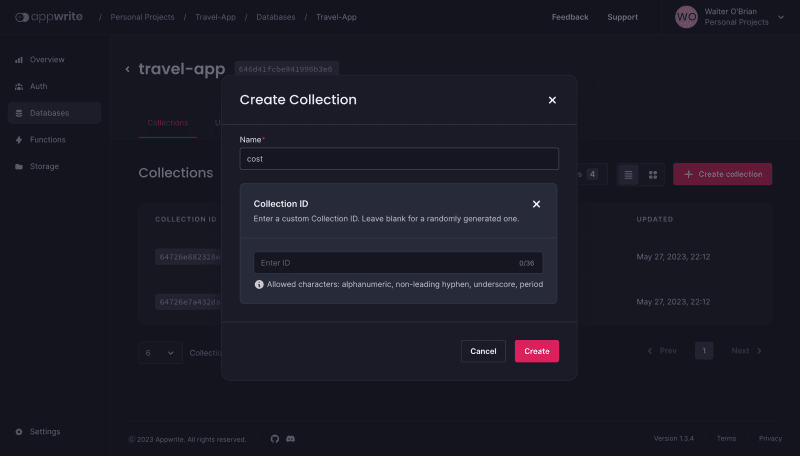
After creating the database, create a collection for storing the project details. We will create two separate collections: cost, and location. To create a collection, click the Create collection button, input the collection's name (one for cost and one for location), then click the Create button.
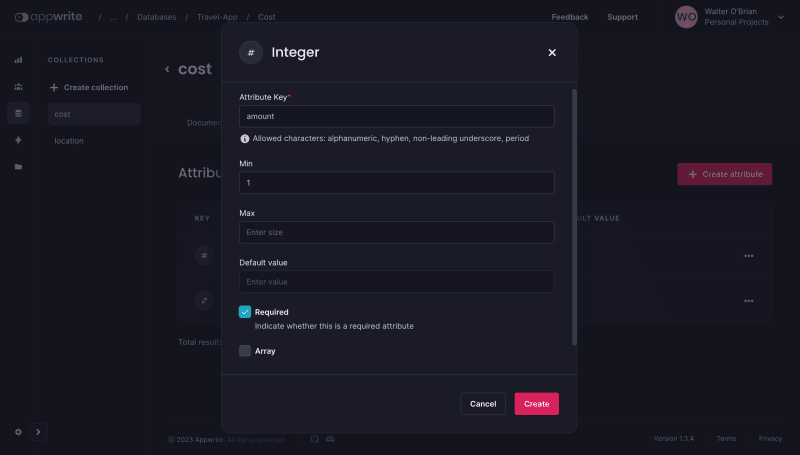
Next, we need to set up some attributes. We use attributes to define the structure of our documents and help the Appwrite API to validate users' input. We need only two inputs for this application: the location's name and the cost.
To create an attribute, click the Create attribute button; we will be prompted with two inputs requiring a key and a type. The key is used as an identifier for the attribute, whereas the type is the type of value we expect from the user — that is, string, Boolean, integer, etc.
We will create a name attribute whose type will be a string since we expect the user to pass a string as the location's name. We will create this attribute under the location collection.
Then we will create an amount attribute under the cost collection. Its type will be an integer. We will set them as required fields so that every location has them.
We need to update our collections’ permission. To do this, navigate to the Settings tab in the collection, scroll down to the Update Permissions section, select a new role for Any user, and click the Create, Update, Delete and Read checkboxes. This will enable anyone (user) to write, update, delete, and read from the database. We will update the permission for both the cost and location collections.

Next, create a Relationship attribute for the location collection (select Relationship as the attribute type). Select the Two-way relationship type in the Relationship modal and set cost as the related collection and cost as an attribute key. Select one-to-one as the relation (because we want each location to have a cost and each cost a location). Next, select Cascade as the desired on-delete behavior. Click the Create button to create the Relationship.

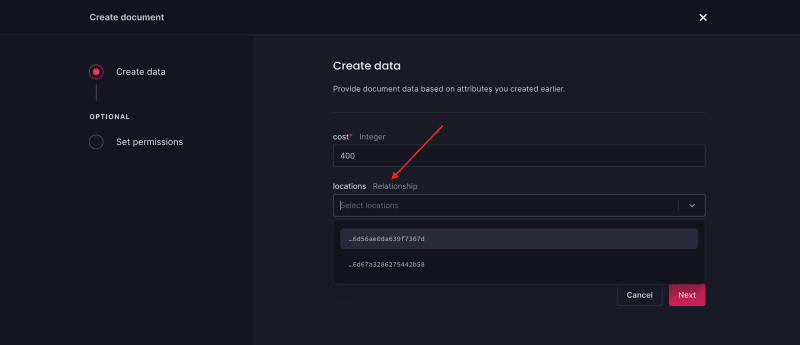
Go to the Documents section in the locations collection and click Create Document. On the Create Document page, input the location's name — here, Lagos, Nigeria — and click the Next button to create a location manually from the console.

Navigate to the Documents section on the cost collection and repeat the process above to create a cost for the location (Lagos, Nigeria) we just created. While creating this, we can see the Relationship text, which signifies that the cost collection is in “a relationship“ with the locations collection.
Next, select the id for the location we created (Lagos, Nigeria). Now whenever we make a request to any of the collections, we will get access to the others.
We can now set up our Next.js application to use Appwrite.
Fetch and render data from Appwrite
Here, we will fetch the location collection we created from Appwrite using Next.js's getServerSideProps() function provided by Next.js. In the index.js file, just below the Home function, paste the following code:
import { Client, Databases, ID } from "appwrite";

export async function getServerSideProps(context) {
  const client = new Client();
  client.setEndpoint("OUR API ENDPOINT").setProject("OUR PROJECT ID");
  const database = new Databases(client);
  const locations = await database.listDocuments(
    "OUR DATABASE ID",
    "OUR LOCATIONS COLLECTION ID"
  );
  return {
    props: { locations },
  };
}
The above code snippet does the following:
- Imports the essential modules, Client, Databases, and ID.
- Creates the client connection by setting the endpoints. Then it establishes the database, pulls the location from it, and returns it as props.
It is important to note that we can get our
API Endpoint,Project ID,[DATABASE_ID], and[COLLECTION_ID]from the Appwrite console.
Here’s one way that shows the impressiveness of the relationships in database feature. In the snippet above, we made a request to just the locations collection, but we still get access to the cost collection.
This feature is very useful if we have many collections, as we will need to make only one request and then get access to the other collections. This saves time and reduces redundancy in code, as we wouldn’t have to make individual calls for different collections.
Next, we pass the props into the home components as locations so that we can render the list of locations in the Home components.
import { useEffect } from 'react';

export default function Home({ locations }) {
  console.log(locations);
}
Building the UI
In the index.js file inside the pages component on VS Code, paste the following code:
import "@appwrite.io/pink";
import "@appwrite.io/pink-icons";
<div className="" style={{ boxShadow: "hsl(var(--shadow-large))" }}>
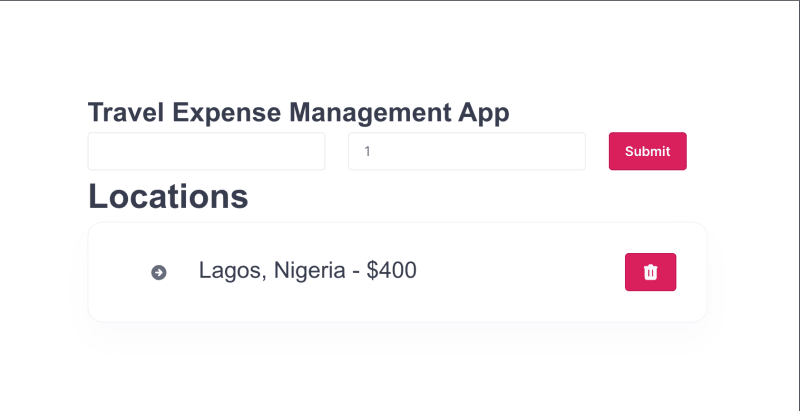
<h3 className="heading-level-3">Travel Expense Management App</h3>
<form onSubmit={addLocation} className="u-flex u-column-gap-24">
<input
onChange={handleLocationName}
value={location}
className="u-max-width-250 u-min-height-100-percent u-max-width-250"
type="text"
required
/>
<input
onChange={handgleCostChange}
value={cost}
className="u-remove-input-number-buttons u-min-height-100-percent u-max-width-250"
type="number"
required
/>
<button className="button">Submit</button>
</form>
</div>;
The above code snippet does the following:
- Imports Pink Design and Pink Design icons.
- Creates two input fields (one for cost, and one for location) and a submit button.
- An
onChangehandler is set on thecostinput with a reference to thehandleChangeCostfunction, and on thelocationsinput with a reference to thehandleLocationNamefunction, to update thecoststate andlocationsstate, as the user types in each input field. - An
onSubmithandler is set on the form referencing theaddLocationfunction we created earlier.
Pink Design provides us with components, utility classes, and more. The Pink Design utility classes used above does the following:
-
heading-level-3: Makes a text an
h3element - u-flex: Sets display to flex
- u-min-height-100-percent and u-max-width-250: Sets the minimum height to 100 percent and the maximum width to 15.625rem
- button: Gives the basic styling for a button element
To render the list of locations, create a components folder above the node modules folder. Then create a LocationList.js file and paste the following code into the file.
const LocationList = ({ locations, deleteLocation }) => {
  return (
    <div>
      <h2 className="heading-level-1">Locations</h2>
      {locations.documents.map((location) => (
        <div key={location.$id} className="card">
          {/* style={{ display: 'flex', justifyContent: 'space-between' } */}
          <ul className="list">
            <li className="list-item u-main-space-between u-flex">
              <div>
                <span
                 className="icon-arrow-circle-right u-margin-32 u-cross-center"
                    aria-hidden="true"
                ></span>
                <span className="text heading-level-4 u-cross-center">
                  {location.name} - ${location.cost.amount}
                </span>
              </div>
              <button className="tooltip" aria-label="variables info">
                <span
                  onClick={() => deleteLocation(location)}
                  className="icon-trash button"
                  ></span>
                <span className="tooltip-popup" role="tooltip">
                  Delete travel details
                </span>
              </button>
            </li>
          </ul>
        </div>
      ))}
    </div>
  );
};
export default LocationList;
The above code snippet does the following:
- Accepts locations, and deleteLocation as props. Locations show the list of all the locations in our database, while deleteLocation is a function that will enable a user to delete a location from our application.
- Maps through the list of locations, rendering its name and cost for every location.
- Uses Pink design for styling, and Pink Design icons to create a delete icon.
We can see what our app looks like by running the following command:
npm run dev
Let’s add the logic to enable users to add both a new location and cost to the application. We’ll also look at the logic allowing users to delete a location. Finally, we’ll add the logic for displaying the total cost of all the locations.
Update the index.js file with the following syntax:
// enable user to add new location and cost
const [location, setLocation] = useState("");
const [cost, setCost] = useState(1);
const [totalCost, setTotalCost] = useState(0);
const [locationsToRender, setlocationsToRender] = useState(
  locations.documents
);

const [totalCostUpdated, setTotalCostUpdated] = useState(false);

useEffect(() => {
  const subscription = async () => {
    const client = new Client();
    client
      .setEndpoint(process.env.NEXT_PUBLIC_ENDPOINT)
      .setProject(process.env.NEXT_PUBLIC_PROJECT);
    // Subscribe to documents channel
    client.subscribe(
        `databases.${process.env.NEXT_PUBLIC_DATABASE}.collections.${process.env.NEXT_PUBLIC_COLLECTION_LOCATION}.documents`,
      (response) => {
        try {
          if (response.events[0].includes("create")) {
            setlocationsToRender([...locationsToRender, response.payload]);
          } else {
            const update = locationsToRender.filter((item) => {
              return item.$id !== response.payload.$id;
            });
            console.log(update);
            setlocationsToRender(update);
          }
        } catch (error) {
          console.log(error);
        }
      }
    );
  };
  const updateTotalCost = () => {
    const total = locationsToRender
      .map((location) => location.cost.amount)
      .reduce((acc, car) => acc + car, 0);
    setTotalCost(total);
  };
  subscription();
  updateTotalCost();
}, [totalCostUpdated, locationsToRender]);

const handleLocationName = (e) => {
  setLocation(e.target.value);
};
const handgleCostChange = (e) => {
  setCost(e.target.value);
};

const addLocation = async (e) => {
  e.preventDefault();
  const client = new Client();
  const database = new Databases(client);
  client.setEndpoint("OUR PROJECT ENDPOINT").setProject("OUR PROJECT ID");
  const response = database.createDocument(
    "OUR DATABASE ID",
    "OUR LOCATION COLLECTION ID",
    ID.unique(), // generates unique IDs
    {
      name: location, // the location state,
      cost: { amount: cost }, // the cost state
    }
  );

  response.then(function (res) {
    console.log(res);
    setTotalCostUpdated(!totalCostUpdated);
    setCost(0);
    setLocation("");
  }),
    function (error) {
        console.log(error);
    };
};

const deleteLocation = async (location) => {
  const client = new Client();
  const database = new Databases(client);
  client
    .setEndpoint(process.env.NEXT_PUBLIC_ENDPOINT)
    .setProject(process.env.NEXT_PUBLIC_PROJECT);
  const response = database.deleteDocument(
    process.env.NEXT_PUBLIC_DATABASE,
    process.env.NEXT_PUBLIC_COLLECTION_LOCATION,
    location.$id
  );
  response.then(function (res) {
    console.log(res);
    setTotalCostUpdated(!totalCostUpdated);
  }),
    function (error) {
        console.log(error);
    };
};

//paste the following code at the end of index.js file just below the list of locations
return (
  ....
  <LocationList locations={locationsToRender} />
  <h3 className="heading-level-3">Total Cost: ${value}</h3>
)
The above code snippet does the following:
- Creates a
costandlocationstate to handle user inputs for cost and location, respectively. - Creates a
totalCoststate to calculate the total cost of all the locations. - Creates a
totalCostUpdatedstate to check whether the total cost has been updated. It is passed into the dependency array of theuseEffect()hook to ensure that the application rerenders whenever a location is added or removed from the database. - Creates a
locationsToRenderstate to holdlocations.documentswhich is the list of locations passed to theHomecomponents as props. - We create a
subscriptionfunction in theuseEffect()hook to subscribe to changes in the location collection documents. We then use thetry-catchblock to update thelocationsToRenderstate appropriately whenever the user adds or deletes a location. - The
addLocationfunction creates a new client connection and establishes a connection to the database. Then it uses the database.createDocument() method to create a new document in the collection. - The
deleteLocationfunction uses the database.deleteDocument() method to remove a document from the collection.
Since we selected Cascade as the desired on-delete behavior while configuring the Relationship, both collections will be gone whenever we delete either collection. Again, that's another cool thing about the relationships in database feature.
Our final application should look like this:
https://www.loom.com/share/99e0544630a34cd99c434e6719a0f52f
Conclusion
Appwrite's Relationships feature is a powerful tool for managing databases, enabling the elimination of redundant information when working with data sets. Pink Design is a flexible framework that empowers developers to create highly responsive applications while providing extensive customization options. This winning combination enables us to rapidly build applications with captivating UIs.


Top comments (0)