One of the most important features of Appwrite is its flexibility. It provides robust toolings that small to large enterprises can use to set up backend engineering from scratch or incrementally adopt its functionality into existing infrastructure.
In this post, we will explore the flexibility of Appwrite through the use of Appwrite Storage for file management. We will accomplish this by building a Flutter application that uses Appwrite and Backblaze adapter to manage images. The project repository can be found here.
Technology overview
Backblaze is a software company that provides online backup and data storage management for images, videos, pdfs, and other file types.
Beyond Appwrite’s default support for storing files in the server’s local storage, it also provides adapters to seamlessly integrate external storage like Backblaze.
Prerequisites
To fully grasp the concepts presented in this tutorial, the following are required:
Configure storage bucket on Backblaze
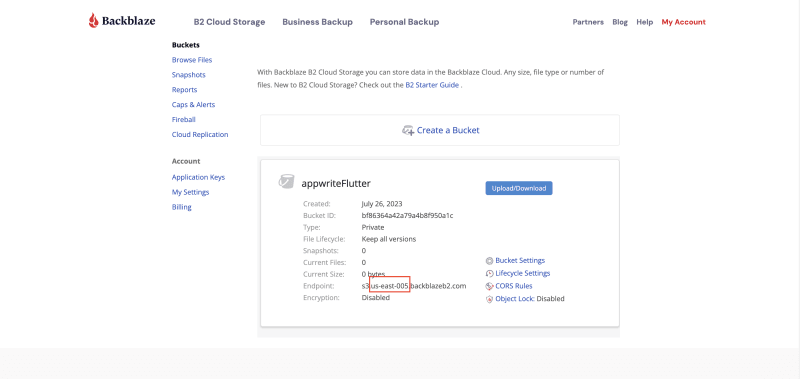
To get started, we need to log into our Backblaze account, click the Create a Bucket button, input appwriteFlutter, and Create.
Next, we need to create an Application Key. The Application Key will let us securely connect our Appwrite instance to Backblaze. To do this, navigate to the Application Keys tab, click the Add a New Application Key button, input appwriteFlutter as the name, and Create.
With that done, we will see a screen showing our application details. We must copy and keep the keyID and applicationKey as they will come in handy when adding Backblaze as an adapter.
Lastly, we must also copy and keep the region our bucket is deployed in. We can get it as shown below:
Configure and create Storage on Appwrite
To get started, we need to create an Appwrite instance in a preferred directory by running the command below:
docker run -it --rm \
    --volume /var/run/docker.sock:/var/run/docker.sock \
    --volume "$(pwd)"/appwrite:/usr/src/code/appwrite:rw \
    --entrypoint="install" \
    appwrite/appwrite:1.3.8
On creation, we should see an appwrite folder with two files.
Then, we need to add Backblaze as an adapter by modifying the environment variables in the .env file, as shown below:
_APP_STORAGE_DEVICE=Backblaze
_APP_STORAGE_BACKBLAZE_ACCESS_KEY=<REPLACE WITH KEYID>
_APP_STORAGE_BACKBLAZE_SECRET=<REPLACE WITH APPLICATIONKEY>
_APP_STORAGE_BACKBLAZE_REGION=<REPLACE WITH REGION>
_APP_STORAGE_BACKBLAZE_BUCKET=appwriteFlutter
Lastly, we need to sync the changes we made on the .env file with our Appwrite server. To do this, we must run the command below inside the appwrite directory.
docker-compose up -d
Set up a project on Appwrite
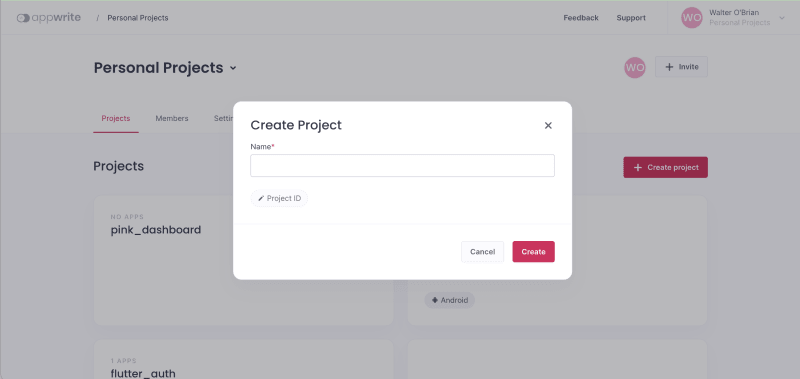
To get started, we need to navigate to the specified hostname and port http://localhost:80, login, click the Create Project button, input appwrite_backblaze as the name, and then Create.
Add platform support
To add support for our Flutter app, navigate to the Overview menu and click the Flutter App button.
Next, we must modify the Flutter application as detailed below:
To obtain our Bundle ID, navigate to the path below:
ios > Runner.xcodeproj > project.pbxproj
Open the project.pbxproj file and search for PRODUCT_BUNDLE_IDENTIFIER.
Create storage on Appwrite
With our project setup, we need to create an Appwrite Storage to save our images on Backblaze. To do this, we must navigate to the Storage tab, click the Create Bucket button, input image_storage as the name, and Create.
Lastly, we must update the storage permission as we need to use it in our Flutter application. To do this, we must navigate to the Settings tab, scroll to the Execute Access section, select Any, check all the permissions, and Update.
Appwrite + Backblaze in Flutter
With that done, we can start building our application. To get started, we need to clone the project by navigating to the desired directory and running the command below:
git clone https://github.com/Mr-Malomz/flutter_backblaze.git
Running the project
First, we need to install the project dependencies by running the command below:
flutter pub get
Then, run the project using the following command:
flutter run
The command above will run the application on the selected device.
Integration and application logic
To get started, first, we need to create a class for storing our Appwrite credentials and a model to convert the response sent from Appwrite to a Dart object. To do this, we need to create a utils.dart file in the lib folder and add the snippet below:
class AppConstant {
  final String projectId = "PROJECT ID GOES HERE";
  final String bucketId = "BUCKET ID GOES HERE";
  final String endpoint = "http://<MACBOOK IP GOES HERE>/v1";
}

class ImageModel {
  String $id;
  String bucketId;
  ImageModel({
    required this.$id,
    required this.bucketId,
  });
  factory ImageModel.fromJson(Map<dynamic, dynamic> json) {
    return ImageModel($id: json['\$id'], bucketId: json['bucketId']);
  }
}
For the endpoint property, we need to modify it to work with our system's local network address. We can get our MacBook IP address by navigating to the Network section as shown below:
Lastly, we need to create a service file to separate the application core logic from the UI. To do this, we need to create an image_service.dart file in the same lib folder and add the snippet below:
import 'package:appwrite/appwrite.dart';
import 'package:flutter_backblaze/utils.dart';
import 'package:image_picker/image_picker.dart';

class ImageService {
  Client _client = Client();
  late Storage _storage;
  final _appConstant = AppConstant();

  ImageService() {
    _init();
  }

  //initialize the application
  _init() async {
    _client
        .setEndpoint(_appConstant.endpoint)
        .setProject(_appConstant.projectId);
    _storage = Storage(_client);
    //get current session
    Account account = Account(_client);
    try {
      await account.get();
    } on AppwriteException catch (e) {
      if (e.code == 401) {
        account
            .createAnonymousSession()
            .then((value) => value)
            .catchError((e) => e);
      }
    }
  }

  Future<List<ImageModel>> getImages() async {
    try {
      var data = await _storage.listFiles(bucketId: _appConstant.bucketId);
      var imageList = data.files
          .map((doc) => ImageModel($id: doc.$id, bucketId: doc.bucketId))
          .toList();
      return imageList;
    } catch (e) {
      throw Exception('Error getting list of images');
    }
  }

  Future saveImage(XFile file) async {
    try {
      var data = await _storage.createFile(
        bucketId: _appConstant.bucketId,
        fileId: ID.unique(),
        file: InputFile.fromPath(path: file.path, filename: file.name),
      );
      return data;
    } catch (e) {
      throw Exception('Error saving image');
    }
  }

  Future getImagePreview(String id) async {
    try {
      var data =
          _storage.getFilePreview(bucketId: _appConstant.bucketId, fileId: id);
      return data;
    } catch (e) {
      throw Exception('Error getting image preview');
    }
  }
}
The snippet above does the following:
- Imports the required dependencies
- Creates an
AuthServiceclass with_clientand_storageproperties to connect to the Appwrite instance - Creates an
_initmethod that configures Appwrite using the properties - Creates a
getImages,saveImage, andgetImagePreviewmethod that uses the_storageproperty to get, save, and preview images
Using the service
First, we need to modify the image_screen.dart file inside the screens folder by importing the required dependencies and using the service to perform required operations:
import 'package:flutter/material.dart';
import 'package:flutter/services.dart';
import 'package:flutter_backblaze/image_service.dart';
import 'package:flutter_backblaze/utils.dart';
import 'package:image_picker/image_picker.dart';

class ImageScreen extends StatefulWidget {
  const ImageScreen({super.key});

  @override
  State<ImageScreen> createState() => _ImageScreenState();
}

class _ImageScreenState extends State<ImageScreen> {
  late XFile file;
  late List<ImageModel> _images;
  var _service = ImageService();
  bool _isLoading = false;
  bool _isError = false;

  @override
  void initState() {
    _getImageList();
    super.initState();
  }

  _getImageList() {
    setState(() {
      _isLoading = true;
    });
    _service
        .getImages()
        .then((value) => {
              setState(() {
                _isLoading = false;
                _images = value;
              })
            })
        .catchError((_) {
      setState(() {
        _isLoading = false;
        _isError = true;
      });
    });
  }

  _saveImage(XFile selectedFile) {
    _service.saveImage(selectedFile).then((value) {
      ScaffoldMessenger.of(context).showSnackBar(
        const SnackBar(content: Text('Image uploaded successfully!')),
      );
      _getImageList();
    }).catchError((_) {
      ScaffoldMessenger.of(context).showSnackBar(
        const SnackBar(content: Text('Error uploading image!')),
      );
    });
  }

  Future _pickImage() async {
    try {
      final image = await ImagePicker().pickImage(source: ImageSource.gallery);
      if (image == null) return;
      _saveImage(image);
    } on PlatformException catch (e) {
      throw Exception(e);
    }
  }

  Widget build(BuildContext context) {
    //UI code goes here
  }
}
The snippet above does the following:
- Line 1-5: Imports the required dependencies
- Line 15-19: Creates the
file,_images,_service,_isLoading, and_isErrorproperties to manage application state and other required services - Line 21-68: Creates a
_getImageList,_saveImage, and_pickImagemethods that use the_serviceto get list of images and save an image
Lastly, we need to update the UI to use created properties to conditionally display the list of images, add a preview using the _service.getImagePreview service, and also call the _pickImage method to upload the image when clicked.
//import goes here

class ImageScreen extends StatefulWidget {
  const ImageScreen({super.key});

  @override
  State<ImageScreen> createState() => _ImageScreenState();
}

class _ImageScreenState extends State<ImageScreen> {
  //properties goes here

  @override
  void initState() {
    _getImageList();
    super.initState();
  }

  //methods goes here

  Widget build(BuildContext context) {
    return _isLoading
        ? const Center(
            child: CircularProgressIndicator(
            color: Colors.black,
          ))
        : _isError
            ? const Center(
                child: Text(
                  'Error getting images',
                  style: TextStyle(
                    color: Colors.red,
                    fontWeight: FontWeight.bold,
                  ),
                ),
              )
            : Scaffold(
                appBar: AppBar(
                  title: const Text('Appwrite + Backblaze'),
                  backgroundColor: Colors.black,
                ),
                body: _images.isNotEmpty
                    ? ListView.builder(
                        itemCount: _images.length,
                        itemBuilder: (context, index) {
                          return Container(
                            decoration: const BoxDecoration(
                              border: Border(
                                bottom:
                                    BorderSide(width: .5, color: Colors.grey),
                              ),
                            ),
                            padding: const EdgeInsets.fromLTRB(10, 20, 10, 20),
                            child: Row(
                              mainAxisAlignment: MainAxisAlignment.spaceEvenly,
                              children: [
                                Expanded(
                                  flex: 7,
                                  child: Row(
                                    crossAxisAlignment:
                                        CrossAxisAlignment.center,
                                    children: [
                                      Container(
                                        height: 45,
                                        width: 45,
                                        child: FutureBuilder(
                                          future: _service.getImagePreview(
                                              _images[index].$id),
                                          builder: (context, snapshot) {
                                            return snapshot.hasData &&
                                                    snapshot.data != null
                                                ? Image.memory(
                                                    snapshot.data,
                                                  )
                                                : const CircularProgressIndicator();
                                          },
                                        ),
                                      ),
                                      const SizedBox(width: 10.0),
                                      Text(
                                        _images[index].$id,
                                      )
                                    ],
                                  ),
                                ),
                              ],
                            ),
                          );
                        },
                      )
                    : const Center(
                        child: Text(
                          'No images uploaded yet. Click "+" button to upload',
                          style: TextStyle(
                            color: Colors.black,
                            fontWeight: FontWeight.bold,
                          ),
                        ),
                      ),
                floatingActionButton: FloatingActionButton(
                  onPressed: () {
                    _pickImage();
                  },
                  tooltip: 'upload image',
                  child: const Icon(Icons.add),
                  backgroundColor: Colors.black,
                ),
              );
  }
}
With that done, we restart the application using the code editor or run the command below:
flutter run
We can also confirm uploaded images on Appwrite’s Storage tab and Backblaze’s Browse File tab.
Conclusion
This post discussed how to add Backblaze adapter to an Appwrite project. Beyond what was discussed above, Appwrite also supports other adapters like Amazon S3, Dospaces, Linode, and Wasabi.
These resources may also be helpful:


Top comments (0)