
Tracking medication dosages made easy with Appwrite’s database
Tracking medication dosages is essential for checking the compliance and consistency level in the prescription given by medical personnel (doctors, pharmacists, etc.). Likewise, it’s crucial for patients’ recovery from the illness or medical condition it was prescribed to treat. Appwrite’s database makes creating an efficient database system to track medication dosages easy.
By the end of this tutorial, we will have created a fully functional database system for tracking medication dosages.
Here is the GitHub repository containing all the code.
Prerequisites
This tutorial requires the reader to satisfy the following:
- Xcode (with developer account for Mac users).
- iOS Simulator, Android Studio, or Chrome web browser to run the application.
- An Appwrite instance running on either Docker, DigitalOcean droplet, or Gitpod. Check out this article for the setup.
Setting up the Appwrite project
In this section, we’ll set up an Appwrite project and create a platform. Let’s start by doing the following:
- Open your browser and enter the
IP address or hostname. Choose
Create Projectoption and fill in theproject name and ID. (ID can be automatically generated.)


Next, head to the databases section, select the
Create Databaseoption, and fill in the desired database name and ID.

-
Next, we will need to create two collections within the database. The first collection will hold the medication data. Thus, we will create eight attributes: four Boolean (
isTrack, isInjection,isTablet, isSyrup), three strings (medicationname, userID, id), and one integer (dosages). This collection will hold the medication information.The second collection will hold the scheduled medications. Thus, we will need four string attributes (
date, medicationname, userID, id) and a single Boolean attribute (isTrack).

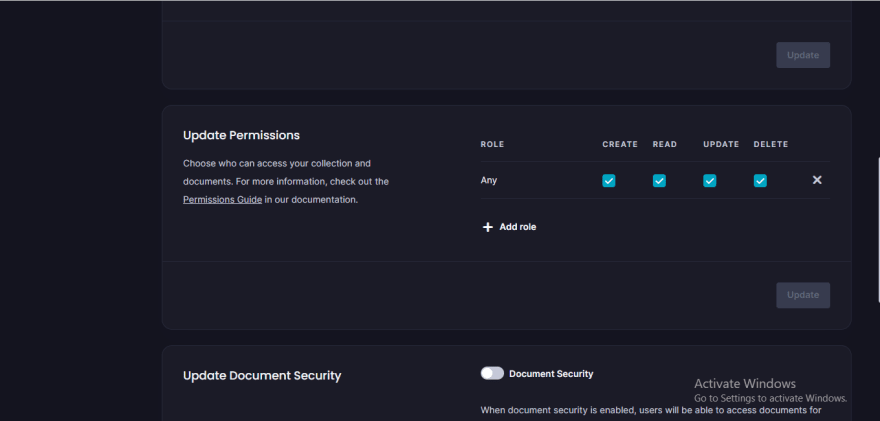
- Finally, set the collection level
CRUDpermission for both collections toAnyand select all the options.
Getting started
In this section, we will clone a Flutter UI template, connect our Flutter app to Appwrite, and explain the functionality of our project.
Clone the UI template
This section uses a UI template containing user registration and login code. Let’s clone the repository specified in the prerequisites. Check out the official GitHub docs to learn more about cloning a repository.


After cloning the UI to local storage, open it in your preferred code editor and run the command below:
flutter pub get
This command obtains all the dependencies listed in the pubspec.yaml file in the current working directory and their transitive dependencies. Next, run the command flutter run, and our application should look like the gif below:


The gif above shows the UI and functionality of the medication tracker, in which there is a section to add medication and track medication (overdue medication and currently tracking). These functionalities were achieved using Appwrite and Flutter_local_notification package.
Note: This program doesn’t use the Appwrite real-time API. Thus, check the resources section for references to its use.
The following sections provide a breakdown of how to implement the features shown above. Let’s start by showing how to connect Appwrite to a Flutter application and seed data to the Appwrite database collection.
Installing and connecting Appwrite to Flutter
First, install the Appwrite, Flutter_local_notification, and the Provider package for state management into the app. We can add them to the dependencies section of the pubspec.yaml file, like the image below:

Alternatively, we can use a terminal by typing the command below:
flutter pub add appwrite

# and

flutter pub add Provider

# and

flutter pub add flutter_local_notifications
Here’s how to connect a Flutter project to Appwrite for Android and iOS devices.
iOS
First, obtain the bundle ID by navigating to the project.pbxproj file (ios > Runner.xcodeproj > project.pbxproj) and searching for the PRODUCT_BUNDLE_IDENTIFIER.
Next, head to the Runner.xcworkspace folder in the application’s iOS folder in the project directory on Xcode. To select the runner target, choose the Runner project in the Xcode project navigator and find the Runner target. Next, select General and IOS 11.0 in the deployment info section as the target.

Android
For Android, copy the XML script below and paste it below the activity tag in the Androidmanifest.xml file (to find this file, head to android > app > src > main).
Note: change [PROJECT-ID] to the ID you used when creating the Appwrite project.
We will also need to set up a platform within the Appwrite console. Follow the steps below to do so.
- Within the Appwrite console, select
Create Platformand chooseFlutterfor the platform type. - Specify the operating system: in this case, Android.
- Finally, provide the application and package names (found in the app-level
build.gradlefile).


Creating the providers
Since we will use the provider package for state management, here are the changeNotifier classes to be utilized:
-
UserRegProvider
-
AppProvider class
-
ReminderProvider
We used queries for the userID in the lists in case there is a need to add a super admin who will have access to all the items in the list. Also, we queried the isTrack attribute in the ReminderProvider to segregate the currently tracked processes to prevent a rerun in the instance when we run our program again.
Lastly, using JSON serialization, we can map the list of documents from Appwrite to a class and get our items in a list. Thus, we have created three model classes for each ChangeNotifier class.
Next, let’s head to the app_constants.dart file to store important constants within a class, such as the projectID, database, collection ID, and so on.
class Appconstants {
  static const String projectid = "<projectID>";
  static const String endpoint = "<Hostname or IP address>";
  static const String dbID = "<database ID>";
  static const String collectionID = "<collection ID 1>";
  static const String collectionID2 = "<Collection ID 2>";
}
Adding medication details
This project uses three Notifier classes — UserRegProvider, AppProvider, ReminderProvider — to map out the user registration, medication document, and reminder document object. Thus, declare the MultiProvider class inside the runApp function of the main.dart file. This MultiProvider class will assist us in building a tree of providers like this:
void main() {
  WidgetsFlutterBinding.ensureInitialized();
  runApp(MultiProvider(
    providers: [
      ChangeNotifierProvider(
        create: (context) => UserRegProvider(),
        lazy: false,
      ),
      ChangeNotifierProvider(
        create: (context) => AppProvider(),
        lazy: false,
      ),
      ChangeNotifierProvider(
        create: (context) => ReminderProvider(),
        lazy: false,
      ),
    ],
    child: const MyApp(),
  ));
}
This allows us to use methods, setters, and getters from the provider classes around our project via the Consumer widget or by calling the provider class. First, use the routerclass.dart to create navigation routes between the Add Medication Information and Track Medication information pages.
Thus, in the Add Medication Information page (register_medication.dart file), we have a stateful widget in which the body property of the scaffold widget takes a condition. This condition checks whether state1 (UserRegProvider) via the consumer is true; it should show a circularloader widget, and if it is false, it should show the appcontainer widget. This condition is to prevent the UI from loading before the provider. If that happens, we will get a null error, as some UI properties vary depending on the provider.
The appcontainer widget contains a column of the logged-in username (retrieved from the UserRegProvider class) and a form field consisting of a string text field, integer text field checkboxes, and a submit button. We can add the medication information to our database collection created earlier with this form field, and its implementation is in the [**medicine_details.dart**](https://gist.github.com/muyiwexy/5d6b638092d6472d39423f807ca09010) file.
Tracking the medication
To track the medication, we will use the Appwrite database collection to track our medication by attaching a Boolean value to each tracked medication. We will then use the flutter_local_notifications package to schedule a notification for each tracked medication.
Thus, in the Track Medication Information page (track_medication.dart file), we have a column of a button and a list area (divided into a row of Overdue and Currently tracking). When we click the button, it shows an alertdialog containing a checklist of all the medications. This checklist allows checking only one item at a time, and once we check an item, it shows a dropdown list to select the date form field to schedule the medication.
If a date or time before the current date is added, and we click done, then the item will be added to the overdue section. However, if a date is after the current date, then it will run the notification function.
The done button triggers the _notificationService.scheduleNotifications(); while passing context, widget.reminderstate.reminderitem! as parameters. These parameters will assist in building the notification function. Here is the code for the notification function:
The code above defines a NotificationService class that handles scheduling and canceling local notifications using FlutterLocalNotificationsPlugin. The NotificationService class follows the singleton pattern, ensuring that only one class instance can exist simultaneously.
Next, we create the init() method to initialize the FlutterLocalNotificationsPlugin, which is required before scheduling any notifications. The scheduleNotifications() method schedules notifications for a list of reminders (the parameter passed earlier). It converts the scheduled time of each reminder to the local time zone and schedules a notification using flutterLocalNotificationsPlugin.zonedSchedule().
Lastly, the cancelNotifications() method cancels a previously scheduled notification using flutterLocalNotificationsPlugin.cancel().
So, to use this code properly, we will need to call the init() method in the void main function, like so:
void main() {
  WidgetsFlutterBinding.ensureInitialized();
  NotificationService().init();
  // add runapp method
}
The earlier results were on a web platform, and flutter_local_notifications does not support the web yet. So here, for the moment of truth:

Conclusion
Taking medications isn’t the most pleasant task of the day, but failing to do so can pose a risk to a patient and cause problems for their caregivers or healthcare providers. Thus, a scheduler can come in handy, as we can now set a future time and receive a notification when it is time. The Appwrite database assists in sorting out those lists, and with a package like the flutter_local_notifications, we are guaranteed to follow our medication schedule.
Check out these additional resources that might be helpful:


Top comments (1)
This tutorial is incredibly insightful and well-detailed, guiding users through the process of setting up Appwrite's database for efficient medication dosage tracking in Flutter. The integration of Flutter_local_notifications adds a practical touch to medication management, showcasing the power of combining Appwrite's capabilities with Flutter's user interface. I have seen this concept already on openingtoclosehours i think. Well Great job on providing a comprehensive guide for developers interested in creating a medication tracking system! 👏🚀