GoCD is an open-source tool which is used in software development to help teams and organizations automate the continuous delivery (CD) of software. It supports automating the entire build-test-release process from code check-in to deployment.
GoCD system requirements
Client (browser) requirements
GoCD supports the latest versions of the following browsers
- Google Chrome
- Mozilla Firefox
- Microsoft Edge
- Apple Safari
GoCD server requirements
Hardware
- RAM - minimum 1GB, 2GB recommended
- CPU - minimum 2 cores, 2GHz
- Disk - minimum 1GB free space
Supported operating systems
- Windows - Windows Server 2012, Windows Server 2016, Windows 8 and Windows 10
- Mac OSX - 10.7 (Lion) and above with Intel processor
- Debian - Debian 8.0 and above
- CentOS/RedHat - CentOS/RedHat version 6.0 and above
- Ubuntu - Ubuntu 14 and above
- Alpine Linux - Alpine Linux 3.6 and above
Installation
GoCD consists of two installable components. The GoCD Server and one or more GoCD Agents. They have a one-to-many relationship in that many GoCD agents can connect to one GoCD Server. To do any real work, you need at least one agent, since agents are the real builders or work executors in the system.
Make sure your system has installed Java / JRE version 13 (for releases 21.1.0 and higher)
- Follow
GoCDServer installation instructions to install server - Follow
GoCDAgent installation instructions to install agent
Follow the the given links instructions, select your operating system and install GoCD Server and (at least one) Agent and run server and angent according to the instructions.
Whatever operating systems you install the GoCD server and (at least one) GoCD agent on, the default ports used by the server are 8153 (HTTP port) and 8154 (HTTPS port). So, after installation you should be able to access either http://localhost:8153 or http://your-server-installation-hostname:8153 and you should see a screen such as,
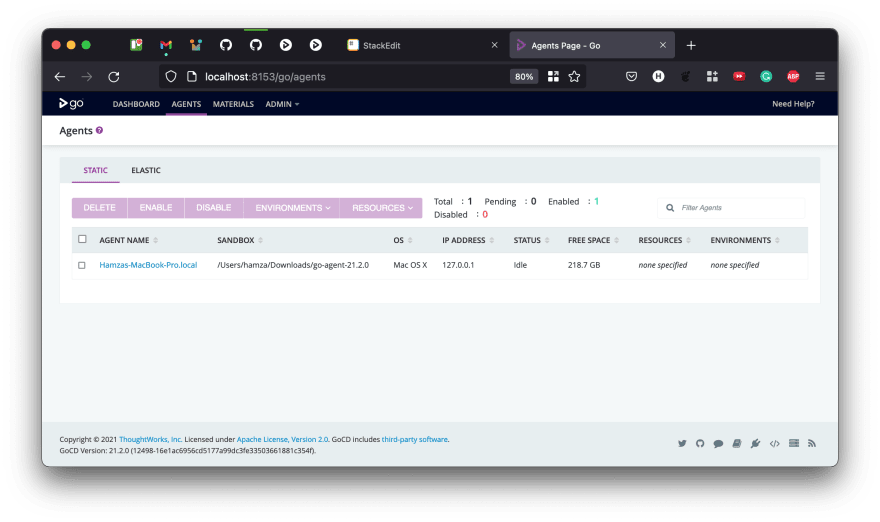
Once the agent is started, switching to the agents tab by clicking on the Agents link in the header should take you to a screen where the agent shows up and is idle. Like this:
An agent or agents can be installed on any node, and not necessarily the node that the GoCD Server is installed on. The only requirements are that ports 8153 and 8154 of the GoCD Server are accessible from the node that the agents are installed on.
Concepts in GoCD
Server and agents
In the GoCD ecosystem, the server is the one that controls everything. It provides the user interface to users of the system and provides work for the agents to do. The agents are the ones that do any work (run commands, do deployments, etc) that is configured by the users or administrators of the system.
The server does not do any user-specified work on its own. It will not run any commands or do deployments. That is the reason you need a GoCD Server and at least one GoCD Agent installed before you proceed.
Pipelines and materials
A pipeline, in GoCD, is a representation of workflow or a part of a workflow. For instance, if you are trying to automatically run tests, build an installer and then deploy an application to a test environment, then those steps can be modeled as a pipeline. GoCD provides different modeling constructs within a pipeline, such as stages, jobs and tasks. We will see these in more detail soon. For the purpose of this part of the guide, you need to know that a pipeline can be configured to run a command or set of commands.
Another equally important concept is that of a material. A material is a cause for a pipeline to trigger or to start doing what it is configured to do. Typically, a material is a source control repository (like Git, Subversion, etc) and any new commit to the repository is a cause for the pipeline to trigger. A pipeline needs to have at least one material and can have as many materials of different kinds as you want.
The concept of a pipeline is extremely central to Continuous Delivery. Together with the concepts of stages, jobs and tasks, GoCD provides important modeling blocks which allow you to build up very complex workflows, and get feedback quicker.
Now, back at the Add pipeline screen, you can choose your own material here, you can change Material Type to Git and provide the URL for your git repository in the URL textbox. If you now click on the Test Connection button, provide github username and github personal access token. it should tell you everything is OK.
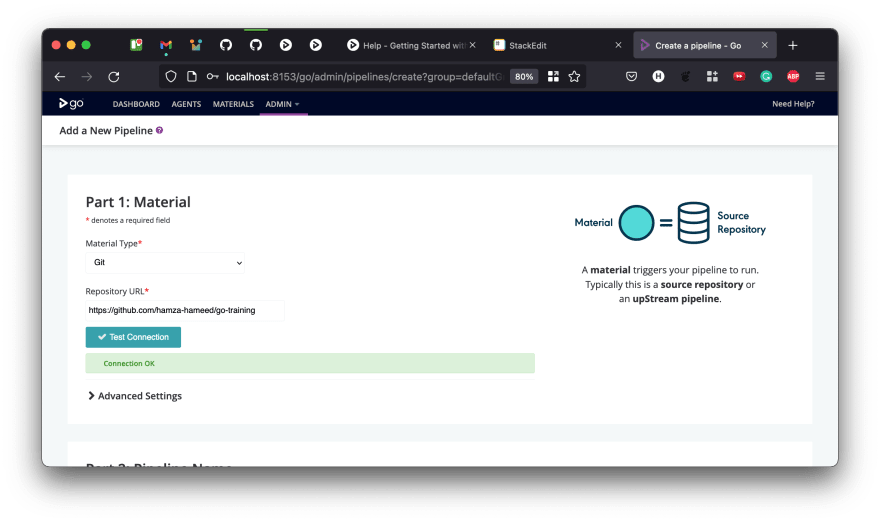
Scroll down and let's provide the pipeline a name, without spaces, and ignore the Pipeline Group field for now.
This step assumes that you have git installed on the GoCD Server and Agent. Like git, any other commands you need for running your scripts need to be installed on the GoCD Agent nodes.
If everything went well, press Next to be taken to step 3, which deals with stages, jobs and tasks.
Stage details, jobs, and tasks
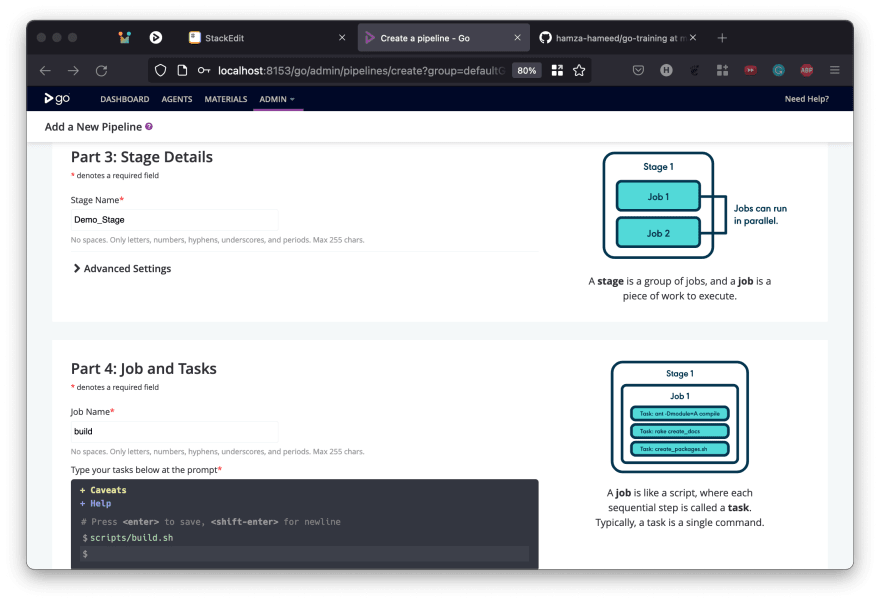
let's provide the stage a name, without spaces. Scroll down you will see the job and task field. Provide the job a name, without spaces and define your task bellow in the task field.
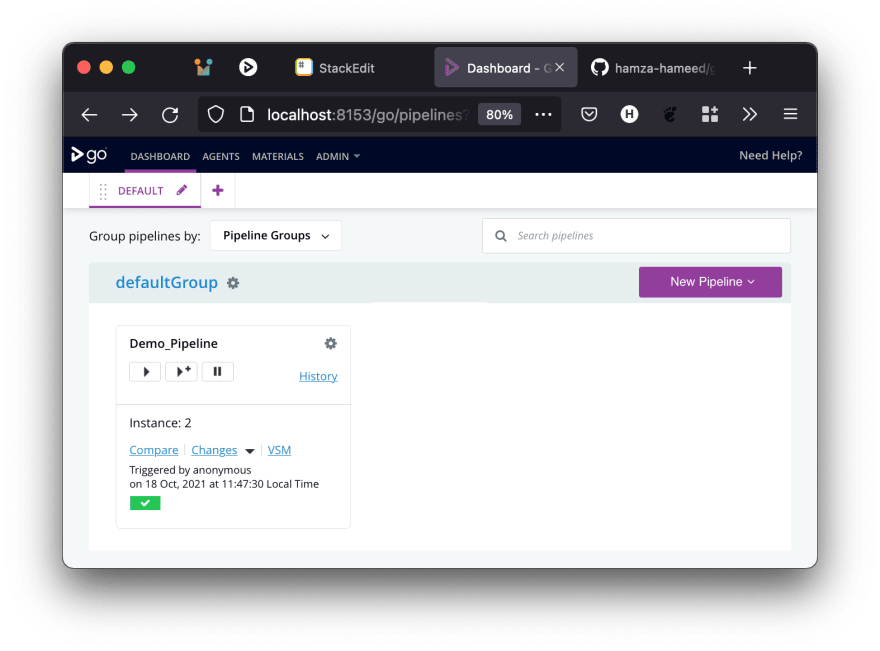
If all went well, you just created your first pipeline! Leaving you in a screen similar to the one shown below. If you give it a minute, you'll see your pipeline building (yellow) and then finish successfully (green)
The pipeline is building
The pipeline is finished successfully.
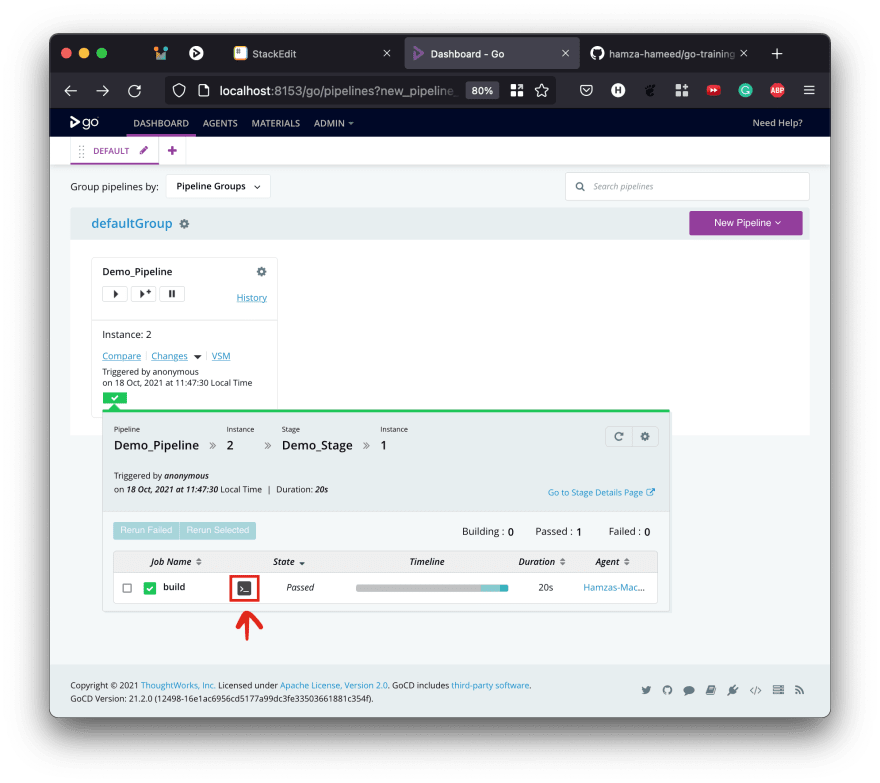
Clicking on the bright green bar will show you information about the stage
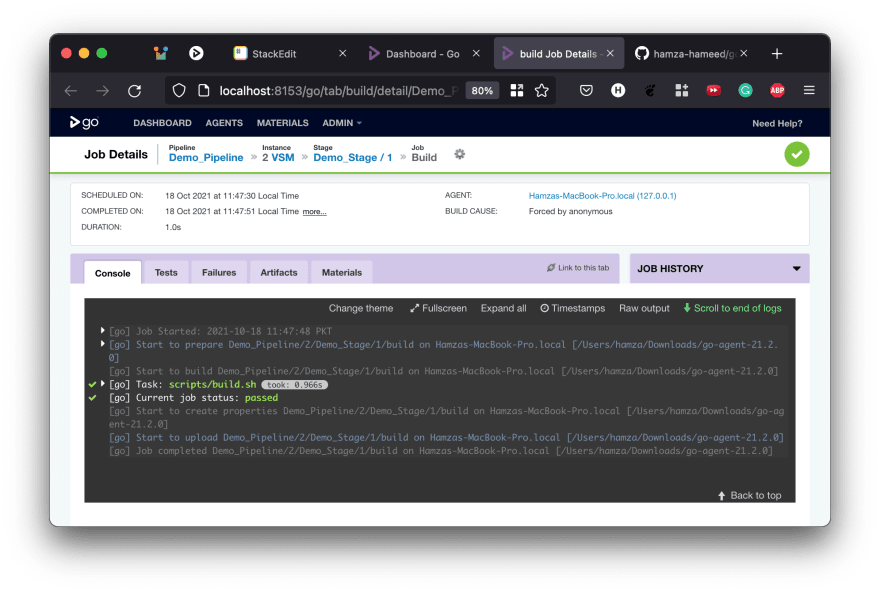
and then clicking on the job (terminal) icon will take you to the actual task and show you what it did
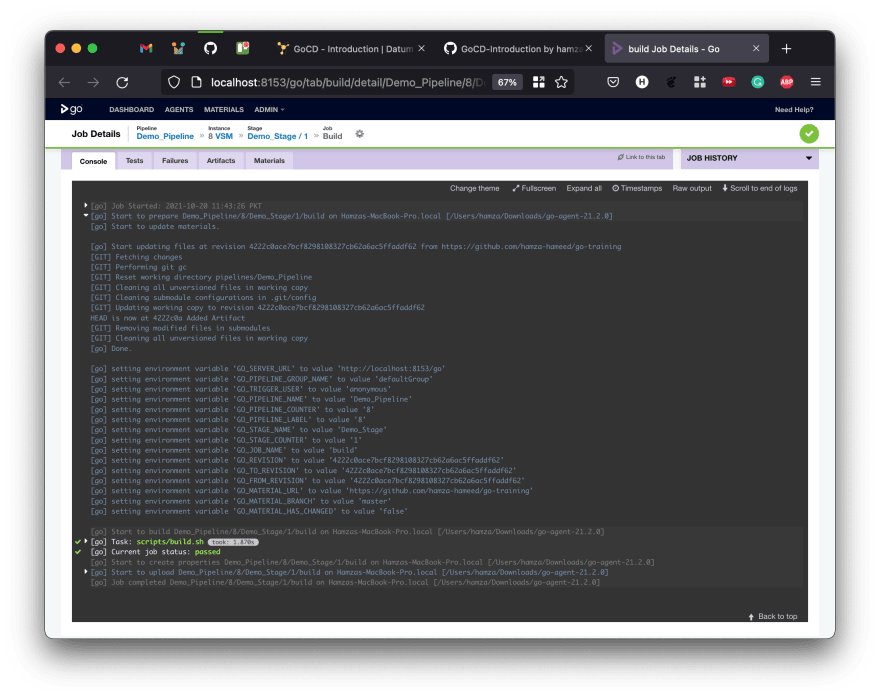
Scrolling up a bit, you can see it print out the environment variables for the task and the details of the agent this task ran on
Pipeline dependency material
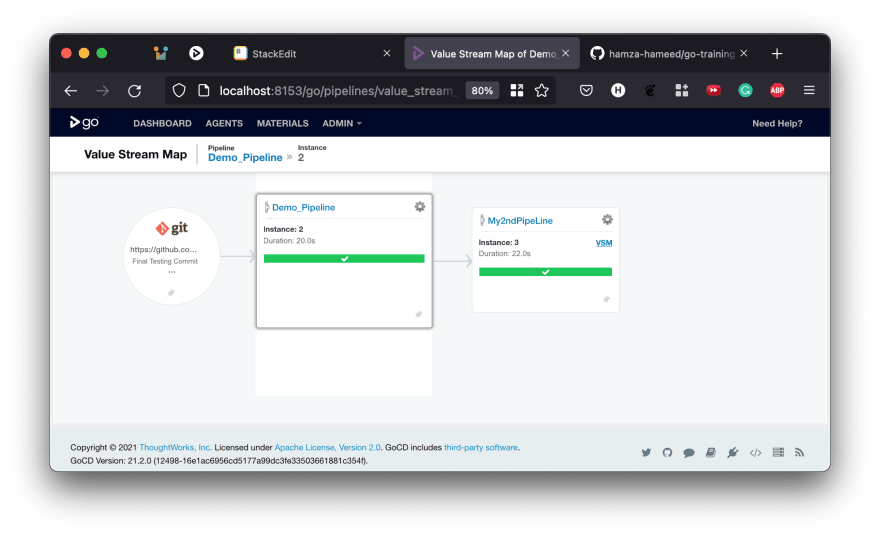
Instead of using a source code repository on GitHub as a material, it is possible to use a stage of any pipeline as a material for another pipeline. This seemingly simple feature provides a lot of power. This allows pipelines to be chained together, allowing very complex workflows to be modeled well and is a basis for the more advanced features in GoCD, such as Value Stream Map (VSM) and fan-in/fan-out.
A pipeline dependency material links pipelines together. The pipeline which has the material which points to another pipeline is called the Downstream Pipeline. The actual pipeline which is the dependency material is called the Upstream Pipeline. Even though it is called a Pipeline Dependency the real dependency is to a stage in an upstream pipeline.
As soon as that stage completes successfully, the first stage of each of the configured downstream pipelines triggers. If the stage does not complete successfully, its configured downstream pipelines do not trigger.
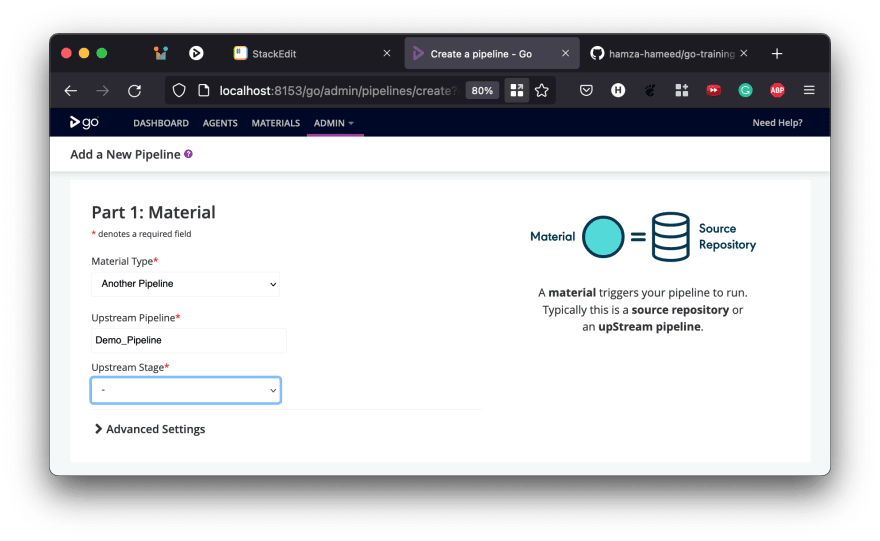
Let's see how we can get a pipeline dependency to work. Clicking on Admin and then Pipelines takes you to the Pipeline Configuration page which lists all the pipelines in the system. It looks like this
we can mange previous piplines or we can add more pipelines here. Lets make another pipeline.
scroll down and chose some task in job and task field and click on Run
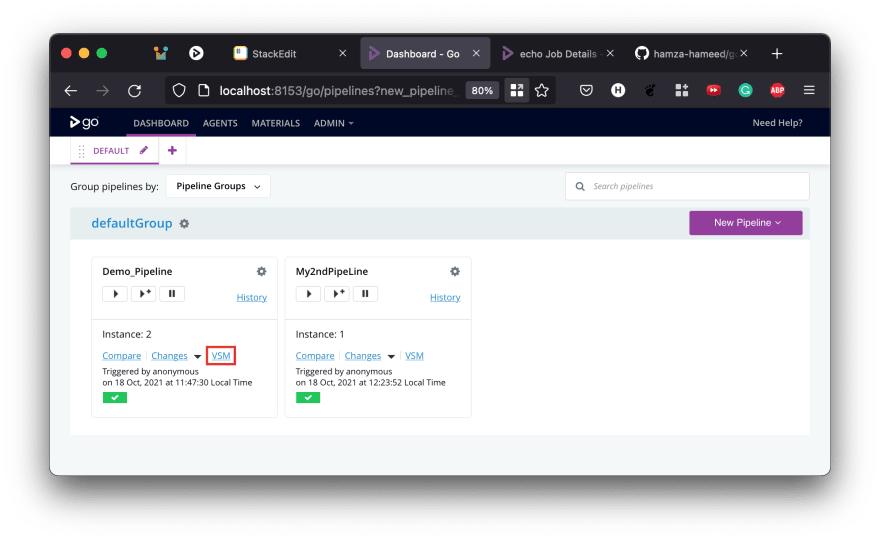
This is how it will look on the Pipelines list (dashboard) when finished. That doesn't look very different. But, this allows for some powerful features such as fan-in, fan-out and the ValueStream Map (VSM) Click on the label of the Demo_PipeLine (the part highlightedin the image above) VSM for a sneak peek at a small Value Stream Map.
You now know how to chain pipelines together. Let's now learn about artifacts, which are very useful when used with pipeline dependencies.
Artifacts
An artifact in GoCD is a file or directory which is most often produced during the run of a pipeline. Every job in a pipeline can be configured to publish its own set of artifacts and GoCD will ensure that these artifacts are moved from the Agent where it is created, to the Server and stored there, so that it can be retrieved at any time.
Typically, artifacts are created during a job run, by one of the tasks. Some examples of artifacts are: Test reports, coverage reports, installers, documentation, meta information about the build process itself and anything else that needs to be stored after a pipeline has finished.
These artifacts, published by a job, can be fetched and used by any downstream pipeline or any stage after the one that produced the artifact in the same pipeline, using a special task called a Fetch Artifact task. As jobs are independent of each other. So, a job in the same stage as another job that produced an artifact cannot use that artifact. It needs to be used in a stage after that one.
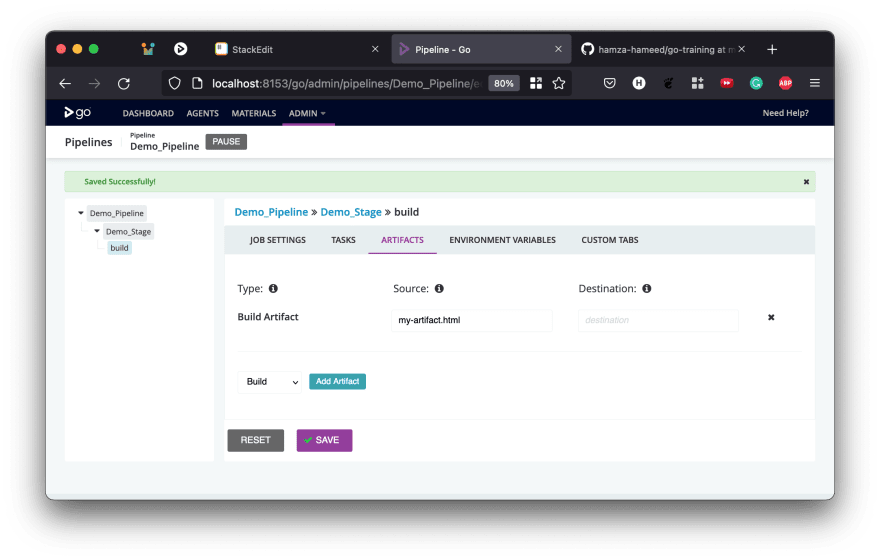
Let's see how to publish an artifact. In the upstream pipeline, Demo_Pipeline, let's first declare an artifact. The build script used throughout this guide creates a file called my-artifact.html after it finishes. We can use that as the artifact for this example.
- Go to
Admin->Pipelinesand select the stage,demo_stageand then the job,build. - Click on the
Artifactstab in the job. - Enter
my-artifact.htmlas the artifact source. - Leave the
Destinationbox empty for now.
Since we have chosen to leave the Destination empty, and that means that the artifact will be accessible at the root, by its own name. We have also chosen the type as Build Artifact, to signify that it is not a Test Artifact. Marking it as a Test Artifact means that GoCD will try and parse the file as a test report and if it can, it will use it in the test aggregation reporting it does. Typically, you'll want to use Build Artifact for installers, binaries, documentation, etc.
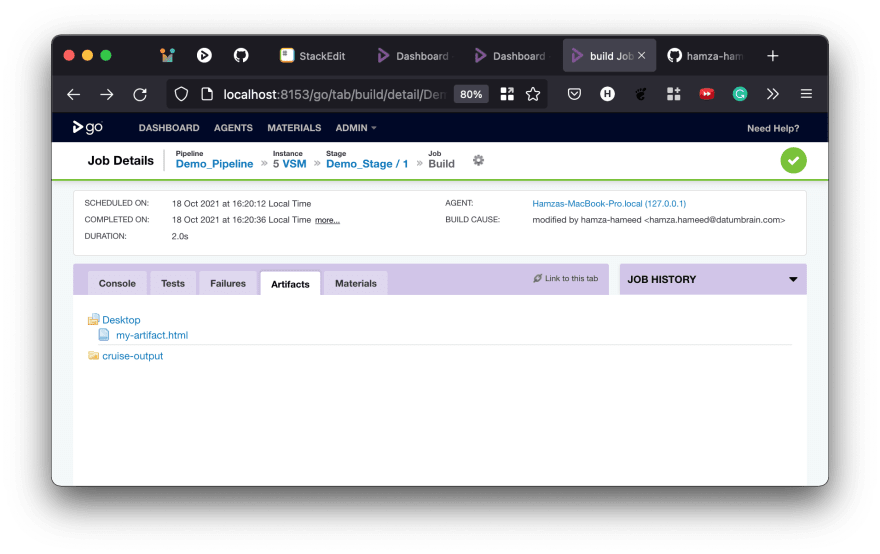
After saving this change, retrigger Demo_Pipeline by going to the pipeline dashboard and clicking on the play button against it. Once it is finished, going to the Artifacts tab of the pipeline run shows you the artifact for that run. Every run of that pipeline, from now on, will have that artifact.
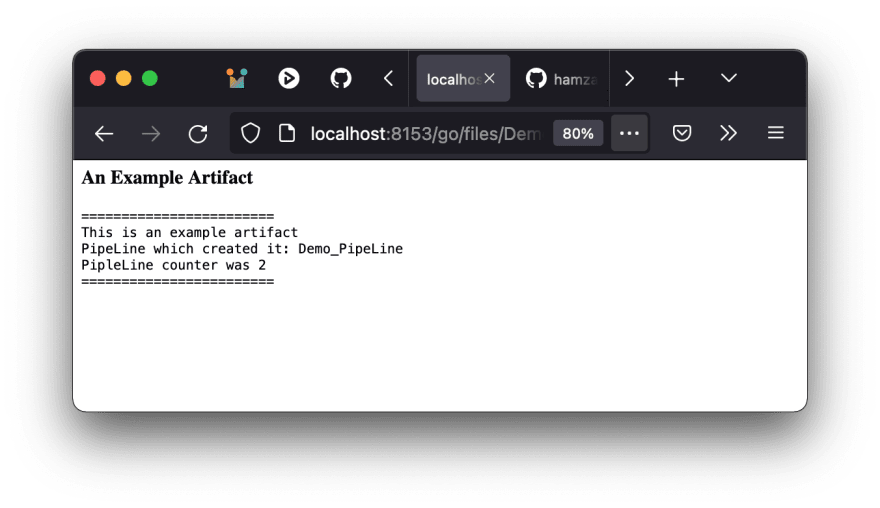
Clicking on it will show you its contents
Fetching and using artifacts
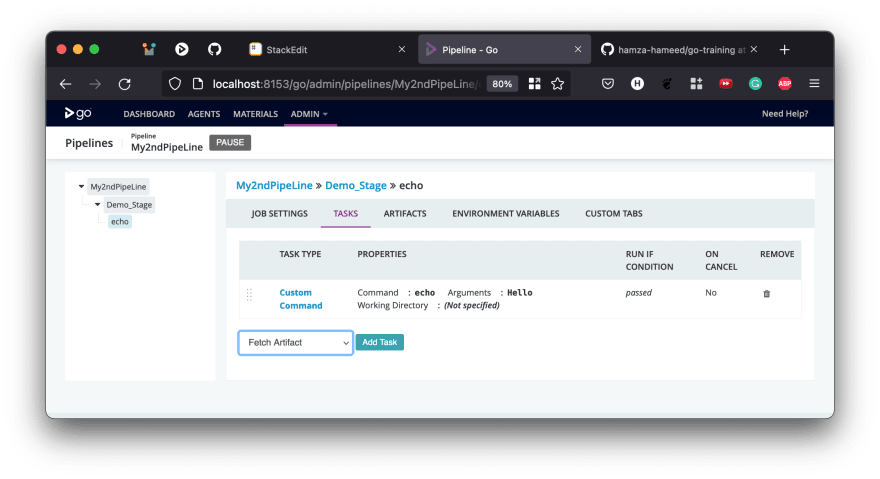
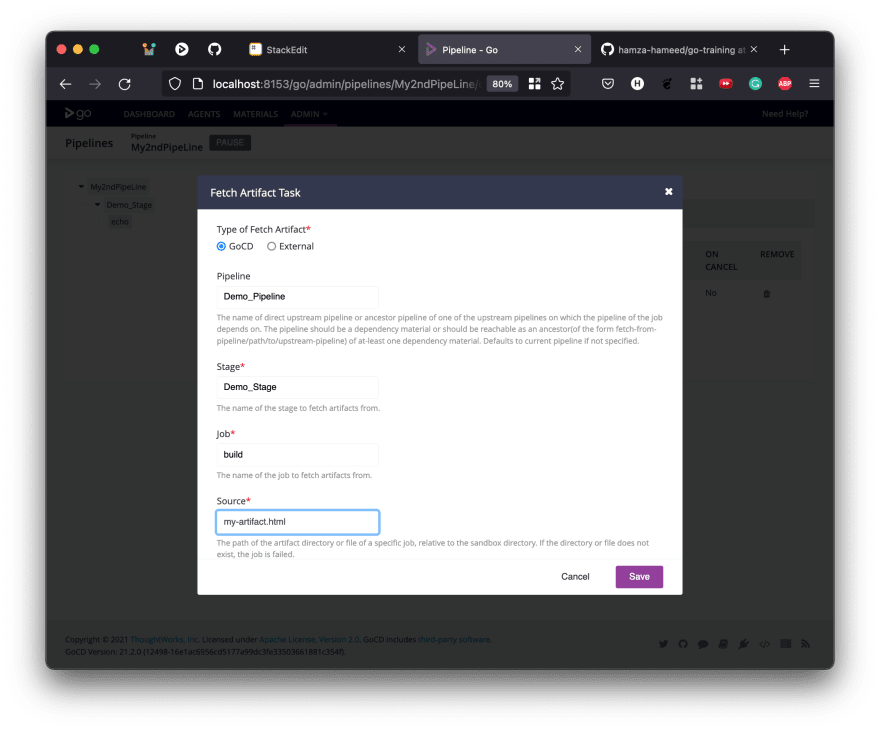
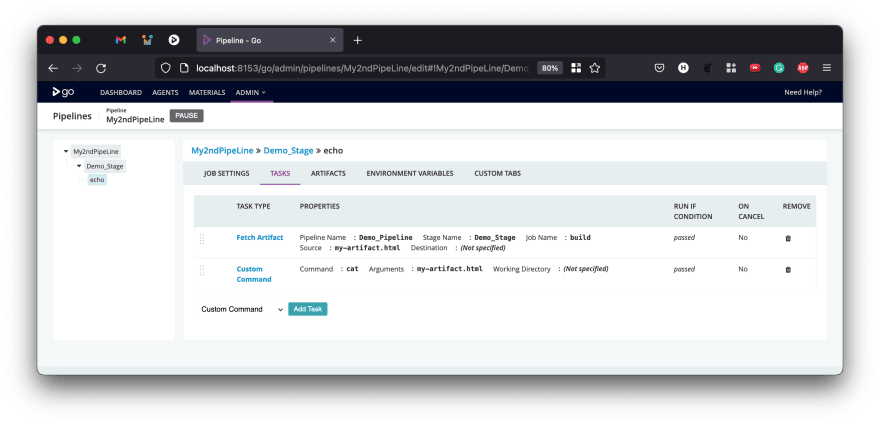
We can now use this artifact in any downstream pipeline, or any subsequent stage of the same pipeline. Let's fetch this artifact in the pipeline My2ndPipeline and display it as a part of the output. To do this, we go to the task configuration section of the echo job inside the Demo_Stage stage of My2ndPipeLine pipeline, and add a Fetch Artifact task.
Once you provide all the details and click save, you can move the Fetch Artifact task above, so that it is done first. Then, for this demonstration, let us display the fetched file in a Custom Command task.
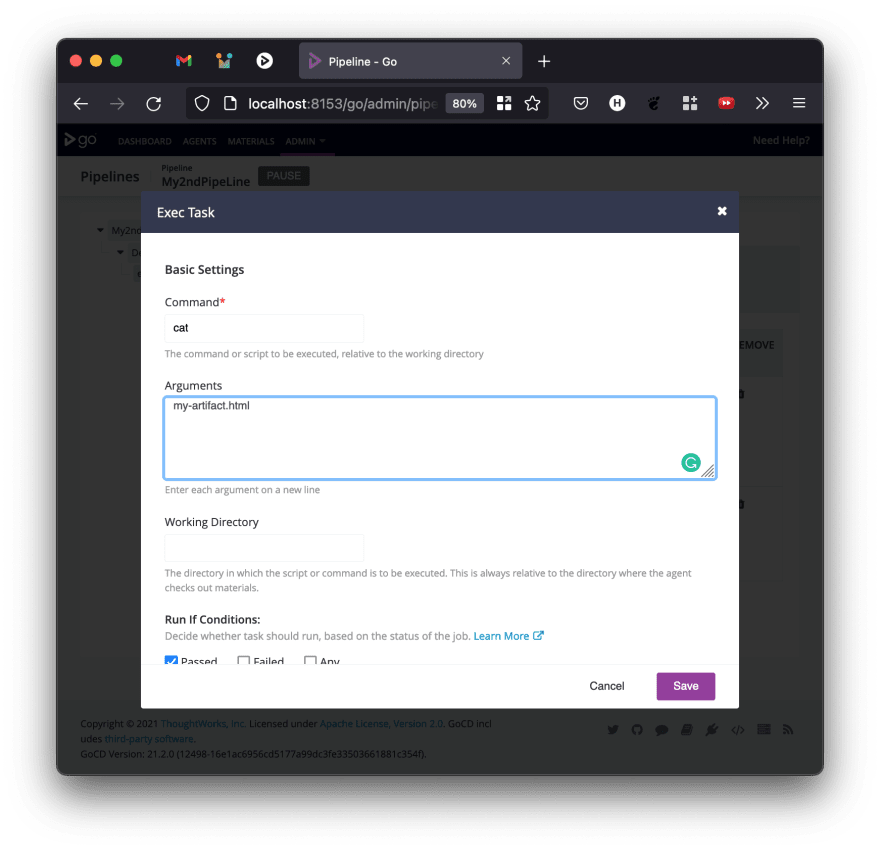
After it is moved up, you can edit the Custom Command task to output the contents of the file (for instance). If you are running this on Windows, use type instead of cat
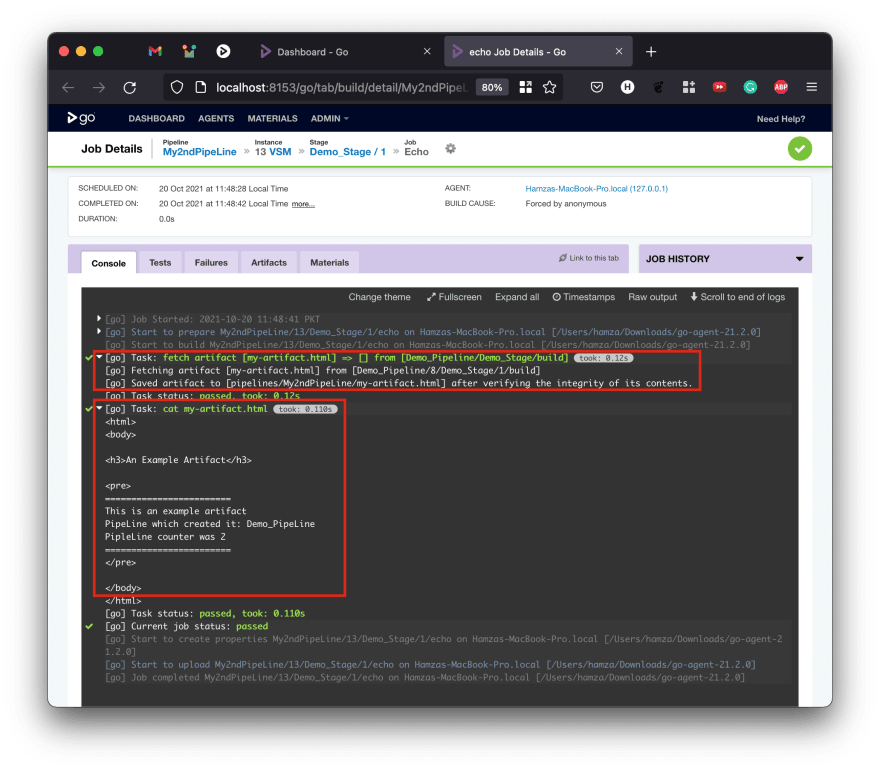
Running My2ndPipeLine now will show you the contents of the file created in Demo_Pipeline and fetched as an artifact. The importance of fetching an artifact this way is that GoCD will ensure that the correct version of the artifact will be fetched and provided to the job in My2ndPipeLine.
If more instances of Demo_Pipeline ran (because it is fast) while My2ndPipeLine has run fewer times, GoCD will ensure that every time My2ndPipeLine runs, the correct (and compatible) version of the artifact is fetched and used. When you now check the output of the pipeline, you should see something like this
Hope this helped you.









Top comments (0)