In this post, we will look at how a calendar app backend with scheduling logic can be implemented with Hasura GraphQL and Scheduled Triggers API in Hasura.
The core functionalities of this app would involve
- Scheduling a one time event with cancellation logic.
- Scheduling a recurring event with cancellation logic (one instance of the event or the whole event)
- Event creator should be able to invite other users to their event.
- Check availability of the user to be invited.
The hard parts about building this app would be about confirming event based on availability, sending email reminders / notifications a few minutes before the event begins and handling for any changes (like modified timestamp) etc.
I'm taking the simplest of schema and will be talking about where logic fits in and how scheduling can be done.
Database Schema
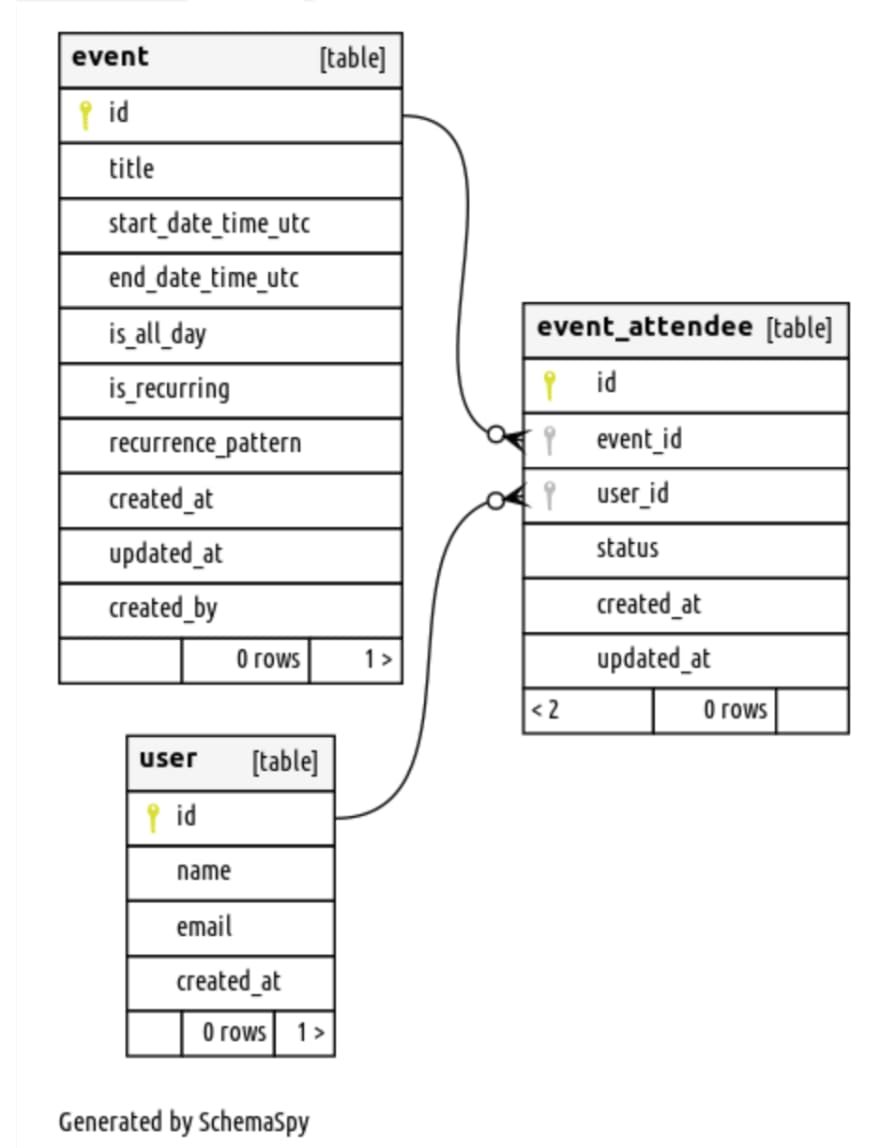
Users want to schedule an event for a specific time and invite users to their event. The simplest schema for scheduling an event would have three tables.
- user (users of the app)
- event (contains the list of events created by any user)
- event_attendee (all the users who are participants of the event)
For recurrence pattern, iCal RFC is being followed which will have the format like FREQ=DAILY;INTERVAL=10;COUNT=5. We will make use of this format later to validate and schedule in our custom code.
Hasura GraphQL
We are going to make use of Hasura to build the backend with GraphQL. Hasura auto-generates CRUD APIs for the app, allows for declarative authorization rules and lets you schedule events in the future.
The database schema in Postgres along with the Hasura project setup is available here on github.
Data Fetching
Let's look at different data fetching queries that are required for a calendar app.
- Fetch all events of a user for a given day/week/month/year
The fundamental requirement of the UI would be to look at the schedule (either upcoming or past) for a given date range. This can be simply retrieved using the following query:
query fetchEvents($from: timestamptz!, $to: timestamptz! ) {
  event(where: {
    start_date_time_utc: {_gte: $from},
    end_date_time_utc: {_lte: $to}
  }) {
    title
    start_date_time_utc
    end_date_time_utc
    recurrence_pattern
    is_recurring
    is_all_day
  }
}
Note the usage of $from and $to variables which can be substituted with the timestamp value. These variables can be passed in the right values depending on date range (day/week/month/year), typically part of any calendar / event booking UI.
Business Logic
The read queries require no code to be written since we are making use of the Instant GraphQL APIs. But there's more to this app than just using the auto-generated API. For example,
- Validating if the event can be scheduled based on availability and checking if dates are valid.
- Sending invitation emails upon event confirmation.
- Schedule an email or notification reminder just few minutes before the event begins.
This requires hooking into the mutation for inserting an event.
Scheduling Events
Let's come to the core part of the app; Scheduling. The ability to get notified a few minutes before or just on time of the event is one of the core parts of the app that we are covering in this post. This is trivial to do with Scheduled Triggers with Hasura.
Hasura has two types of scheduled events:
- Cron triggers
- One-off scheduled events
As the name suggests, Cron triggers are used to schedule events on a cron schedule. (For example, run every day at 12AM). In a calendar app, this is useful to setup reminders/notifications for a recurring event.
One-off scheduled events
One-off scheduled events are used to reliably trigger an HTTP webhook to run custom business logic at a particular point in time. This is useful to setup a webhook to run only once in the future. This is a more common use case for our calendar app.
Actions for custom mutation
The logic of scheduling events will take place immediately after creating an event. Hasura gives you GraphQL mutations as part of its auto-generated API. But since we have some custom logic to check if event is valid and some scheduling of tasks to be done, we will make use of Actions to write a custom mutation that handles this.
The createEvent custom mutation will look something like:
mutation createEvent($object: eventInput! ) {
  createEvent(object: $object) {
    id
  }
}
This is how the types look like for the Action:
type Mutation {
  createEvent (
    object: eventInput!
  ): eventOutput
}
If you look at the input type eventInput, we have just derived the types from the original mutation that was auto-generated by Hasura and added one more object called attendees so that we can tag who are all attending the event in the same mutation call.
input eventInput {
  created_by : Int
  end_date_time_utc : timestamptz
  is_all_day : Boolean
  is_recurring : Boolean
  recurrence_pattern : String
  start_date_time_utc : timestamptz
  title : name
  attendees : [attendeeIds]
}

input attendeeIds {
  id : Int
}

type eventOutput {
  id : uuid!
}
Alright! Now that the types are out of the way, let's write the resolver. In Hasura Actions, your resolver is basically a HTTP POST endpoint and you don't need to write a GraphQL server from scratch.
The codegen tab under an Action gives you boilerplate code to get started. You don't need to even set this up, no kidding :D
Validations
Once you have the boilerplate setup, the first thing to start writing would be validations. We have a few validations to be performed.
- Check if the event start date and end date are future date/time and valid.
- Check if the user who is creating the event and the user who is attending the event are available during that time. Now this may not be a blocking validation and we can totally allow multiple events for the same timeframe.
Create a scheduled event
Once the mutation is complete, we would like to schedule an event a few minutes before the start time (start_date_time_utc) of the event.
The request body for this one-off scheduled event will roughly look like:
{
    "type" : "create_scheduled_event",
    "args" : {
        "webhook": "<my_webhook_url>",
        "schedule_at": moment(start_time).subtract('10','minutes'),
        "payload": {
            attendees_data
        }
    }
}
The payload contains the attendees data (in this case the user_id) to actually send out email notifications.
Cancellation Logic
The application typically allows for cancelling scheduled events. In this case, we need to be able to handle this logic inside the scheduling webhook. The webhook can check the status of event and event_attendee to verify if the event is still valid to be executed.
For example, if the status column on the event table says cancelled, then the scheduled event can be ignored.
Note: You don't need to delete the scheduled event, but rather put the logic in place inside the webhook to understand if the event is valid at the time of execution.
Webhook for Scheduling
The webhook URL that you specified during the creation of scheduled event must handle the cancellation logic mentioned above. This will also be responsible for sending out emails/reminder notifications as part of the app logic.
- Fetch the event details and check the status column
- If event is cancelled, don't proceed further
- If valid, send email to all notifications
Permissions
What about security? Hasura gives you role based access control that can be configured declaratively. Depending on the app we might want to restrict who is able to read the event, who is able to create an event etc.
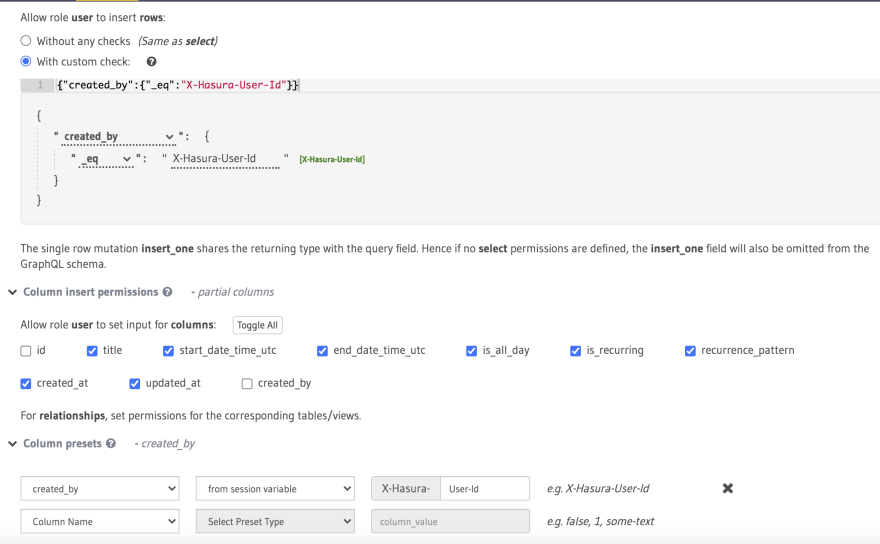
We would like to enable anybody who is logged in to be able to create an event. Let's assume logged in users are assigned the role user.
For example: The insert permission for event looks like the following:
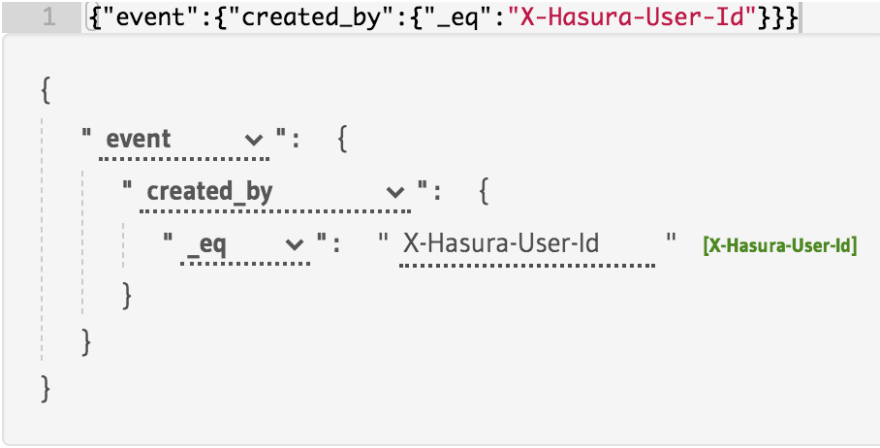
So who can invite attendees to the same event? Most likely the creator of the event.
Note that we are making use of relationships here and applying permission. If the requirement is to allow any existing participant to invite other participants, then we can apply the following insert permission:
This is a boolean expression which lets either the creator of the event or the attendee of the event to invite other users to participate in the event. The permission rules can be tweaked quickly according to the app requirement.
For the custom mutation createEvent we need to allow the role user to be able to execute the mutation. This can be done via the Actions manage tab.
We can also configure who can update the event; If all participants of the event can update or just the creator of the event. With flexible boolean expressions, the permission can nest to different relationships and conditions.
Summary
The freedom of writing custom logic in language of choice but making configuration declarative is a great balance to build complex apps. Hasura's eventing system helps build asynchronous logic away from the core API, and with serverless, you don't need to worry about scaling and cost.
The permission layer allows you to build custom logic via Actions, yet keep it secure via metadata configuration. Role based access control lets you focus on the scheduling logic of the app than the permissions.


Top comments (0)