While email campaigns aren't the newest or shiniest of marketing strategies, they’re still considered a trusted method of e-marketing and are used to communicate to both current and potential customers (or users) of your product. So planning and managing your campaigns properly is important.
While marketing teams are aware of this importance, one thing that often gets neglected is the images. The images used in email campaigns are usually really heavy, which results in the email loading really slowly or, in network areas where coverage is poor, not loading at all.
In this post, we’ll show you how to use Cloudinary’s image optimization feature to adjust images for your email campaigns. Every image manipulation, optimization, and transformation offered by Cloudinary can also be applied to images that are sent out as part of your emails. So, whether you want to scale your images, reduce the size, add some text to it etc., Cloudinary has got you covered. Awesome right?
Optimizing an image is basically keeping the size of the image down by resizing, converting the format or changing the quality. And with that knowledge, let us now see how this can be achieved.
Adjusting your image quality
First up, let's see how easy it is to change our image quality. You probably have a creative team that provides you with the images that are used for your campaigns. Most times these images are of really high quality. While having an image of such quality might be a nice-have, you might really want to reconsider. Such images are usually very large and they cause the email to gain a few pounds 😜.
So lets shed those off.
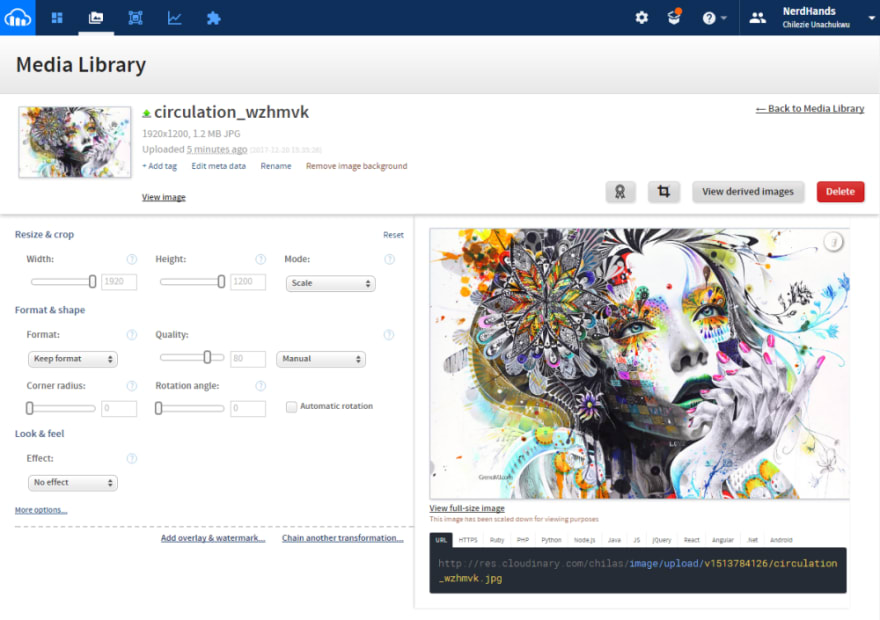
Go ahead and create a Cloudinary account which only takes a few minutes. When you are done upload a test image to your media library. You can easily get your image URL by clicking on the image on the media library. Clicking on the image also reveals some basic controls for manipulating your image. See screenshot below.
Now that we have our high-quality image on the platform, how do we request one with a lower quality? Simply by adding q_[quality] to the URL. So take for example our image below whose URL is https://res.cloudinary.com/chilas/image/upload/v1513784126/circulation_wzhmvk.jpg and is 1.2MB will now become https://res.cloudinary.com/chilas/image/upload/q_40/v1513784126/circulation_wzhmvk.jpg if we want the quality to be set to 40. This also reduces the file size to 389KB.
The quality scale ranges from 10 to 100 but of course, you can always let Cloudinary handle it automatically by specifying q_auto. I would advise though for Email campaigns it's best to find the sweet spot yourself and use.
Resizing your images
Let me point out now that my image's dimension is 1920 x 1200. This is a full HD resolution. But we don't need our image to be that large when most of your users might likely be using a mobile device.
Well adjusting the size of the image doesn't require us going back to the creative design but adding a simple width parameter to the generated URL.
Say we want our image to be adjusted to a width of 500px, we simply just add w_500 to the URL. Hence it should look like this:
https://res.cloudinary.com/chilas/image/upload/q_40/w_500/v1513784126/circulation_wzhmvk.jpg
That's just it. Now you have an image perfect for most mobile devices.
Using the right image format
Cloudinary supports Browser-based Image formats which, to be honest, is a super important. Browsers usually have image formats that have been optimized for viewing on them and Cloudinary's intelligent system takes advantage of this.
To take advantage of this, all you should do is add f_auto parameter to the URL and it delivers the image in a format that has been optimized for the browser. For example, it serves the WebP version of the image to Google Chrome users and JPEG-XR version of the image to Internet Explorer 9+ users. If the browser does not support these modern image formats, the default optimized JPEG is served.
https://res.cloudinary.com/chilas/image/upload/q_40/w_500/f_auto/v1513784126/circulation_wzhmvk.jpg
Conclusion
This post showed you how to adjust your images for more successful images using Cloudinary’s image optimization feature. What are your tips for optimizing images for you campaigns? Let us know your thoughts in the comments!


Top comments (1)
Excellent use of Cloudinary! :D