
Introduction
Docker is a powerful tool in today’s software world which helps developers/software engineers package their applications and all the things they need to run smoothly into small containers. These containers work the same no matter where they are used whether on a developer’s laptop or in a big server. This guide is for anyone who wants to learn Docker, from people starting in DevOps and software development to students and anyone curious about technology. We’ll cover the basics of Docker, how to set it up, and how to use it in real-life situations. By the end, you’ll have a good grasp of Docker and how it can make your work easier.
Prerequisite
- Basic understanding of the command line interface (CLI) or terminal.
- Access to a computer with internet connection.
Table of contents
- Introduction
- Prerequisites
- What is Docker?
- Benefits of using Docker
- Setting Up Docker
- Docker Architecture
- Creating Your First Docker Image
- Basic Docker Networking
- Push Your Image To Docker Hub
- Docker Compose
- Persisting Data with Docker Volumes
- Conclusion
What is Docker
Docker is an open-source platform designed to automate the deployment, scaling and management of applications encapsulated into containers. This means that Docker packages the application code along with its dependencies, libraries, configuration files, and other required components into a single, isolated container ensuring that it runs consistently across different computing environments. The underline host where docker is installed is called docker host or docker engine.
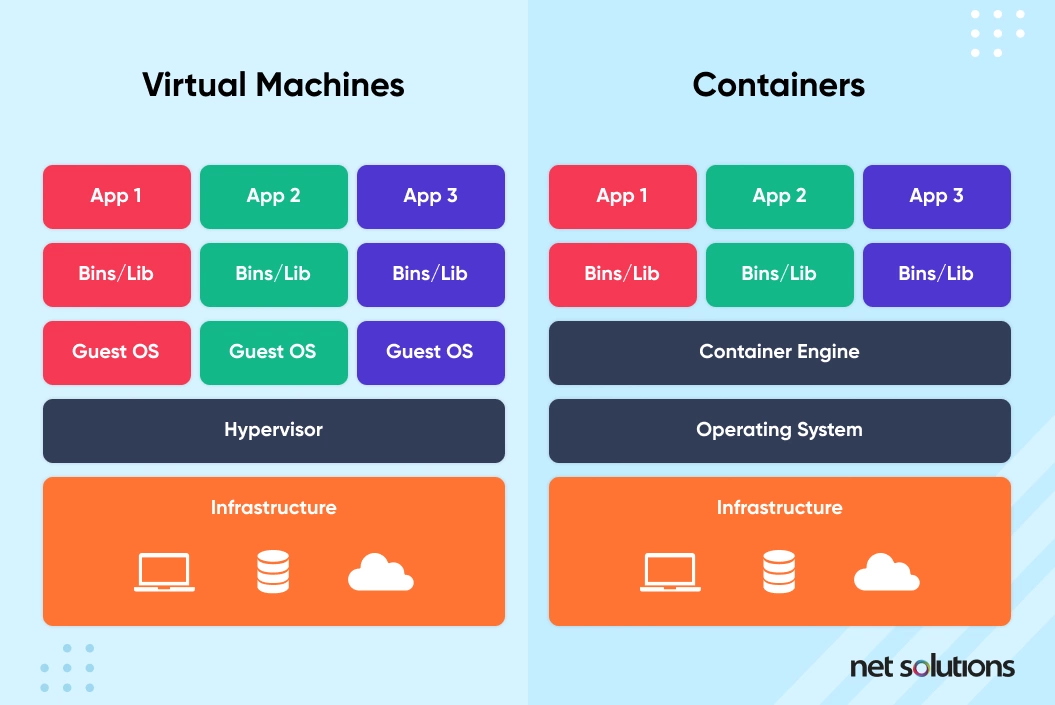
Containers vs. Virtual Machines
Unlike virtual machines, which run on hypervisors and require a full operating system to function, containers share the host OS kernel and isolate processes at the application layer, making them more lightweight and efficient. This also means they can be provisioned faster.
Container vs Container Image
A container is a runnable instance of an image which means containers are created from images. When a container is started, docker takes the image and adds a read-write layer on top allowing it to perform certain tasks like save data and interact with the outside world.
A simple command like docker run <image name> can be used to run a container from an image and multiple instances of an image can be run on the same server.
A container image is the template, while a container is an instance of that template in action.

Docker is used for microservices architectures, continuous integration/continuous deployment (CI/CD), simplifying environment setup and scaling applications. It can also be used for Monolithic Architecture where multiple instances of your image are spin up and you can either scale up (adding more instances — vertical scaling) or scale out (provision new server with same image — horizontal scaling) ensuring consistency across servers.

Benefits of using Docker
- Efficiency: Containers are lightweight and faster to spin up.
- Portability: Containers can run on any system that supports Docker.
- Isolation: Containers isolate applications from one another and the host system, improving security.
Setting Up Docker
Docker can be installed on your OS by downloading it from their official website.
Once you’re done installing Docker, you can test your installation by running a simple docker image (hello-world)
docker run hello-world
The docker run command does two things here. If it does not find the image in your local system it goes ahead to first run the docker pull <image-name> which downloads the image from the official dockerhub repository before it executes the docker run <image-name>.
Basic Docker Commands
You might need to add sudo (superuser do) for elevated privileges in a Linux based distribution. sudo docker pull
docker pull: This command is similar to the git pull command, it simply pulls the docker image from the dockerhub registry.
docker run: Run a container from an image.
docker version: Check the installed version of docker.
docker ps: Lists running containers
- You can add the
- aflag to view stopped containers. docker images: Lists all images (or docker image ls)
docker stop: Stops a running container
docker rm: delete container
docker rmi: delete image
Docker Architecture
Docker uses a client-server architecture where the docker client talks to the docker daemon. The docker daemon does all the heavy lifting of running, building and distributing your docker containers.
Components of Docker
- Dockerhub: Docker Hub is a cloud-based registry service provided by Docker that allows you to find, store, and share container images.
- Docker Compose: Docker Compose is a tool for defining and running multi-container Docker applications. With Docker Compose, you use a YAML file to configure your application’s services, networks, and volumes. With a simple command you can create and start all the services from your configuration file. We will look more on this later.
- Docker Daemon: This is a background process that manages docker images, containers, networks, and storage volumes.
- Docker Engine: This is a core component of docker that creates and runs containers.
Docker Objects
- Docker Image: A read-only template to create containers which contains all necessary codes and dependencies required to run your application.
- Docker Container: A runnable instance of an Image. Containers run the actual application.
- Docker Volume: This is a persistent data storage mechanism used to by containers to store data outside the container’s filesystem. More on this later…
- Docker Network: This is a networking component that allows docker containers to communicate with each other and non-docker environments.
Creating Your First Docker Image
Docker uses Dockerfile for building docker images. A Dockerfile is a text file that contains instructions on how to build a particular application into a docker image and these instructions are processed by the Docker Engine. A simple Dockerfile will look like this:
FROM ubuntu:20.04
RUN apt-get update && apt-get install -y <dependencies>
COPY . /app
WORKDIR /app
CMD ["./your_app_executable"]
1) FROM ubuntu:20.04
-
FROMis a Dockerfile instruction that specifies the base image for the Docker container. The base image is the starting point for building your own image. - If the image is not already on your local system docker will pull this image from dockerhub (ubuntu:20.04)
- Tags are a way to version and label docker images making it easier to identify and manage different versions of it. You can always find the tag after the colon (:) which is
:20.04or:v1.0,:v2.0
2) RUN apt-get update && apt-get install -y
-
RUNis a Dockerfile instruction used to execute commands in the container during the build process. - This line runs commands to update the package list and install necessary dependencies.
3) COPY . /app
-
COPYis a Dockerfile instruction used to copy files and directories from the host filesystem into the container’s filesystem - This line is copying files from the current working directory on the host machine (.) to the (/app) in the container.
4) WORKDIR /app
-
WORKDIRis a Dockerfile instruction that sets the working directory in the container for any subsequent instructions in the Dockerfile
5) CMD ["./your_app_executable"]
- CMD is a Dockerfile instruction used to specify the default command to run when the container starts. These defaults include the executable to run.
To build your image run this:
docker build -t myimage-name .
The -t flag is used to assign a name and an optional tag to the Docker image that is being built from a Dockerfile.
To run a container from that image run this command
docker run -d --name mycontainer myimage-name
I added some extra parameters to this command here
- d: runs the container in detached mode. In simple terms running the container in the background
-- name: the flag is used to assign a unique name to your container for easy identification. You can give it any name depending on it’s function.

Basic Docker Networking
Docker networking allows containers to communicate with each other and with external systems. It is an essential aspect of deploying applications using Docker. To see all the networks on your machine run this command
docker network ls
Network Drivers: Docker provides several network drivers for different use cases:
- bridge: The default driver for standalone containers. Containers on the same bridge network can communicate with each other using their IP address. docker run ubuntu
- host: Removes network isolation between the container and the docker host, using the host’s networking directly. There’s no need for port mapping as the port created on the container can be accessible directly on the host. docker run ubuntu --network=host
- none: Disables all networking. Containers only have a loopback interface. docker run ubuntu --network=none
Creating a Network:
You can create a user-defined bridge network to allow better control over container communication using the create command.
docker network create my_bridge
Connecting Containers to a Network:
When starting a container, you can connect it to a specific network using the --network flag.
docker run -d --name my_container --network my_bridge my_image
Inspecting Networks:
To inspect a network and see the connected containers use the inspect command.
docker network inspect my_bridge
DNS Resolution:
Docker networks have built-in DNS resolution, allowing containers to resolve each other by name.
Push Your Image To Docker Hub
You can push your image to your own docker repository after creating an account on dockerhub. Here is a simple step on how to push your image to your dockerhub repository:
1. Create a Docker Hub Account:
If you don’t have a Docker Hub account, you can create one at dockerhub.
2. Login to dockerhub from the CLI
Open your terminal and log in to dockerhub using the following command:
docker login
You will be prompted to enter your dockerhub username and password.
3. Tagging Your Image
Before pushing your image to dockerhub, you need to tag it with a repository name that includes your dockerhub username. Let’s assume your local image is named my-image.
docker tag my-image:latest yourdockerhubusername/my-image:latest
Replace yourdockerhubusername with your actual dockerhub username.
4. Push the Image to Docker Hub
Use the docker push command to push the tagged image to dockerhub.
docker push yourdockerhubusername/my-image:latest
Docker Compose
Docker Compose allows you to define and run multi-container Docker applications using a YAML file.
Writing a Docker Compose File:
Unlike JSON that uses curly braces YAML uses indentation to define blocks of instructions. A YAML file can either have .yaml or .yml extension.
If you’re unfamiliar with the YAML syntax check out this YouTube video
Example of a docker-compose.yml (this is the standard way of writing a compose file) file for a web application with a database.
version: '3.8'

services:
  web:
    build: ./frontend
    ports:
      - "8080:80"

  api:
    build: ./backend
    ports:
      - "3000:3000"
    environment:
      DB_URL: mongodb://db/db-name


  db:
    image: mongodb:4.0-xenial
    ports:
      - "27017:27017"
    volumes:
      - db_data:/data/db

volumes:
  db_data:
- Define docker compose version
- Define services: In our case we have frontend(web), backend(api) and database(db).
- We need to tell docker how to build an image for each service. We can either use the
buildproperty and tell docker where to find our Dockerfile which will be in the root folder of each service or we can pull an image from dockerhub using theimageproperty. - Next we have to define port mapping for each service using the ports property.
- Setting up an environment variable for the api service to tell where to find the database. We can use the environment property for this. Since all services are connected using the bridge driver we can access each service directly by calling their name
(web,api,db). - The
volumesproperty can be used to store persistent data outside the container’s filesystem. - In the last line we need to define the volumes first before we can use it (db_data).
Running Multi-Container Applications:
To start services run this command
docker-compose up
Once our services are up we can access them using the ports we mapped to each one. Our application has three hosts/containers that communicate with each other using a bridge driver.
You can test to confirm containers can communicate with each other by running a simple ping command.
First let’s enter the terminal shell of our frontend(web) container
docker exec -it -u root web_container_id sh
We have a new command and options here. Let me break it down.
The command docker exec -it -u root web_container_id sh is used to run a shell (sh) inside a running Docker container.
- exec: Command to run a command in a running container.
- -i: Keeps STDIN open, allowing you to interact with the container. You would be able to provide input to the shell, but the session would not have terminal features, making it less user-friendly.
- -t: Allocates a pseudo-TTY (terminal). You would have a terminal interface, but you wouldn’t be able to provide interactive input.
- -u root: Specifies the user as root to run the command.
- container_id: The ID or name of the running container.
- sh: The shell to run inside the container (Bourne shell). Now let’s ping the backend (API) service
ping api
To stop and remove services run this command
docker-compose down
Docker Volumes and Persistent Storage
Docker volumes are used to persist data generated and used by Docker containers. When you stop a docker container by default without explicitly specifying volume mapping, everything generated and stored in it is deleted making it ephemeral, meaning it is tied to the lifecycle of the container
Types of Volumes:
Named Volumes: This is managed by docker and stored in docker’s storage area.
Bind Mounts: This maps a file or directory on the host to a container. This offers more control on the data but less portability.
Creating and Using Volumes:
Create a named volume:
docker volume create my_volume
Use a volume when running a container:
docker run -d --name my_container -v my_volume:/data image-name
Where my_volume is the directory mapped on the host system and /data on the container.
Volume Lifecycle:
Volumes are not automatically deleted when a container is removed, preserving the data.
You can manually remove a volume using this command.
docker volume rm my_volume
Inspecting Volumes:
To inspect a volume and view details about it
docker volume inspect my_volume
Summary
In this article, we covered various fundamental aspects of Docker:
- Basic Docker Networking: How containers communicate with each other and external systems, and the different network drivers available.
- Docker Volumes and Persistent Storage: Methods to persist data generated by containers and ensure data persists across container restarts.
- Docker Compose: Tool for defining and running multi-container applications, simplifying orchestration using a YAML file.
- Pushing Docker Images to Docker Hub: Steps to share and manage Docker images on Docker Hub.
By mastering these concepts, you’ll be better equipped to deploy and manage applications using Docker efficiently.
Let’s connect on LinkedIn here


Top comments (0)