image is borrowed from rietti.com
The Problem
I have hit a hard wall trying to develop with OCaml/ReasonML/Docker/Esy etc. This stack will get you fast app but the build environment is brutally disk space heavy.
I had a bunch of scripts that clean up my computer every night. The scripts deleted every React Native related file, clean the simulator out, deleted all node modules in my working directories and the ~/.esy and ~/.pnpm cache directories on my machine. I could usually get back to about 20-30GB to start my next day of coding.
This worked for a while until I tried to work on a pull request on the esy/esy. Building esy got me down to about 3GB of space which makes it super slow to work on this mac.
Solution (so far)
Get a Samsung Portable SSD T5. After trying to figure out which drive would be best for this purpose, I ended up with this one, basically because @jaapfrolich said so. And if he says so, then it probably right. Luckily, that was enough justification in this case.
Set environmental variables so that the programs eating up the disk space eat up external drive space instead.
You can set the default root directories to something different for all of the above programs. The first thing I did was change the name of my ssd drive to SSD because its easier to type than Samsung Portable SSD T5. I then create an enviromental variable for my external drive using the fish shell.
set -Ux SSD /Volumes/SSD
I then set my roots:
PNPM & NPM
For pnpm, I run:
 [I] ➜ npm config set store-dir $SSD/.pnpm-store
 [I] ➜ npm config set prefix $SSD/.npm
Then test it on a random project to check where the pnpm cache is being generated:
// run ls first to see that there is no `.pnpm-store` directory
 [I] ➜ ls
Containers/       .fnm/        .opam/
Github/           .fseventsd/ .Spotlight-V100/  .npm/        .DS_Store
 [I] ➜ bsb -init test-pnpm-store -theme basic-reason
 [I] ➜ cd test-pnpm-store
 [I] ➜ pnpm i
 [I] ➜ cd /Volumes/SSD
 [I] ➜ ls
Containers/       .fnm/        .opam/
Github/           .fseventsd/  .pnpm-store/
.Spotlight-V100/  .npm/        .DS_Store

 [I] ➜ /Volumes/SSD
We can see that the .pnpm-store directory was created on our external ssd drive. So that works.
ESY
For ESY__PREFIX
// set root for esy.
/Volumes/SSD
[I] ➜ set -Ux ESY__PREFIX $SSD/.esy
/Volumes/SSD
 [I] ➜ echo $ESY__PREFIX
/Volumes/SSD/.esy
I wanted to use .esyrc because it seems cleaner but I could not get it to work.
OPAM
For OPAMROOT. There are apparently a few ways to do this per the man-pages but I could not get them to work so for now we stick with @etiennemillon's suggestion on discuss.ocaml.org. Thank you @etiennemillon.
Be sure to run opam init after you have set the root.
// set opam root
[I] ➜set -Ux OPAMROOT $SSD/.opam
~/Downloads took 2m 52s 87ms
[I] ➜ echo $OPAMROOT
/Volumes/SSD/.opam
[I] ➜ opam init
FNM
I am using the excellent Schniz/fnm node package manager. Mostly because I was loyal to ReasonML. Now it written in Rust but the support there is still ReasonML level friendly and responsive so, fnm it is.
@galstar, who built fnm, says that I just need to change my fish.config to source the directory where I want the cache to be with
// $HOME/.config/fish/config.fish
fnm env --fnm-dir="$SSD/.fnm" | source
DOCKER
For Docker, make a directory on your ssd for Docker to use to store images and whatever else it stores. Here I have named it Containers because that is what @frankrietta's rietta.com almost right on point blog post says. The blog doesn't use Macos Catalina but its totally worth the read anyway.
/Volumes/SSD
 [I] ➜ mkdir /Volumes/SSD/Containers
Assuming you have already installed Docker, open the dashboard:
Click the settings icon to the left of the upgrade button:
Then the resources tab in the menu:
Then change the disk image location directory to the directory you created above.
After you click apply changes, you should be good to go.
Now lets test it by running some random project that uses all these build tools. For that I'll use @davesnx's reason-in-barcelona/async. I am going to clone it to a folder not on my ssd to see how this goes.
[I] ➜ cd ~/Downloads
[I] ➜ git clone https://github.com/reason-in-barcelona/async.git reason-in-barcelona
 [I] ➜ cd reason-in-barcelona/
direnv: loading ~/Downloads/reason-in-barcelona/.envrc
direnv: export +ASYNC_PG_PORT +DATABASE_URL
The project requires watchexec and direnv so make sure you have those installed.
Now let's run make dev from the Makefile and see if this worked.
[I] ➜ make dev
...
∗ installed core.v0.14.0
Done.
# Run eval (opam env) to update the current shell environment
opam install -y ocaml-lsp-server dune

<><> Synchronising pinned packages ><><><><><><><><><><><><><><><><><><><><>  🐫
[ocaml-lsp-server.dev] no changes from git+https://github.com/ocaml/ocaml-lsp.git#HEAD

[NOTE] Package dune is already installed (current version is 2.8.2).
[NOTE] Package ocaml-lsp-server is already installed (current version is dev).
make install
# Install the dependencies
opam install --deps-only --with-doc --with-test -y .
Nothing to do.
# Run eval (opam env) to update the current shell environment
That looks like it worked, thankfully. Let see what happens when we try to build the local db with docker by running docker-compose -f docker-compose.dev.yml up -d.
docker-compose -f docker-compose.dev.yml up -d
reason-in-barcelona on main is 📦 v0.1.0 via ⬢ v14.15.4 is 🐳 v20.10.2
[I] ➜ docker-compose -f docker-compose.dev.yml up -d
Creating network "reason-in-barcelona_default" with the default driver
Creating volume "reason-in-barcelona_db-data" with default driver
Creating volume "reason-in-barcelona_pgadmin-data" with default driver
Pulling db (postgres:12.2)...
12.2: Pulling from library/postgres
54fec2fa59d0: Pull complete
30a95add0890: Pull complete
57bc798d3c84: Pull complete
a41bedb2c5de: Pull complete
589548c3abb4: Pull complete
c4c6b75d5deb: Pull complete
8f8c045a6a99: Pull complete
69f9dd86b24d: Pull complete
45bbaba740ff: Pull complete
1761ca7befa0: Pull complete
57feb34018f4: Pull complete
bede8373accc: Pull complete
6e4c69fbe63b: Pull complete
8a7949704ab2: Pull complete
Digest: sha256:d96835c9032988c8a899cb8a3c54467dae81daaa99485de70e8c9bddd5432d92
Status: Downloaded newer image for postgres:12.2
Pulling pgadmin (dpage/pgadmin4:4.18)...
4.18: Pulling from dpage/pgadmin4
89d9c30c1d48: Pull complete
910c49c00810: Pull complete
7efe415eb85a: Pull complete
7d8d53519b81: Pull complete
519124ac136c: Pull complete
fbfa5cf626f8: Pull complete
f53a64187e16: Pull complete
feae0c230730: Pull complete
87ae2307a1ad: Pull complete
0a609eb1a1ca: Pull complete
b8bb05efc354: Pull complete
bccaa4da228f: Pull complete
084101fb937a: Pull complete
774874c72d7a: Pull complete
45a1fa7f66b7: Pull complete
b19cea40abf6: Pull complete
76e3d6803955: Pull complete
Digest: sha256:1141073018353f91953c1523f170821e139dbd1c2d7808d3804962b2ba7e89e3
Status: Downloaded newer image for dpage/pgadmin4:4.18
Creating reason-in-barcelona_db_1 ... done
Creating reason-in-barcelona_pgadmin_1 ... done
reason-in-barcelona on main is 📦 v0.1.0 via ⬢ v14.15.4 is 🐳 v20.10.2 took 1m 3s 441ms
[I] ➜
That also works! And my primary disk space is unaffected. Big win.
Testing Esy
I guess I should have said go get a coffee because the previous steps take so long. You have to pay for the fast and typed end product by taking the time to install your ocaml build env...
As I ran that command I realized that the project doesn't use esy so I am going run the quickstart steps from the esy.sh to test the esy setup.
Since I deleted my .fnm before I started this process I am going I need to reinstall esy.
[I] ➜ npm i -g esy@next
[I] ➜ git clone https://github.com/esy-ocaml/hello-reason.git
[I] ➜ cd hello-reason
hello-reason on master is 📦 v0.1.0 via ⬢ v14.15.4
[I] ➜ esy
fish: Unknown command: esy
Running esy does not work. Apparently, my environment does not know that it is there. Anyone know what is going on here? I have posted this in the discussion for esy@next here. I will get back to you all when I figure this out.
Update:
I used my trusty go to debugging method, just trying stuff, which got us esy working. At the very beginning, I got cute and ran npm config set prefix $SSD/.npm which resulted in out $HOME/.npmrc file looking like this:
store-dir=/Volumes/SSD/.pnpm-store
prefix=/Volumes/SSD/.npm
When I read the output from npm i -g @esy@next I saw a bunch of symlinks. I have learned the hard way over the years that symlinks are not always your friend. I removed prefix=/Volumes/SSD/.npm from .npmrc, ran npm i -g esy@next again, then running esy in the hello-reason directory worked.
hello-reason on master is 📦 v0.1.0 via ⬢ v14.15.4
[I] ➜ cat package.json | jq '.scripts'
{
"test": "esy x Hello",
"format": "esy dune build @fmt --auto-promote",
"doc": "esy dune build @doc"
}
hello-reason on master is 📦 v0.1.0 via ⬢ v14.15.4
[I] ➜ esy test
Running Test Program:
Hello, World!
If your run ls in your external volume, you will see that that esy is using it to cache files.
/Volumes/SSD
 [I] ➜ ls
Containers/  .Spotlight-V100/  .fnm/        .npm/   .pnpm-store/
Github/      .esy/             .fseventsd/  .opam/  .DS_Store
I should probably delete the .npm dir.
Let see if there are any other issues. I find that there is usually some quirk that show up later on so I am sure I will be back.
XCode
XCode is the master of all disk space hoarders. Dealing with XCode and Esy/OCaml's disk space was the point of this excersize and when I went to use this set up, I realized I had forgotten about Xcode.
This is what I did to get this going.
First, read this stackoverflow issue -> https://stackoverflow.com/questions/59159232/can-i-install-xcode-on-an-external-hard-drive-along-with-the-iphone-simulator-ap/65683543#comment116453766_65683543
There are a bunch of good bits in there though the author says he doesnt vouch for it with XCode 12.
Here is how I did it for XCode 12.
Go to https://developer.apple.com/download/more/?q=xcode, sign in if you have to and select the version of XCode you want. I selected the latest stable version which was XCode12.3.
If you have space issue, which is why you are reading this, you will want to download this to your ssd. I set my browser download location to my SSD drive and double clicked on XCode12.3.zip. This takes a while as you know.
I then deleted the old XCode with CleanMyMac. You can do without it from the terminal with:
rm -rf ~/Library/Developer/Xcode
rm -fr /Applications/Xcode.app
Then you want to symlink Xcode from your ssd to your ~/Applications directory.
ln -s /Volumes/SSD/Applications/Xcode.app /Applications/Xcode.app
Set up the simulator by
Important! Double Click XCode to open it so that it prompts you accept the license. If you dont do this, when you have symlinked the simulator it will just silently shutdown.
After you have accepted the license you can close Xcode which will have opened.
Tell XCode which XCode to use:
[I] ➜ sudo xcode-select --switch /Volumes/SSD/Applications/Xcode.app
Tell XCode which xcode-select to use:
sudo xcode-select -s /Volumes/SSD/Applications/Xcode.app/Contents/Developer
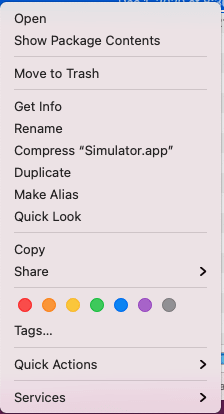
Set up the simulator by aliasing the simulator on your ssd into your applications. I am only using the IPhone simulator so I did the following. Go to the Simulator on your ssd which should be at /Volumes/SSD/Applications/Xcode.app/Contents/Developer/Applications/Simulator.app. Right click it and select Make Alias:

Copy/Drag that to ~/Applications.

Now if you go into some project and run react-native run-ios it should be good to go.
I hope this help you all with limited disk space trying to do too much with your limited tools like I am.
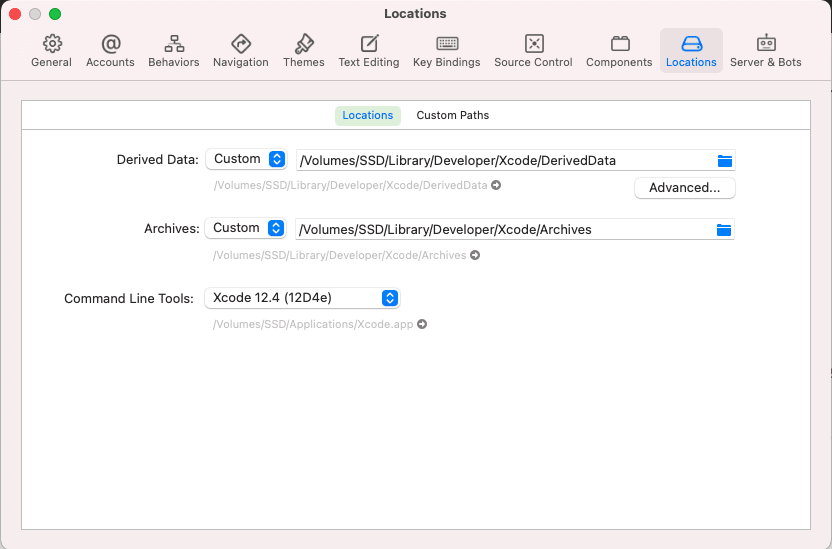
You can also set a custom path for Library/Developer/Xcode/DerivedData and Library/Developer/Xcode/Archives via Xcode -> Preferences -> Locations.
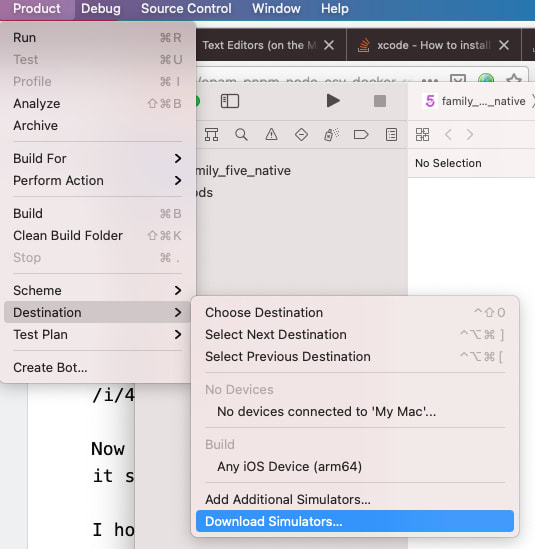
Now download the version you might need via Xcode -> Preferences -> Components or via the Xcode app:
Hopefully these are now being installed in our custom directory on our external SSD.
This also seems to work: https://www.simpleswiftguide.com/how-to-add-missing-iphone-se-simulator-in-xcode-11-with-ios-13-sdks/
Stay tuned.
Other Tips
installing xcode command line tools. Get it from here -> https://developer.apple.com/download/more/
accepting the license in terminal
sudo xcodebuild licensegreat resource: https://wilsonmar.github.io/xcode/#InstallIDE
great resource on installing simulators versions:https://suelan.github.io/2020/02/05/iOS-Simulator-from-the-Command-Line/
fix macos LibreSSL vs openssl xcode react-native issue with https://yasar-yy.medium.com/installing-openssl-library-on-macos-catalina-6777a2e238a6


Top comments (0)