In this post we will look at how we can utilise binary payload such as Protobuf with AWS IoT, to get started and set the environment up we will use Cloud 9 environment and bootstrap to get started. We will utilise the newly released feature of the AWS IoT Rules engine (Decode function) and see how it can work well with protobuf (binary payload).
What is Protobuf
Protocol Buffers (protobuf) is an open-source data format used to serialize structured data in a compact, binary form. It's used for transmitting data over networks or storing it in files. Protobuf allows you to send data in small packet sizes and at a faster rate than other messaging formats.
How does AWS IoT support Protobuf
AWS IoT Core Rules support protobuf by providing the decode(value, decodingScheme) SQL function, which allows you to decode protobuf-encoded message payloads to JSON format and route them to downstream services.
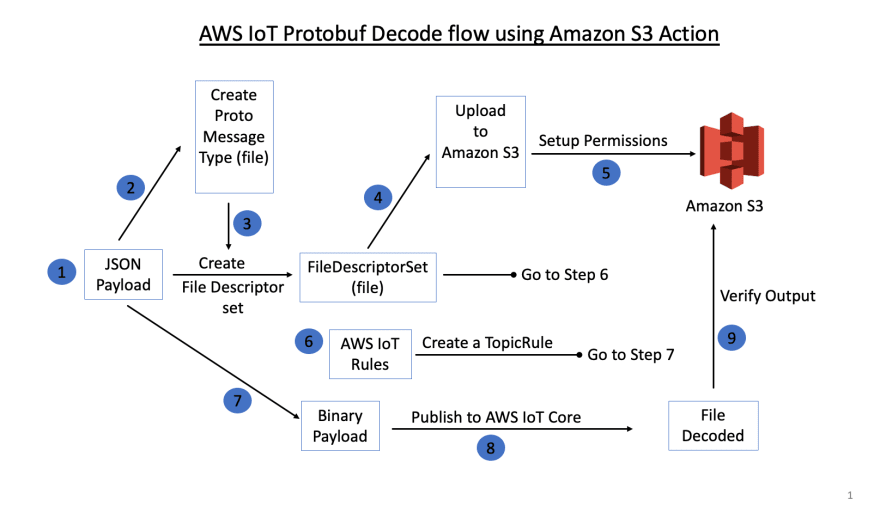
Testing Protobuf with AWS IoT Core Rules engine (Flowchart)
We will use Python to compile our JSON payload and send to AWS IoT Core. We will build FileDescriptorSet to Amazon S3 as AWS IoT Core rules use this DescriptorSet to decode the payload.
Let's look at the flow of how it works:
Environment setup:
Let's use Cloud9 template from here Pick closest region to your location. I will use Ireland as it's closest to me and get started.
Once our environment is set up, we will need to install the following tools and compiler for protobuf (open source)
Acquire the Protobuf Compiler
we will use open source protobuf compiler (protoc) to build our binary payload from JSON, You clone and install the compiler from GitHub here
Create a Protobuf Message Type
Let's create a Protobuf message type file (.proto file extension). Let go through the code and see what is actually going on here (aptly named: automotive.proto):
syntax = "proto3";

package automotive;

message Automotive {
    uint32 battery_level = 1;
    string battery_health = 2;
    double battery_discharge_rate = 3;
    uint32 wheel_rpm = 4;
    uint32 mileage_left = 5;
}
Within our 'Automotive' message, we have 5 variables containing:
- Battery level
- Battery health
- Battery discharge rate
- wheel RPM
- Mileage left on the battery
These are some variables which are used by EV car manufactures (ones I have worked with in the past) as this gives up-to-date data to user as well as obtain latest information from the cloud for consumers on the state of their journey and getting closer GPS location based on the discharge rate vs journey length left.
Now that we have this created, let's create 'File Descriptor Set' using our Proto file.
Create a FileDescriptorSet
We will use our message definition file created earlier (automotive.proto) along with our protoc tooling to create File Descriptor Set (file)
Let's use the following command:
protoc \
--descriptor_set_out=<OUTPUT_PATH>/automotive_descriptor_set_out.desc \
--proto_path=<PROTO_PATH> \
--include_imports <PROTO_PATH>/automotive.proto
In this example:
- is the location where you’d like the FileDescriptorSet to be saved.
- is the directory where your automotive.proto file is stored.
Upload FileDescriptorSet to Amazon S3
We will use Amazon S3 to upload this FileDescriptorSet file to decipher. Upload the FileDescriptorSet to an S3 bucket in the account where you’ll be creating a Rule.
Attach Policy to Amazon S3 bucket
Attach to the following policy on the bucket, so Rules Engine service has the permissions to read the object and its metadata:
{
    "Version": "2012-10-17",
    "Statement": [
        {
            "Sid": "Statement1",
            "Effect": "Allow",
            "Principal": {
                "Service": "iot.amazonaws.com"
            },
            "Action": "s3:Get*",
            "Resource": "arn:aws:s3:::<BUCKET_NAME>/<FILENAME>"
        }
    ]
}
In this example:
- is the name of the S3 bucket where the FileDescriptorSet was uploaded.
- is the object key for the FileDescriptorSet in S3.
- Use the iot.amazonaws.com service principal, as shown in the above policy
Note: The S3 bucket needs to be created in the same region where testing against rules will occur.
Create AWS IoT Rule
We will use AWS IoT Rules to decode the payload and invoke Amazon S3 bucket to store this, as many customers use Amazon S3 either as data lake or as conduit to their data lake further down stream.
Create an IoT Rule with the following SQL expression:
SELECT VALUE decode(encode(*, 'base64'), 'proto', '<BUCKET_NAME>', '<FILENAME>', 'test_proto', 'TestProto') FROM '<TOPIC>'
In this example:
- must match the bucket name we created earlier.
- must match the filename from an earlier step.
- should be replaced with the MQTT topic where you’ll publish messages into AWS IoT Core.
Bucket policy
In order to validate the SQL expression’s result, you’ll need an action associated with the Rule. In this example, I’m using an S3 Action, which uploads the result to the same S3 bucket where the FileDescriptorSet is stored. (Using the same bucket for configurations and runtime data is not ideal. But it’s just a simple way to set up this manual test easily.) The TopicRule payload (saved in a file called rule.json, in my case) for this setup looks like:
{
    "sql": "SELECT VALUE decode(encode(*, 'base64'), 'proto', 'protobuf-docs-manual-test', 'descriptor_set_out.desc', 'test_proto', 'TestProto') FROM 'test/proto'",
    "ruleDisabled": false,
    "awsIotSqlVersion": "2016-03-23",
    "actions": [
        {
            "s3": {
                "bucketName": "<BUCKET_NAME>",
                "key": "result",
                "roleArn": "<ROLE_ARN>"
            }
        }
    ]
}
In this example:
- is the name of the S3 bucket where the FileDescriptorSet was uploaded.
- is values from your account / configuration.
Setup AWS IoT Rule
You can set up AWS IoT Rule by going to AWS IoT Core console and navigating to Message Routing > Rules > Create rule
As I have created below with action invoking the Amazon S3 bucket:
Use AWS CLI if you prefer:
You can create the Rule using AWS CLI by using the following command if you prefer:
$ aws --region us-east-1 --endpoint-url https://us-east-1.iot.amazonaws.com iot create-topic-rule --rule-name <RULE_NAME> --topic-rule-payload file://rule.json
If you want to verify the Rule was created with the correct data, you can run following AWS CLI Command:
aws --region us-east-1 --endpoint-url https://us-east-1.iot.amazonaws.com iot get-topic-rule --rule-name <RULE_NAME>
Create Binary payload
You can use programming language of your choice. In this instance, I'm using 'protoc' which can translate human readable message into binary payload by using our 'FileDescriptorSet' created earlier.
Create a payload file
Let's create ASCII text file as below, saving as payload.txt:
battery_level: 75,
battery_health: "good",
battery_discharge_rate: 18.00,
wheel_rpm: 4000,
mileage_left: 150
Use the following command to create a binary version of this:
cat payload.txt | protoc --encode=automotive.Automotive --descriptor_set_in=automotive_descriptor_set_out.desc > binary_payload_auto
Publish message and verify result
We have completed all the steps needed as we have binary test payload created. The last remaining step is to publish the test payload into IoT and validate that the message was decoded as the expected JSON result and stored in Amazon S3 bucket.
Replace with the endpoint and applicable to you, run the following command to publish the test message into IoT Core:
aws --region us-east-1 --endpoint-url https:// iot-data publish --topic "" --payload fileb://binary_payload
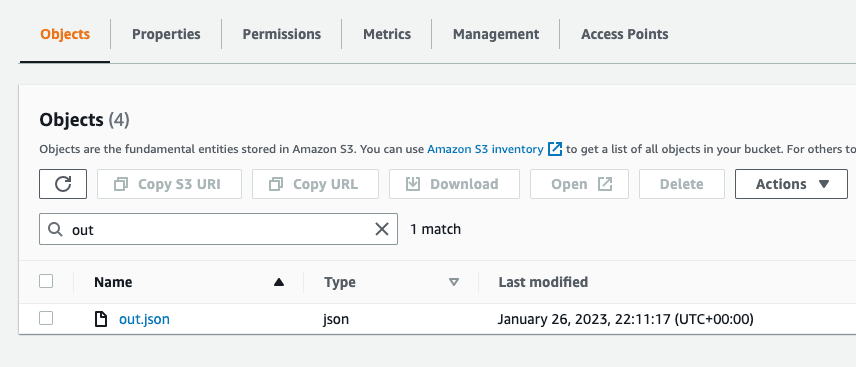
Now we should have payload decoded and stored in the Amazon S3 bucket (one we created earlier and setup as part of our AWS IoT rules action) and you can download and review the payload to verify.
When the file is downloaded, we should be able to see the decoded payload:
{"batteryLevel":75,"batteryHealth":"good","batteryDischargeRate":18.0,"wheelRpm":4000,"mileageLeft":150}
Amazon S3 bucket should show the latest created file.
Conclusion
By following these steps, we can set up our binary payload and program to send this automatically from any device connected to AWS IoT and be able to have this data decoded and stored in Amazon S3.
Further Questions?
Reach out to me on Twitter or LinkedIn always happy to help!


Top comments (0)