GitHub Actions have revolutionized the way we automate workflows in our projects. In this guide, we'll explore how to use GitHub Actions to automatically publish your Node package to npmjs.com, simplifying the release process, since the GitHub cats will take care of the job 🐱.
With this setup, you can ensure that your package stays up to date without manual intervention (may be a paw-intervention). Let's get started with the step-by-step process.
Table of Contents
- Publish Your Code GitHub Repository
- Create an NPM Token on npmjs.com
- Create a GitHub Secret with Your NPM Token
- Create a YAML File
- Configuring the Workflow
- Wrapping Up
1. Publish Your Code GitHub Repository
Before we dive into the automation, make sure your code is hosted on GitHub. If it's not already, create a repository for your Node.js project and push your code to it.
2. Create an NPM Token on npmjs.com
To publish packages to npmjs.com, you need an authentication token. Here's how to create one:
a. Visit npmjs.com.
b. Log in to your npmjs.com account.
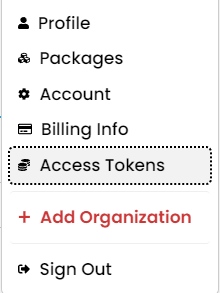
c. Click on your profile picture in the upper right corner and select "Access Tokens."

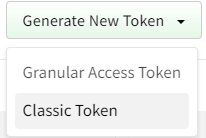
d. Click the "Generate New Token" button and select "Classic Token".

e. Provide a Name for your token, such as "GitHub Actions Token."
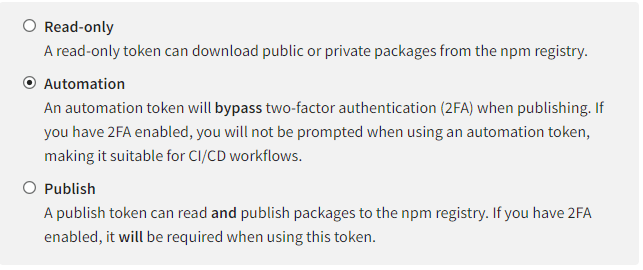
f. Select the "Automation" permission.

g. Click "Generate Token."
h. Keep your generated token secure; you won't be able to see it again.
3. Create a GitHub Secret with Your NPM Token
a. Go to your GitHub repository.
b. Click on the "Settings" tab.
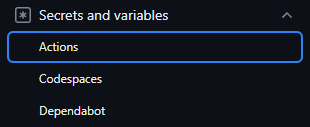
c. In the left sidebar, click on "Secrets and variables" and then "Actions".

d. Click the "New repository secret" button.
e. Name the secret "NPM_TOKEN".
f. Paste the npm token you generated in the previous step into the "Value" field.
g. Click "Add secret" to save it.
Create an YAML file
We'll now set up a workflow to automate the package publishing process. Start by creating a YAML file in your project's repository under the .github/workflows directory. You can name the file something like npm-publish.yml.
└── .github
    └── workflows
        └── npm-publish.yml
Configuring the workflow
Now, inside your YAML file, paste the following code.
name: Publish
on:
  push:
    branches:
      - master

jobs:
  publish:
    runs-on: ubuntu-latest
    steps:
      - name: checkout repo
        uses: actions/checkout@v4

      - name: setup node
        uses: actions/setup-node@v3
        with:
          node-version: 18.x
          cache: "npm"
          registry-url: "https://registry.npmjs.org/"

      - name: install dependencies
        run: npm ci

      - name: increment version
        run: git config user.email "<YOUR_EMAIL>" && git config user.name "<YOUR_NAME>" && npm version patch

      - name: run tests
        run: npm run lint && npm run test

      - name: build package
        run: npm run build

      - name: publish package
        run: npm set "//registry.npmjs.org/:_authToken" ${{ secrets.NPM_TOKEN }} && npm publish -access public
Brief explanation of the code
We have set up the workflow to run on every "push" to the repository, and it will run only on the "master" branch.
Next, we have set up the jobs with some standard GitHub actions configuration, setting up the node version and the "registry-url" from npmjs.org.
The workflow continues by installing dependencies, incrementing your package version (See details below), running the tests, building the package from our source code and finally publishing the package to npmjs.com.
Guidelines
Important: To ensure this workflow functions properly, you MUST have setup your
package.jsonfile before accordingly to this post: Building and Publishing Your TypeScript Code as a NPM Package.Make sure you replace
<YOUR_EMAIL>and<YOUR_NAME>with your email and name, respectively, since the commandnpm version patchwill need to change yourpackage.jsonfile inside your repository.You can replace
npm version <patch>with any other<property>as stated on npm's official documentation; this is up to you.
Wrapping up
So, in this post we saw how you can automate the workflow of building and publishing a package to npmjs.com using GitHub Actions.
Next week I'll explore more this amazing feature from GitHub and use it to deploy a website to a shared hosting service (such as Hostinger, HostGator and so on...).
I was supposed to publish this article next Tuesday, but as I'm new to dev.to I decided to play a little with the posting dates/hours.
Hope you all enjoyed reading this and learnt something new 😄


Top comments (0)