In this tutorial, you are going to learn What is ReactJS and how you can use this JS framework to write maintainable web apps in Javascript.
The project we are going to build will be a clone of Coinmarketcap, a famous website that lists the latest price of Cryptocurrencies. CMC provides JSON APIs to access their data.
Before I get into the main project, let’s talk a bit about ReactJS itself.
What is ReactJS?
From the official website:
A JavaScript library for building user interfaces.
ReactJS was initially developed by Facebook and now maintained by the community.
ReactJS is:
- Declarative :- By declarative, it means that you don’t tell all the nitty gritty details and just tell what you want and the framework will take care of itself. In short, no direct DOM manipulation like it’s done via jQuery.
- Component Oriented:- In ReactJS, a page is divided into components. Some components are children of other components. For instance, if there a page with a search bar. The search bar will be treated as a component.
- Learn Once, Write Anywhere:- ReactJS can be used as a server language with NodeJS and for mobile apps with the help of ReactNative.
Thinking in React
The team behind ReactJS shared a very useful article that talks about the philosophy behind the framework itself and how could you design your apps efficiently by collaborating with other team members. I will be following it to write our CoinmarketCap clone.
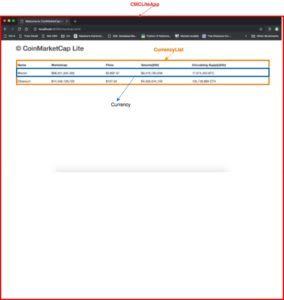
The mockup is done so is component labeling. We will be making our components accordingly.
Creating ReactApp
Assuming you have updated Node and NPM installed, we will use npx tool to install and run react app locally.
npx create-react-app cmclite
You should also install React Developer tools, a Chrome extension to inspect DOM.
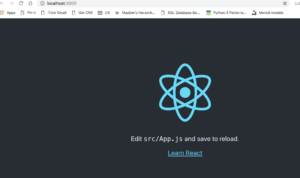
Once the app is created, run npm start to run the server. If all goes well, you should see something like:
At the first level, it creates public and src folder and a few other files.
➜ cmclite git:(master) tree -L 1.├── README.md├── node\_modules├── package-lock.json├── package.json├── public
In public folder you find an index.html file. The file contains the following line:
<div id="root"></div>
The is the main container div of the entire app.
If you notice there is no inclusion of any .jsfile within index.html. TheCreate-React App is doing some magical things to take care of all such dependencies. If you want to dig deeper, read this excellent answer.
Next, go to src/App.js file in which you find the following code:
class App extends Component { render() { return ( <div className="App"> <header className="App-header"> <img src={logo} className="App-logo" alt="logo" /> <p> Edit <code>src/App.js</code> and save to reload. </p> <a className="App-link" href="https://reactjs.org" target="\_blank" rel="noopener noreferrer" > Learn React </a> </header> </div> ); }}
We will remove the unnecessary code lines and the file now looks like:
import React, { Component } from 'react';import './App.css';class CMCLiteApp extends Component { render() { return ( <div className="App"> <h1>Welcome to CMC Lite</h1> </div> ); }}export default CMCLiteApp;
I am not going to discuss what this import means since this is beyond the scope of this article. You might want to google to learn about ES6 javascript. If you are too lazy, visit here.
Alright. the very outer component that is CMCLiteApp is ready and now we have to work on inner components.
Did you notice the weird mixture of Javascript and HTML? It is called JSX (JavaSript XML).
What is JSX?
ReactJS uses JSX for templating purpose, though it is not necessary. There are a few advantages to using it:
- Faster because it performs optimization while compiling.
- Type-safe, most of the errors can be caught during compilation.
- Productivity is increased as it is easier to write templates.
Babel is used as a pre-processor to compile JSX based syntax to JS objects. Let’s discuss a simple example:
const element = <h1>Hello, world!</h1>
You can see this weird syntax. Weird because you see HTML and Javascript are mixed up. If you run paste this line in online Babel REPL you will see the native JS code:
"use strict";var element = React.createElement("h1", null, "Hello, world!");
Another:
const myId = 'test'const element = <h1 id={myId}>Hello, world!</h1>
Here you assign a variable and then use it. The JS version of it is generated as:
var myId = 'test';var element = React.createElement("h1", { id: myId}, "Hello, world!");
As you can see that JSX version is shorter and readable.
<div> <Article /> <LeftBar /></div>
The JS version is:
"use strict";React.createElement("div", null, React.createElement(Article, null), React.createElement(LeftBar, null));
As you can see <div> has nested <Article> and <LeftBar> tags. The JS version also created elements.
Alright, let’s get back to our project. We will create the CurrencyList object now which is nothing but displaying <table></table>
I create a folder under src and named it as components. Under this foder I created a file called CurrencyList.js. Refer to the diagram/mockup I shared above. The name is used there as well.
import React, { Component } from 'react';class CurrencyList extends Component { render() { return ( <table></table> ); }}export default CurrencyList;
The CurrencyList.js contains <table> tag. App.js now looks like this:
import CurrencyList from './components/CurrencyList'class CMCLiteApp extends Component { render() { return ( <div className="App"> <h1>Welcome to CMC Lite</h1> <CurrencyList /> </div> );
After importing the file, I called <CurrencyList> component. If all goes well you should the following in Chrome Inspector’s REACT tab.
The <table> tag is visible here. The typical Chrome inspector shows the following markup:
You can definitely see the difference between the two markups here.
OK, the next component is the Currency component. A single row of the table. Create a new file Currency.js in src/components.
import React, { Component } from 'react';class Currency extends Component { render() { return ( <tr> <td>Bitcoin</td> <td>$68,501,264,485</td> <td>$3,897.57</td> <td>$9,419,160,206</td> <td>17,575,400 BTC</td> </tr> ); }}export default Currency;
As expected, it contains nothing but rows of entries. Right now it is hard-coded but it will soon be linked with CMC API. The CurrencyList.js file now looks like this:
import Currency from './Currency'class CurrencyList extends Component { render() { return ( <table className="table margin-top"> <tr> <th>Name</th> <th>MarketCap</th> <th>Price</th> <th>Volume(24h)</th> <th>Circulating Supply(24h)</th> </tr> <Currency /> </table> ); }}
After adding the static <th> I called <Currency /> component. I also made bootstrap related changes in App.js which now looks like:
class CMCLiteApp extends Component { render() { return ( <div className="container"> <div className='row'> <div className="col-md-12"></div> <h2>© CoinMarketCap Lite</h2> </div> <div class="row margin-top"> <CurrencyList /> </div> </div> ); }}
If everything works fine you should see something like below:
Before I move further and connect the API, let’s talk a bit about Props and State.
Prop vs State
A prop is a read-only object which is passed to the child object(s) by a Parent object. Props can’t be modified. On the other hand, a state object can be modified. Typically, a state object becomes a prop when is passed to a child object. From the CoinMarketAPI, I picked a couple of JSON entries and set a state variable in App.js file.
API\_KEY = '<YOUR COINMARKET API KEY>' state = { currencies: [{ "id": 1, "name": "Bitcoin", "symbol": "BTC", "slug": "bitcoin", "circulating\_supply": 17578950, "total\_supply": 17578950, "max\_supply": 21000000, "date\_added": "2013-04-28T00:00:00.000Z", "num\_market\_pairs": 6700, "tags": [ "mineable"], "platform": null, "cmc\_rank": 1, "last\_updated": "2019-03-09T12:07:27.000Z", "quote": { "USD": { "price": 3943.74146337, "volume\_24h": 10641968561.724, "percent\_change\_1h": 0.0142697, "percent\_change\_24h": 0.477704, "percent\_change\_7d": 2.24831, "market\_cap": 69326833997.50806, "last\_updated": "2019-03-09T12:07:27.000Z" } } }, { "id": 1027, "name": "Ethereum", "symbol": "ETH", "slug": "ethereum", "circulating\_supply": 105163658.5616, "total\_supply": 105163658.5616, "max\_supply": null, "date\_added": "2015-08-07T00:00:00.000Z", "num\_market\_pairs": 4770, "tags": ["mineable"], "platform": null, "cmc\_rank": 2, "last\_updated": "2019-03-09T12:07:20.000Z", "quote": { "USD": { "price": 138.471887904, "volume\_24h": 4958392663.27933, "percent\_change\_1h": 0.105328, "percent\_change\_24h": 0.747307, "percent\_change\_7d": 2.97593, "market\_cap": 14562210339.916405, "last\_updated": "2019-03-09T12:07:20.000Z" } } }, ] }
And then in render() I did the following:
<div className="row margin-top"> <CurrencyList currencies={this.state.currencies} /> </div>
And then in the CurrencyList component, I accessed it via a prop variable:
render() { console.log(this.props.currencies); return (...
As you can see I passed a currencies parameter in CurrencyList tag which I then access within the CurrencyList component. So far so good. Our data is available. What all is required to iterate and create multiple <Currency> objects. I am going to make a few changes in CurrencyList.js so pay attention as they are important.
return ( <table className="table margin-top"> <thead> <tr> <th>Name</th> <th>MarketCap</th> <th>Price</th> <th>Volume(24h)</th> <th>Circulating Supply(24h)</th> </tr> </thead> <tbody> { this.props.currencies.map(( currency ) => { return ( <Currency key={currency.id} currency={currency} /> ); }) } </tbody> </table>
First I surrounded the rows with THEAD and TBODY because I was getting warnings by the compiler. After that, I added an evaluation block {} and within that, I called map to iterate the acurrencies object and pass the value to <Currency> tag. Notice I passed key parameter. Again, React wants to make sure that there are unique DOM entries. Arrow functions and map is beyond the scope of this post. You may find some good resources online. You may also use plain-old for loop too, The Currencycomponent now looks like below:
<tr> <td>{this.props.currency.name}</td> <td>{this.props.currency.quote.USD.market\_cap.toLocaleString('en-US', {style: 'currency',currency: 'USD',})}</td> <td>{this.props.currency.quote.USD.price.toLocaleString('en-US', {style: 'currency',currency: 'USD',})}</td> <td>{this.props.currency.quote.USD.volume\_24h}</td> <td>{this.props.currency.circulating\_supply}</td> </tr>
So far so good. The state object is integrated and the data is being displayed. What is now left is to access the real-time data.
Accessing Remote API
I am going to use Axios library for that purpose. Install it by running npm i axios. You might need to install dependencies manually.
CoinMarketCap API does not allow to access their API directly from Javascript so I created a simple PHP script which accesses CMC API and then returns data by enabling CORS in the returned header. Once Axios is installed, import it import axios from 'axios
class CMCLiteApp extends Component { state = { currencies: [] } componentDidMount() { axios.get('http://localhost:8080/fetch.php') .then(res=> this.setState({ currencies:res.data.data })) }
After emptying the currencies it is then being set in componentDidMount() method. It is invoked immediately once the DOM is inserted into tree. Once the data is fetched, setState() is used to assign the key currencies of state object.
Conclusion
So this was the very basic ReactJS tutorial which should help you to kick start. There are more things that can be explored and I recommend you to visit official docs and other online resources. The code is available on Github.


Top comments (1)
Nice tutorial. I have writeen a turotial on coin market cap api. Hope you find it useful.