If you would prefer a video check it out on youtube at
.
HTML forms are one part of the frontend development cycle that every web developer has had to deal with at one point or another in their career, and recently a friend of mine asked if there was a way to save data entered on an HTML form without any backend, and the Answer was YES!!.
In this article, I would be teaching you how you can link a simple HTML form to a google spreadsheet With the easiest, quickest approach possible. All you need is an HTML form, a Google account (to create the Google sheet), and the ability to copy and paste.
The steps below are used to link the forms and Sheet together:
1.) Create your HTML Form and add the appropriate input fields. For this example I would be creating a feedback form with a name and message field
 .
.
2.) Then log in to your Google account and create a Spreadsheet, fill in the first row of the sheet with the name of the input fields in your HTML form. OMIT THE FIRST COLUMN; it would be used to track the date of each entry.
3.) while still on the sheet, click on the extension menu and select app script. This would open up in another browser tab  .
.
4.)

Rename the app script from “untitled project” to whatever you want. I renamed mine to “feedback form”. After replace the myFunction function with the one below
const sheetName = 'Sheet1'
const scriptProp = PropertiesService.getScriptProperties()
function intialSetup () {
const activeSpreadsheet = SpreadsheetApp.getActiveSpreadsheet()
scriptProp.setProperty('key', activeSpreadsheet.getId())
}
function doPost (e) {
const lock = LockService.getScriptLock()
lock.tryLock(10000)
try {
const doc = SpreadsheetApp.openById(scriptProp.getProperty('key'))
const sheet = doc.getSheetByName(sheetName)
const headers = sheet.getRange(1, 1, 1, sheet.getLastColumn()).getValues()[0]
const nextRow = sheet.getLastRow() + 1
const newRow = headers.map(function(header) {
return header === 'Date' ? new Date() : e.parameter[header]
})
sheet.getRange(nextRow, 1, 1, newRow.length).setValues([newRow])
return ContentService
.createTextOutput(JSON.stringify({ 'result': 'success', 'row': nextRow }))
.setMimeType(ContentService.MimeType.JSON)
}
catch (e) {
return ContentService
.createTextOutput(JSON.stringify({ 'result': 'error', 'error': e }))
.setMimeType(ContentService.MimeType.JSON)
}
finally {
lock.releaseLock()
}
}
```.
Save the project (Ctrl + S or click the floppy disk icon).
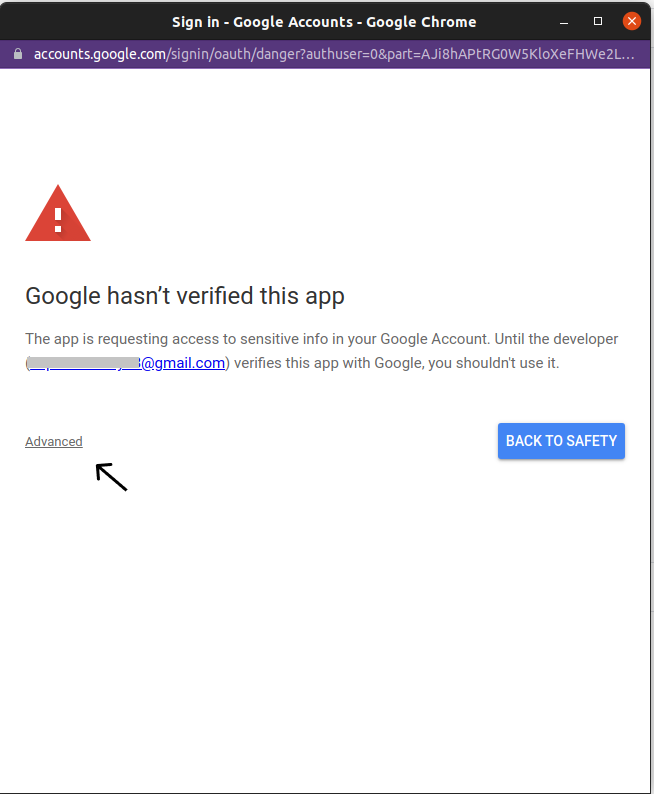
5.) Run the script. This should bring up a permission dialog, follow the steps and grant all permissions required. When you get to this part
 click in advance and continue to the form. If permissions have been given properly, then you should see this
.
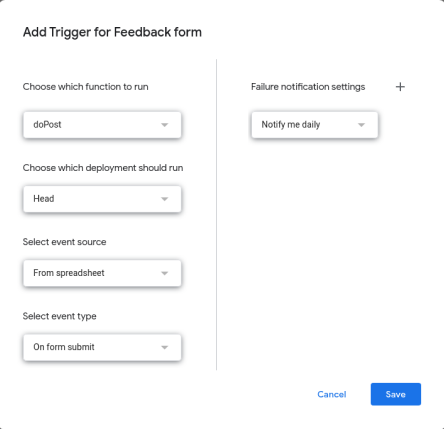
6.) create triggers for the script by clicking on the trigger icon(alarm) on the sidebar and clicking the fab-like button to add a trigger. This would open up a modal like this

Fill in the following options:
- Choose which function to run: “doPost”
- Choose which deployment should run: “Head”
- Select event source: “From Spreadsheet”
- Select event type: “On form submit”
Then save, this might require another permission request which you should grant.
7.) After saving, click on the blue Deploy button on the top right corner and select “New Deployment”. Then click the “Select type Icon” and select “Web App”.
8.) In the form that appears fill in the description field, this can be whatever you want. In the “execute as” field, select “Me”. and then in “who has access” select “anyone”
9.) Deploy and copy the web URL that is shown afterward.
With the above steps, we are done with the google sheet aspect. All that is left now is to link the HTML Form to the sheet. There are several methods of doing this but I would be showing you the one I perceive to be the easier and most flexible. Copy and paste the code below in a script tag.
const form = document.querySelector("#form")
const submitButton = document.querySelector("#submit")
const scriptURL = 'https://script.google.com/macros/s/AKfycbwG9vCMBREFM4suhSiTdVPFu7-F-6JclKyZGGuKjFS-dqaZT6kKXS6r_15kub3YH2R5yw/exec'
form.addEventListener('submit', e => {
submitButton.disabled = true
e.preventDefault()
let requestBody = new FormData(form)
fetch(scriptURL, { method: 'POST', body: requestBody})
.then(response => {
alert('Success!', response)
submitButton.disabled = false
})
.catch(error => {
alert('Error!', error.message)
submitButton.disabled = false
   }
   )
})
The above script:


- submits the form data.
-  prevents the page from reloading.
-  Disables the submit button while the data is being sent to
prevent double clicks.

### Conclusion.
If you follow the instructions above, then you should be able to any type of HTML form to a google spreadsheet. Below is a list of helpful links.
- The Github repo: https://github.com/kromate/HTMLForms-to-google-sheets
- The Google Sheet: https://docs.google.com/spreadsheets/d/1WDCaLrS8u9Topr2cwERgOgvKbJGqhuHgnQjyf5oZWgY/edit#gid=0


Top comments (25)
I have 4 fields in my form.
When I click submit, it shows success but the google sheet only updates the 'Date' column and all the other 4 columns remain empty.
I even changed the code a little bit
const headers = sheet.getRange(1, 1, 1, 1, 1, sheet.getLastColumn()).getValues()[0]const nextRow = sheet.getLastRow() + 1
   const newRow = headers.map(function(header) {

     return header === 'Date' ? new Date() : e.parameter[header]

   })
sheet.getRange(nextRow, 1, 1, 1, 1, newRow.length).setValues([newRow])
Please help
I have not change the code in Google app script and it work well. Suggest to check the script in HTML form. Since the script above may not show all, hence you may need to watch the video (youtube) for better understanding.
I figured out the issue and now my problem has been resolved. Thanks.
Hi @faraazusmani . I have a similar issue, the only difference is that I have 2 fields in my form (so 3 columns in Excel).
What was the issue in your case?
I retried 2 times but didn't make any difference.
Hi @paula , rather than changing the app script, I changed my HTML Form code instead. I did not change the number of fields or anything, everything remained the same, I just changed the code structure for the form segment.
Hey everyone,
If the form is not working, you need to make sure the
column headermatches the form inputnameThis is from this line of code in the google sheets script:
const newRow = headers.map(function(header) {
return header === 'Date' ? new Date() : e.parameter[header]
})
It gets the form parameter based on what your column heading name is. I spent an hour figuring that out so hopefully this saves you some time.
I walked your path but there is no change in spreadsheet even if request returns "success". I checked twice the "web app link" and wrote the column names including "Date".
Okay, I solved it. Just retried everything and it worked. Nice tutorial, thanks!
I have 4 fields in my form.
When I click submit, it shows success but the google sheet only updates the 'Date' column and all the other 4 columns remain empty.
Please help
Please check the names of columns are in match with the field names in code
i also have same issue how can i resolve
It's a great tutorial and I can build my form. Just 2 additional questions:
the answer to your first question is to use Zapier
How do I get an email notification that I have a new form after successful submission?
You can edit the app script to adjust for that
Try using Zapier. It can handle up to 100 free customizable emails with variables.
It's redirecting when the form is submitted but I don't want it to redirect how can I do that??
My trigger is not getting saved even after I click the 'Save" button and authorize.
Hello, I created a video about this topic. Find it here: youtu.be/NOlxNGrm7KU
Anyidea how to add this script to a Wordpress page/form?