When it comes to automation testing, the first thing that strikes most of our minds is Selenium. Selenium is one of the best automation frameworks and is being widely used by automation testers for writing the tests and designing the automation framework. It is compatible with multiple programming languages like Java, Python, JavaScript, PHP, Ruby, and C#. It also supports running the tests across various browsers like Chrome, Firefox, Microsoft Edge, Internet Explorer, and much more; making it an ideal choice for test automation.
If you are new to automation and wondering what is Selenium, you can go through the Selenium WebDriver tutorial, which can help you kickstart the Selenium automation journey.
In this article, I will take you through the basic configuration of setting up Selenium in your system, and then explain how to write test scripts in Selenium. But, before that, let us briefly introduce Selenium, its components, and its features.
Let’s begin…!
What is Selenium?
Selenium is an open-source automation testing framework that has been widely used for automating web applications. It helps carry out tests in multiple browsers, languages and operating systems. In addition, it is compatible with various programming languages like Java, Python, Ruby and C#. Furthermore, it supports various browsers like Chrome, Firefox, Safari, Edge and Opera. It can also be integrated with other automation testing frameworks like JUnit and TestNG.
When writing this article, Selenium has 22.3k Stars and 6.7k Forks on the Selenium GitHub Page, which shows its popularity among the developer community.
In the last few years, there have been a lot of changes in the world of software testing due to the enormous advancements made in modern web automation frameworks. However, more and more enterprises still prefer Selenium for browser testing over other modern frameworks like Cypress because of its rich, mature ecosystem of tools. Therefore, Cypress vs Selenium comparison will help you make the right choice for your project and organization.
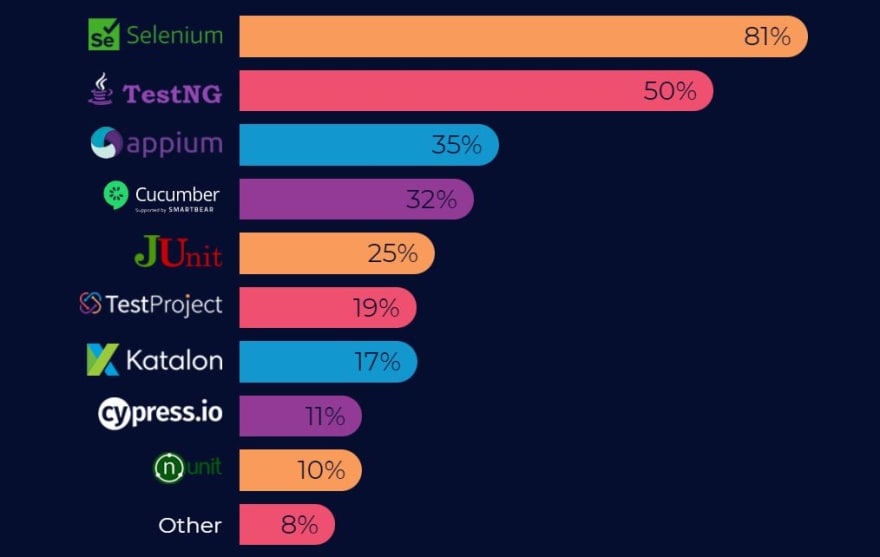
As per the State of Open Source Survey, Selenium is still the go-to framework for automated web browser testing.
What are the components of Selenium?
Selenium is composed of the following components:
- Selenium IDE
- Selenium WebDriver
- Selenium Grid
Selenium IDE
Selenium IDE is a browser plugin that lets you write, execute, and debug your Selenium scripts without switching between tools. You can run the IDE from Firefox or Chrome.
Selenium IDE in Selenium 4 is much more than a normal script recorder, as the recorded steps can be exported in any Selenium-supported programming language. This allows an automated test script to be automatically generated from these actions. It can also be used as a playback tool to repeatedly execute those recorded test scenarios.
Selenium WebDriver
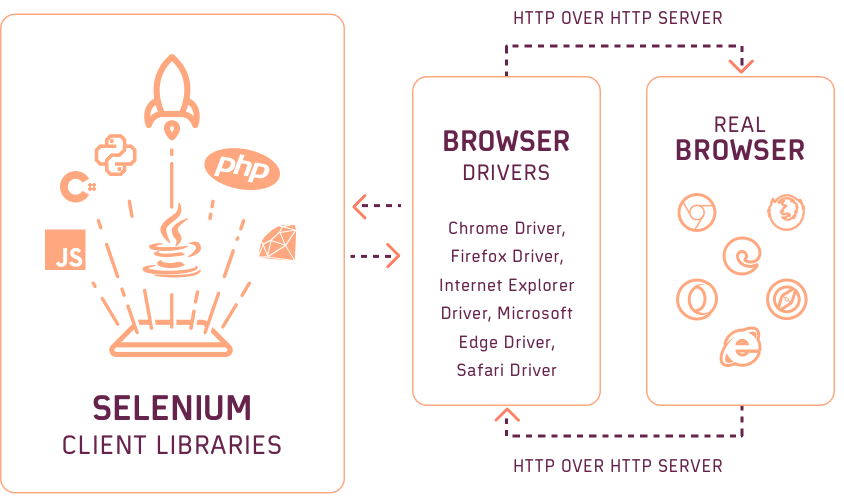
Selenium WebDriver is a browser-specific driver that provides an interface to write and execute the browser automation scripts for testing web applications. It binds with any popular programming language via browser-specific drivers, providing the ideal environment for automated testing. Selenium can also be integrated with language-supported frameworks, irrespective of whether they are TDD or BDD frameworks.
Automated tests using Selenium WebDriver can also expedite the testing and release processes by integrating with top CI/CD tools like Jenkins, TeamCity, GitLab CI, and more.
Selenium Grid
In case you want to leverage the benefits of parallel test execution in Selenium, you should opt for the Selenium Grid. It lets you run Selenium tests at scale on multiple browsers and platforms in parallel. Selenium Grid works by distributing the tests across multiple machines, enabling the testers to execute their tests in an asynchronous manner.
Selenium Grid in Selenium 4 is entirely re-architectured, thereby enabling you to start the Grid in different modes - Standalone mode, Hub & Node mode, and fully-distributed mode.
Did you know? input placeholder attribute is used to suggest the expected input information, use a pre-filled placeholder text. The placeholder text will be replaced with actual input when the user interacts with the field.
What is new in Selenium 4?
Selenium 4 is the latest version of Selenium. It has come up with advanced features like improvised Selenium IDE and Selenium Grid, relative web locators, and W3C compliance of WebDriver APIs. As of writing this blog, the latest version of Selenium 4 was Selenium 4.10.
The JSON Wire Protocol which was responsible for the communication between the browser and the test scripts is no longer a part of Selenium 4. W3C in Selenium 4 is responsible for direct communication between the test scripts and browser driver (or browser).
WebDriver W3C Protocol is the major architectural change in Selenium 4 and WebDriver W3C standardization will result in more stable and less flaky Selenium tests. If you are using Selenium 4, refer to the blog that deep dives into the Selenium 4 WebDriver architecture.
Relative locators in Selenium 4 are used to locate the web elements relative to other WebElements on the document (or page). So, for example, we can use relative locators like near(), above(), below(), toRightOf(), and toLeftOf() of a particular element. In addition, significant changes have also been brought in Actions class and FluentWait class in Selenium 4.
Next, let us get into the prerequisites before we deep-dive into how to write test scripts in Selenium.
This Selenium WebDriver video tutorial for beginners and professionals will help you learn what’s new in Selenium 4 (Features and Improvements).
Prerequisites for running the first Selenium test script
In this section of the blog on how to write test scripts in Selenium, we will see how to configure a few other dependencies before configuring Selenium. To get started with Selenium automation testing, please configure the following components:
Java
- Depending on the operating system (Mac, Windows, or Linux), download JDK with JRE (32 or 64 bit) and then install it.
- Set an environment variable JAVA_HOME with the value to JDK installation location in the system.
- In the Path variable, update the path to the bin folder of the JDK installation folder.
- Ensure successful installation of Java by using the java –version command in the command prompt.
IDE (Integrated Development Environment)
- Depending upon your operating system and preference, you can download and set up an IDE in your system for creating the Selenium tests and running them.
Drivers and Grid
- For running our tests in different browsers, we have to use drivers. Therefore, choosing the correct driver and version plays a crucial role in successfully executing the tests.
- For running tests in the grid, we have to set up Hub and Nodes, and it has to be downloaded from the Selenium official website.

Configuring and writing test scripts in Selenium
In the previous section of this blog on how to write test scripts in Selenium, we covered the prerequisites for setting and running our tests. Now let us see how to configure and write the first test script in Selenium.
To configure Selenium in our IDE, we can use Java or Maven. Let us see the steps to configure our project in both ways.
Step 1: Creating Java Project.
- Open Eclipse.
- Create a new project File🡪 New🡪Project.
- Provide the project name and click Finish.
- Create a new class in the project.
- To write the first test script in Selenium, download the external jars required.
- To add the external jars, right-click on the project 🡪 Build Path 🡪 Configure Build Path and click OK.
2. Creating Maven Project
- Download maven.
- Add MAVEN_HOME system variable and update it with the maven installed folder path.
- Verify successful installation of Maven by using the mvn -version in the command prompt.
- In the pom.xml file, we have to add all the dependencies required to create and run our first Selenium test.
- We need to add the below Selenium dependency to create our tests.
    org.Seleniumhq.Selenium
    Selenium-java
    3.141.59
- We have the setup and created a project to kickstart our first Selenium test script.
Test Scenario:
- Launch the LambdaTest webpage https://accounts.lambdatest.com/login.
- Enter valid username and password.
- Click the Login button.
- Upon login, verify the page’s title to ensure that the user is successfully logged in and then directed to the home page.
To begin with, we need to first specify the driver’s path and then instantiate the appropriate browser for that driver. Then, depending on our choice of browser we can instantiate the drivers.
Chrome
System.setProperty(“webdriver.chrome.driver”,path_to_browser_driver);
WebDriver driver = new ChromeDriver();
Firefox
System.setProperty(“webdriver.gecko.driver”,path_to_browser_driver);
WebDriver driver = new FirefoxDriver();
Edge
SSystem.setProperty("WebDriver.edge.driver",path_to_browser_driver);
WebDriver driver = new EdgeDriver();
Internet Explorer
System.setProperty("WebDriver.ie.driver", path_to_browser_driver);
WebDriver driver=new InternetExplorerDriver();
Now, let us kickstart our scripting. To implement our login scenario, we need to:
- Identify the web elements for entering the email, password and click the Login button.
- Right-click on the specific element and click Inspect, which will help us identify that particular element’s locator.
There are eight basic Selenium locators that are supported to locate the elements. They are
- ID
- Name
- className
- tagName
- linkText
- partialLinkText
- CssSelector
- XPath
In our scenario, we need to identify three web elements: email, password, and a login button. Next, right-click on the email web element text box and click Inspect.
In the Elements tab, we can see the different types of attributes that can be used for identifying the web element. Let us take a simple attribute id and use it in our test.
To enter the value for the email in the text box, we can use sendKeys and pass the value to be entered
WebElement email = driver.findElement(By.id("email"));
email.clear();
email.sendKeys("abc12@gmail.com");
Next, moving to the password text box, right-click and click Inspect.
We will use id to locate the web element.
WebElement password = driver.findElement(By.id("password"));
password.clear();
password.sendKeys("abc@123");
For the login button, right-click the button and click Inspect.
As the button must be clicked, we have to click() to act on the login button.
WebElement loginButton = driver.findElement(By.id("login-button"));
loginButton.click();
As this is our first script, we have used id as the locator to identify the web page’s web elements.
Once the user has been successfully logged in, we need to verify the web page’s title to ensure successful login.
To get the title of the webpage, we have to use the getTitle() method in Selenium.
String actualTitle = driver.getTitle();
To compare the actual and expected title, we can use assertions in TestNG.
String title = "Welcome - LambdaTest";

String actualTitle = driver.getTitle();

Assert.assertEquals(actualTitle,title,"Page title doesnt match");
Once the tests for Selenium Java automation testing are executed, you need to close the browser instance, which is considered the best practice in finishing the test execution.
You can close the browser by using two different WebDriver commands, these are:
- close(): Closes the current browser window.
- quit(): Quit all the instantiated browser instances.
driver.close(); // Closes the single browser window accessed by the WebDriver instance
driver.quit();   // Closes all the open browser windows instances
Code snippet for login functionality
Package MyTests;

import org.openqa.Selenium.By;
import org.openqa.Selenium.WebDriver;
import org.openqa.Selenium.WebElement;
import org.openqa.Selenium.chrome.ChromeDriver;
import org.testng.Assert;

import java.util.concurrent.TimeUnit;

public class SimpleTest {
    public static void main(String[] args) {

        System.setProperty("webdriver.chrome.driver","C:\\Users\\Shalini\\Downloads\\chromedriver_win\\chromedriver.exe");
        WebDriver driver = new ChromeDriver();

        String url = "https://accounts.lambdatest.com/login";

        driver.get(url);
        driver.manage().window().maximize();
        driver.manage().timeouts().pageLoadTimeout(10, TimeUnit.SECONDS);


        WebElement email = driver.findElement(By.id("email"));
        WebElement password = driver.findElement(By.id("password"));
        WebElement loginButton = driver.findElement(By.id("login-button"));

        email.clear();
        email.sendKeys("abc@gmail.com");

        password.clear();
        password.sendKeys("abc@123");

        loginButton.click();

        String title = "Welcome - LambdaTest";

        String actualTitle = driver.getTitle();

        Assert.assertEquals(actualTitle,title,"Page title doesnt match");


System.out.println("User logged in successfully");


driver.quit();
    }
}
We can use our local setup or a cloud grid set up to run the above code. Let me show you both the ways.
To run in the local Selenium grid, right-click your test class and click Run.
This will run our tests locally, and you will then see the results in the console.
Did you know? Search input type or is a very basic text field intended for entering search queries.
Running Selenium test scripts on cloud Selenium Grid
In this section, we will see how to write test scripts in Selenium and run it on a cloud Selenium Grid.
With a cloud-based Selenium Grid like LambdaTest, you can now run your Selenium automated test cases on a scalable Selenium infrastructure running real browsers and operating systems. With more than 3000+ online browser and OS combinations available, Selenium testing tools like LambdaTest gives you the ability to run your Selenium Automation tests on any of these combinations.
You can find the complete list of supported browsers and OS by LambdaTest on our list of pages.
You can leverage the LambdaTest grid to realize cross browser testing through parallel execution of tests either in selenium or cypress parallel testing.
For example, if you want to run your tests across 30 browsers and the test takes around 100 seconds for execution, it would take around 3000 seconds to complete the entire execution if the test is executed in each browser one by one. On the other hand, if we run our tests in parallel (say in three parallel threads), the total time taken for execution would be 1000 seconds which saves a lot of time!
Let us run our tests in different browsers using the LambdaTest online Selenium Grid.
To begin with, you need to create a LambdaTest Account. Upon successful account creation, you can sign in to your account and navigate to the dashboard. Next, go to the LambdaTest Profile section under the Settings.
Here you can find your username and access token, which can be used in your tests to run them in the LambdaTest grid.
In your test script, you need to specify the username, access key, grid URL, and the website to be tested.
String username = "XXX"; //Enter your username
String accesskey = "XXXXXX"; //Enter your accesskey

static RemoteWebDriver driver;
String gridURL = "@hub.lambdatest.com/wd/hub";
String urlToTest = " https://accounts.lambdatest.com/login”;
Next step is to define the desired capabilities of our browser and the operating system in which our tests have to be run. We have to define the browser, its version and operating system under desired capabilities which can be done as below.
DesiredCapabilities capabilities = new DesiredCapabilities();
    capabilities.setCapability("build", "your build name");
    capabilities.setCapability("name", "your test name");
    capabilities.setCapability("platform", "Windows 10");
    capabilities.setCapability("browserName", "Chrome");
    capabilities.setCapability("version","93.0");
I have mentioned the desired capabilities for running our tests in a chrome browser with version 93 in Windows 10 operating system. Similarly, you can also define the desired capabilities for other browsers and operating systems. If you are not sure of writing your own desired capabilities, still LambdaTest extends its hand to assist you with it!
You can generate the desired capabilities of different browser and OS combinations using the LambdaTest Desired Capabilities Generator.
We can select a specific operating system, browser, and its version and resolution and generate the desired capabilities for the selected configuration in the right-side panel.
We can also specify the Selenium version and enable the headless mode option in our desired capabilities.
Under advanced configuration, you can set some additional parameters in the desired capabilities.
- Enable logs to be captured in the tests.
- Set the timezone.
- Enable capture for the screenshot.
- Enable video recording of the tests.
Now let us start implementing our tests in the LambdaTest grid. We shall use the same login test logic used earlier.
Let us run our login test in two different browsers – Chrome and Firefox. Use the Desired Capabilities Generator for setting the desired capabilities in our tests.
Code snippet
package MyTests;

import org.openqa.Selenium.By;
import org.openqa.Selenium.WebDriver;
import org.openqa.Selenium.WebElement;
import org.openqa.Selenium.chrome.ChromeDriver;
import org.openqa.Selenium.remote.DesiredCapabilities;
import org.openqa.Selenium.remote.RemoteWebDriver;
import org.testng.Assert;
import org.testng.annotations.AfterTest;
import org.testng.annotations.BeforeTest;
import org.testng.annotations.Parameters;
import org.testng.annotations.Test;

import java.net.MalformedURLException;
import java.net.URL;
import java.util.concurrent.TimeUnit;

public class Demo {

    String username = "XXXX"; //Enter your username
    String accesskey = "XXX"; //Enter your accesskey

    static RemoteWebDriver driver;
    String gridURL = "@hub.lambdatest.com/wd/hub";
    String urlToTest = "https://accounts.lambdatest.com/login";

    @BeforeTest
    @Parameters("browser")
    public void setUp(String browser)throws MalformedURLException
    {
        if(browser.equalsIgnoreCase("Chrome"))
        {
            DesiredCapabilities capabilities = new DesiredCapabilities();
            capabilities.setCapability("browserName", "chrome");   //To specify the browser
            capabilities.setCapability("version", "93.0");    //To specify the browser version
            capabilities.setCapability("platform", "win10");      // To specify the OS
            capabilities.setCapability("build", "LambdaTestApp");               //To identify the test
            capabilities.setCapability("name", "Test_Chrome");
            capabilities.setCapability("network", true);   // To enable network logs
            capabilities.setCapability("visual", true);          // To enable step by step screenshot
            capabilities.setCapability("video", true);       // To enable video recording
            capabilities.setCapability("console", true);         // To capture console logs
            try {
                driver = new RemoteWebDriver(new URL("https://" + username + ":" + accesskey + gridURL), capabilities);
            } catch (MalformedURLException e) {
                System.out.println("Invalid grid URL");
            } catch (Exception e) {
                System.out.println(e.getMessage());
            }
        }

        else if(browser.equalsIgnoreCase("Firefox"))
        {
            DesiredCapabilities capabilities = new DesiredCapabilities();
            capabilities.setCapability("browserName", "Firefox");  //To specify the browser
            capabilities.setCapability("version", "76.0");    //To specify the browser version
            capabilities.setCapability("platform", "win10");      // To specify the OS
            capabilities.setCapability("build", "LambdaTestApp");  //To identify the test
            capabilities.setCapability("name", "Test_Firefox");
            capabilities.setCapability("network", true);      // To enable network logs
            capabilities.setCapability("visual", true);          // To enable step by step screenshot
            capabilities.setCapability("video", true);                          // To enable video recording
            capabilities.setCapability("console", true);         // To capture console logs
            try {
                driver = new RemoteWebDriver(new URL("https://" + username + ":" + accesskey + gridURL), capabilities);
            } catch (MalformedURLException e) {
                System.out.println("Invalid grid URL");
            } catch (Exception e) {
                System.out.println(e.getMessage());
            }
        }
    }


    @Test
    public void Login() {

       driver.get(urlToTest);
        driver.manage().window().maximize();
        driver.manage().timeouts().pageLoadTimeout(10, TimeUnit.SECONDS);

        WebElement email = driver.findElement(By.id("email"));
        email.clear();
        email.sendKeys("XXX@gmail.com");

        WebElement password = driver.findElement(By.id("password"));
        password.clear();
        password.sendKeys("XXX@123");

        WebElement loginButton = driver.findElement(By.id("login-button"));
        loginButton.click();
        driver.manage().timeouts().pageLoadTimeout(10,TimeUnit.SECONDS);
        String title = "Welcome - LambdaTest";

        String actualTitle = driver.getTitle();

        Assert.assertEquals(actualTitle,title,"Page title doesnt match");

        System.out.println("User logged in successfully");

    }

    @AfterTest
    public void tearDown() {
        driver.quit();
    }

}
TestNG.xml
<!--?xml version="1.0" encoding="UTF-8"?-->
To run the test in the LambdaTest grid, right-click on the TestNG.xml file and click Run.
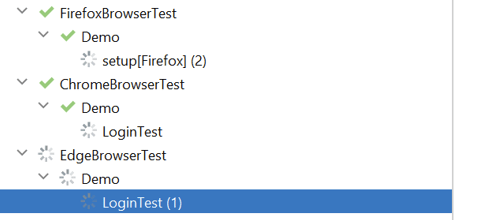
Now you can see the tests running in two different browsers.
So how do we know that the tests ran in the LambdaTest grid?
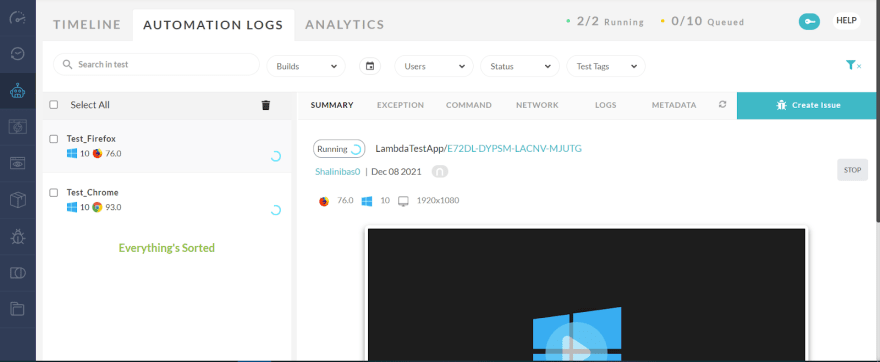
Go to the LambdaTest account and navigate to the Automation page. Here you can see the build name you provided in your tests.
On further navigation, you will run the tests in the grid.
Here you can see the tests run in the grid and the video recording captured during the test execution. This will help us identify the exact issue in case of any test failure.
In the tests listed, we can see the browser and the OS configuration used for running them.
How to perform parallel testing on cloud Selenium Grid
In this section, we will see how to write test scripts in Selenium and run it parallely over a cloud Selenium Grid.
Parallel testing is a way of simultaneously carrying out the test execution in various environments. This helps reduce the total execution time and efforts, thereby meeting the quality of the code as well. Moreover, it helps in covering wider compatibility in a very short duration.
Let us understand how to run our tests in parallel in the cloud Selenium Grid.
To run our tests in parallel we will use TestNG in this article.
To use TestNG we need to add the dependency in the pom.xml file.
    org.testng
    testng
    6.14.3
    test
After adding the dependency, we have to create a TestNG.xml file that can be used to customize the execution of the tests. This file helps in parameterizing the tests, grouping the tests, and running the tests in parallel in TestNG. As our goal is to run our tests in parallel, we will add the parallel attribute in this file to execute the tests in different threads in parallel.
Moreover, we can have different values for this parallel attribute, each having its purpose.
- classes – it runs all the tests inside the classes in parallel
- methods – it runs all the methods with @test annotation in parallel
- tests – it runs all the tests within the tag in parallel
So now you must have got some idea on the parallel test execution. To run the tests in parallel, we have to define the threads used for the execution. We can define the thread count in the TestNG.xml file as below.
So the above line will run the methods annotated with @test in the suite in 4 parallel threads.
Running test methods in parallel in cloud Selenium Grid
In this section of the article on how to write test scripts in Selenium, let us create two test methods in a class and run them parallel.
Test 1: Login to LambdaTest website
- Launch LambdaTest website
- Enter valid credentials
- Click Login button
Test 2: Get the title of the LambdaTest playground website
- Launch LambdaTest playground website https://www.lambdatest.com/selenium-playground/
- Print the title of the webpage
Code snippet
package MyTests.ParallelTests;

import org.openqa.Selenium.By;
import org.openqa.Selenium.WebElement;
import org.openqa.Selenium.remote.DesiredCapabilities;
import org.openqa.Selenium.remote.RemoteWebDriver;
import org.testng.annotations.AfterMethod;
import org.testng.annotations.BeforeMethod;
import org.testng.annotations.Parameters;
import org.testng.annotations.Test;

import java.net.MalformedURLException;
import java.net.URL;
import java.util.concurrent.TimeUnit;

public class MethodsInParallel {
   public String username = "YOUR_USERNAME";
   public String accesskey = "YOUR_ACCESSKEY";
   public RemoteWebDriver driver = null;
   public String gridURL = "@hub.lambdatest.com/wd/hub";

   @BeforeMethod
   @Parameters(value={"browser"})
   public void setUp(String browser) throws Exception {
       DesiredCapabilities capabilities = new DesiredCapabilities();
       capabilities.setCapability("browserName", browser);
       capabilities.setCapability("version", "97.0");
       capabilities.setCapability("platform","win10" ); // If this cap isn't specified, it will just get the any available one
       capabilities.setCapability("build", "ParallelExecution_TestMethods");
       capabilities.setCapability("name", "ParallelExecution_TestMethods");
       capabilities.setCapability("network", true); // To enable network logs
       capabilities.setCapability("visual", true); // To enable step by step screenshot
       capabilities.setCapability("video", true); // To enable video recording
       capabilities.setCapability("console", true); // To capture console logs
       try {
           driver = new RemoteWebDriver(new URL("https://" + username + ":" + accesskey + gridURL), capabilities);
       } catch (MalformedURLException e) {
           System.out.println("Invalid grid URL");
       } catch (Exception e) {
           System.out.println(e.getMessage());
       }
   }


   @Test
   public void login() {
       String url = "https://accounts.lambdatest.com/login";

       driver.get(url);
       driver.manage().window().maximize();
       driver.manage().timeouts().pageLoadTimeout(10, TimeUnit.SECONDS);

       WebElement email = driver.findElement(By.id("email"));
       email.clear();
       email.sendKeys("abc@gmail.com");

       WebElement password = driver.findElement(By.id("password"));
       password.clear();
       password.sendKeys("abc@123");

       WebElement loginButton = driver.findElement(By.id("login-button"));
       loginButton.click();
   }

   @Test
   public void printTitle() {
       String urlToTest = "https://www.lambdatest.com/selenium-playground/";
       driver.get(urlToTest);
       driver.manage().window().maximize();
       String title = driver.getTitle();

       System.out.println("The title of the page is ==> " +title);

   }

   @AfterMethod
   public void tearDown() throws Exception {
       if (driver != null) {
           driver.quit();
       }
   }
}
**TestNG.xml
**
<!--?xml version="1.0" encoding="UTF-8"?-->
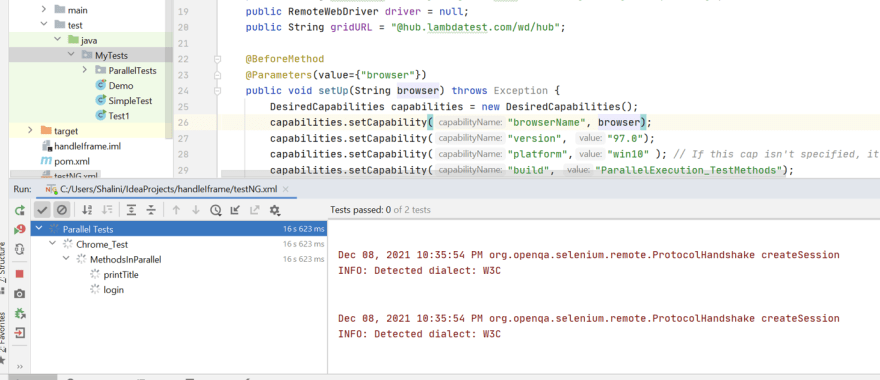
In the TestNG.xml file, we set the parallel attribute with methods and the thread count as two, which will now run the test methods in parallel in 2 threads.
Once you run the tests, you will see the two tests running in parallel.
Did you know? PNG favicons are preferred to utilize icons to identify a webpage or site. While all browsers accept the '.ico' format.
Running test classes in parallel in cloud Selenium Grid
In this section of the article on how to write test scripts in Selenium, let us now see how to run the test classes in parallel using cloud Selenium Grid.
First, we have to create two test classes containing a test method. Let us use the same example as used in the previous section.
Test class 1: Login
package MyTests.ClassInParallel;

import org.openqa.Selenium.By;
import org.openqa.Selenium.WebElement;
import org.openqa.Selenium.remote.DesiredCapabilities;
import org.openqa.Selenium.remote.RemoteWebDriver;
import org.testng.annotations.AfterMethod;
import org.testng.annotations.BeforeMethod;
import org.testng.annotations.Parameters;
import org.testng.annotations.Test;

import java.net.MalformedURLException;
import java.net.URL;
import java.util.concurrent.TimeUnit;

public class ClassA {
   public String username = "YOUR_USERNAME";
   public String accesskey = "YOUR_ACCESSKEY";
   public RemoteWebDriver driver = null;
   public String gridURL = "@hub.lambdatest.com/wd/hub";

   @BeforeMethod
   @Parameters(value={"browser"})
   public void setUp(String browser) throws Exception {
       DesiredCapabilities capabilities = new DesiredCapabilities();
       capabilities.setCapability("browserName", browser);
       capabilities.setCapability("version", "97.0");
       capabilities.setCapability("platform","win10" ); // If this cap isn't specified, it will just get the any available one
       capabilities.setCapability("build", "ParallelExecution_TestClassA");
       capabilities.setCapability("name", "ParallelExecution_TestClassA");
       capabilities.setCapability("network", true); // To enable network logs
       capabilities.setCapability("visual", true); // To enable step by step screenshot
       capabilities.setCapability("video", true); // To enable video recording
       capabilities.setCapability("console", true); // To capture console logs
       try {
           driver = new RemoteWebDriver(new URL("https://" + username + ":" + accesskey + gridURL), capabilities);
       } catch (MalformedURLException e) {
           System.out.println("Invalid grid URL");
       } catch (Exception e) {
           System.out.println(e.getMessage());
       }
   }


   @Test
   public void login() {
       String url = "https://accounts.lambdatest.com/login";
       driver.get(url);
       driver.manage().window().maximize();
       driver.manage().timeouts().pageLoadTimeout(10, TimeUnit.SECONDS);
       WebElement email = driver.findElement(By.id("email"));
       email.clear();
       email.sendKeys("abc@gmail.com");
       WebElement password = driver.findElement(By.id("password"));
       password.clear();
       password.sendKeys("abc@123");
       WebElement loginButton = driver.findElement(By.id("login-button"));
       loginButton.click();
   }


   @AfterMethod
   public void tearDown() throws Exception {
       if (driver != null) {
           driver.quit();
       }
   }
}
Test class 2: Print title
package MyTests.ClassInParallel;

import org.openqa.Selenium.By;
import org.openqa.Selenium.WebElement;
import org.openqa.Selenium.remote.DesiredCapabilities;
import org.openqa.Selenium.remote.RemoteWebDriver;
import org.testng.annotations.AfterMethod;
import org.testng.annotations.BeforeMethod;
import org.testng.annotations.Parameters;
import org.testng.annotations.Test;

import java.net.MalformedURLException;
import java.net.URL;
import java.util.concurrent.TimeUnit;

public class ClassB {
   public String username = "YOUR_USERNAME";
   public String accesskey = "YOUR_ACCESSKEY";
   public RemoteWebDriver driver = null;
   public String gridURL = "@hub.lambdatest.com/wd/hub";

   @BeforeMethod
   @Parameters(value={"browser"})
   public void setUp(String browser) throws Exception {
       DesiredCapabilities capabilities = new DesiredCapabilities();
       capabilities.setCapability("browserName", browser);
       capabilities.setCapability("version", "97.0");
       capabilities.setCapability("platform","win10" ); // If this cap isn't specified, it will just get the any available one
       capabilities.setCapability("build", "ParallelExecution_TestClassB");
       capabilities.setCapability("name", "ParallelExecution_TestClassB");
       capabilities.setCapability("network", true); // To enable network logs
       capabilities.setCapability("visual", true); // To enable step by step screenshot
       capabilities.setCapability("video", true); // To enable video recording
       capabilities.setCapability("console", true); // To capture console logs
       try {
           driver = new RemoteWebDriver(new URL("https://" + username + ":" + accesskey + gridURL), capabilities);
       } catch (MalformedURLException e) {
           System.out.println("Invalid grid URL");
       } catch (Exception e) {
           System.out.println(e.getMessage());
       }
   }


   @Test
   public void printTitle() {
       String urlToTest = "https://www.lambdatest.com/selenium-playground/";
       driver.get(urlToTest);
       driver.manage().window().maximize();
       String title = driver.getTitle();

       System.out.println("The title of the page is ==> " +title);

   }

   @AfterMethod
   public void tearDown() throws Exception {
       if (driver != null) {
           driver.quit();
       }
   }
}
TestNG.xml
<!--?xml version="1.0" encoding="UTF-8"?-->
In the TestNG.xml file, we have set the value as classes in the parallel attribute with the thread count as 2. Therefore, this will execute two test classes in parallel.
Now you will see two classes running in parallel.
In the LambdaTest grid, you will see the two test classes Class A and Class B, run parallel.
Here’s a short glimpse of the Selenium Advanced certification from LambdaTest:
Wrapping Up!
To summarize this article on how to write test scripts in Selenium, we have seen basic steps in setting up the requirements for running our simple test in Selenium, steps to write our first Selenium test and finally, the different ways to run our tests. It has always been easy to run the tests in a cloud-based Selenium Grid like LambdaTest as it is easy to use and provides multiple features like parallel testing, live interactive testing, mobile app testing, and most importantly, visual testing.
Thus, it provides a robust and scalable platform to execute tests at ease. I hope this article is informative and helps in running your first Selenium test. Please feel free to provide your feedback in the comment section. Until then, keep exploring and try your hands on the LambdaTest platform.
Happy Testing …!








Top comments (1)
Great article Shalini. I highly advice to check my article about Selenide which is a framework built on top of Selwnium WebDriver with many cool additional features. Like fluent API, simpler syntax, advanced selectors, built-in profiler and more. I fell in love with it immediatelly. I am pretty sure you will love it too: mszeles.com/selenium-or-selenide