In Part 3 we'll talk about why CORS is a bad thing and how to properly connect your frontend & backend using a custom domain on aws.
So we've deployed the frontend of our Medium clone in part 1 of this tutorial and the backend in part 2. Everything is running live on aws at https://mediumserverless.com. However at the end of part 2 our backend was still not connected to the frontend.
TL;DR
Don't enable cors instead just proxy all frontend api calls to yourdomain.com/api in the simple steps labelend 1-3 below. Feel free to skip the extra explanation in parts marked [FYI]
[FYI] Why CORS is Bad
Many tutorials will enable CORS as a default. There are a few problems with enabling CORS:
- The frontend will have to send OPTIONS preflight requests for API calls which adds latency.
- You will need to use the Proxy type of Lambda instead of Intergration which will require a bunch of additional boilerplate in your code. Here is a great Stackoverflow thread breaking down Lambda Integration vs. Lambda Proxy: Pros and Cons
- Google complains about it (and we have no idea if that matters)
The bottom line is; if it isn't that difficult to not have to enable CORS, you shouldn't do it.
[FYI] AWS CloudFront Content Delivery Network
CloudFront is a CDN - it responds to users HTTP requests from a server close to them. So for our Frontends HTML, JavaScript and Image files which are stored on Amazon Simple Storage Service / S3 which we've already connected as a source (origin) for CloudFront. That means our frontend will automatically be server from servers all over the globe and that will make it a lot faster for our users.
So CloudFront takes data from one source (origin) and then distributes the same stuff from multiple places for the sake of speed. So we also want our backend api to be one of these origins under the same domain - so that we can speed up our API as well.
Our backend code is deployed in a single Lambda based on Node.js. This Lambda gets invoked by a HTTP event, via API Gateway. So it's this API Gateway deployment we want to make available.
In summary:
- mediumserverless.com should serve our Vue.js frontend
- mediumserverless.com/api should serve our Node.js/Express.js Lambda backend.
CloudFront can also cache any HTTP requests, which makes it extremely powerful for speeding up your site. We'll dig into CloudFront cache in later parts of this tutorial :)
1. CloudFront Origin
First fetch the API Gateway URL for your API by opening https://console.aws.amazon.com/apigateway, find your backend deployment, click on stags, dev, then copy the "invoke URL".
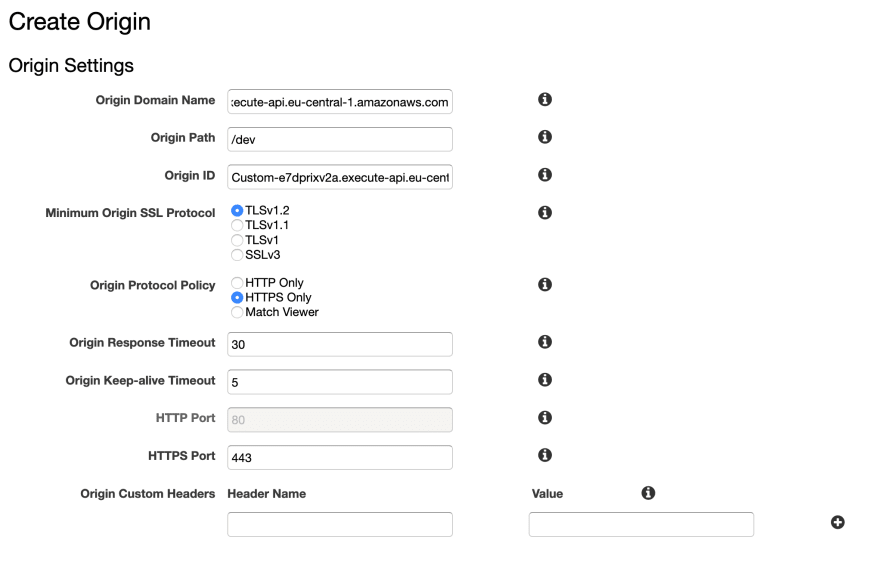
Open up https://console.aws.amazon.com/cloudfront and click on the distribution for your domain. Select Create Origin. Paste the invoke URL you just copied into "Origin Domain Name", select TLSv1.2 and HTTPS only and click create.
2. CloudFront Behaviour
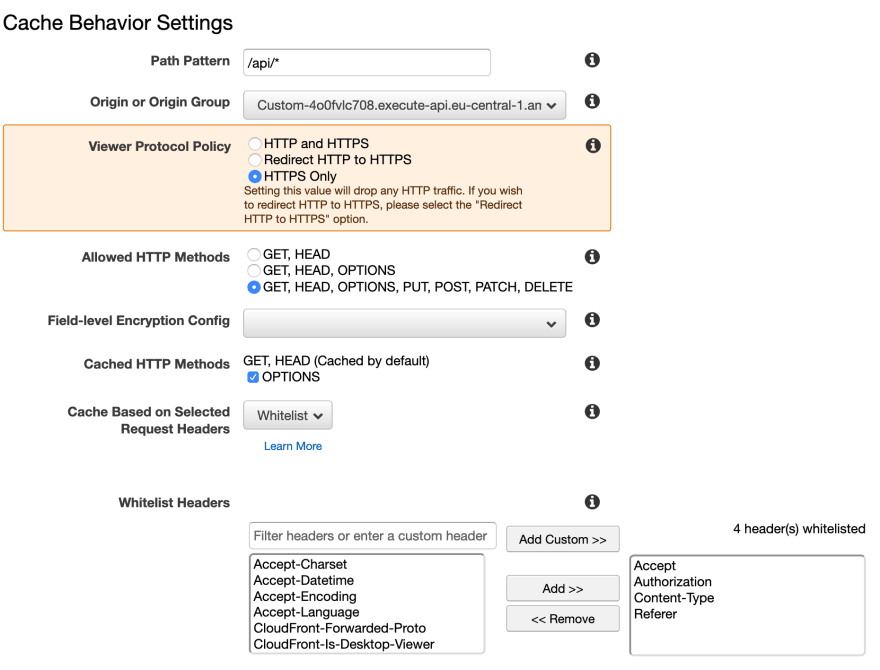
Still in the CloudFront console for your distribution click Create Behaviour under the Behaviours tab (duh). Setting /api/* as path means that any http requests to mediumserverless.com/api/whatever will be forwarded to our backend. With minimum TTL of 0 CloudFront will by default not cache our api responses, unless we specify otherwise with our backend response.
Follwing this your CloudFront behaviours should look as follows:
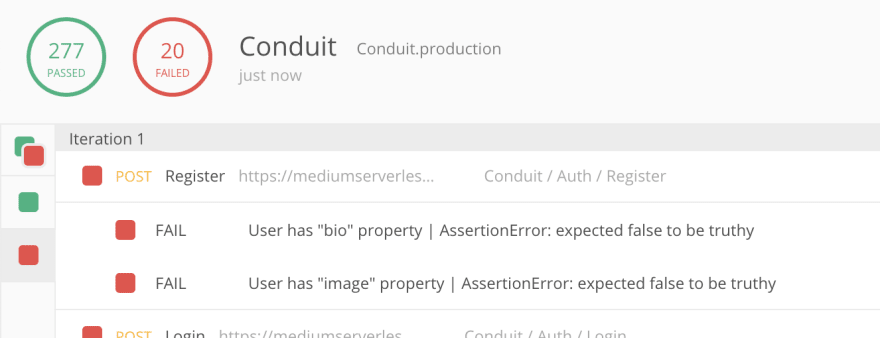
If you go back to the overview of all your CloudFront distributions you'll see that the status for the one you just changed says "In Progress". It make 20 minutes or so before things will go into effect.
3. Run test suite on /api
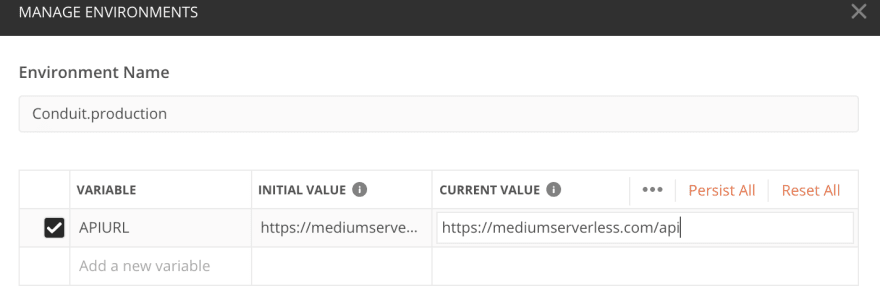
Open up the postman collection from Part 2 of the tutorial and edit the production environment variable url to yourdomain.com/api.
4. Update frontend api url
Open your frontend from Part 1 and change the URL in src/common/config.js to your new url then deploy the updated frontend with serverless. When you open your production frontend now it should load all articles directly from your frontend instead!
Next Step
Serverless could still do a lot more for us! A lot of the logic that we have implemented in code using Express.js and various NPM packages, can actually be handled by various aws services. Configuring those services is a lot faster than implementing them in code.
If you learn to configure instead of implement the type of stuff that all projects need, you will become a much faster developer. So next we are going to start to peel away many of our dependencies and have Serverless do more of the work in our app.
Starting with authorization in Part 4.


Top comments (0)