Nowadays Linux operating system’s popularity is increasing. Most of the servers are using the Linux Operating System, and personal system also start using various Linux distribution. Ubuntu is one of the popular Linux operating systems.
These days most of the IT professionals learning Linux, as their work environment around Linux based open source and free operating system.
As per my experience, when you are learning anything and for a silly mistake, you are going to format the entire system and reinstall, again and again, the learning period going to be very frustrating and bored.
So, I am suggesting you to at learning time use a virtual environment to configure any Linux and use if any mistake will happen you need to reinstall the only virtual machine, not the system. Or you can keep the previous virtual machine for your experiment to learn to troubleshoot the problem and parallelly you can run new vm to move your learning ahead.
Here, in this article, I am going to explain “How to install Ubuntu 16.04 in VMware workstation?”. You can use any other virtual environment also like Virtualbox, VMware Player, KVM, etc.
PREREQUISITES – UBUNTU 16.04 INSTALLATION
Ubuntu 16.04:
Virtual Environment:
Download VMware Workstation from here.
Download VMware Player from here.
Download Virtualbox from here.
Any application from above is enough for a virtual environment, I am going to use here VMware Workstation, but the overall process of installation is the same for all virtual environment package.
Installing Ubuntu in VMware Workstation
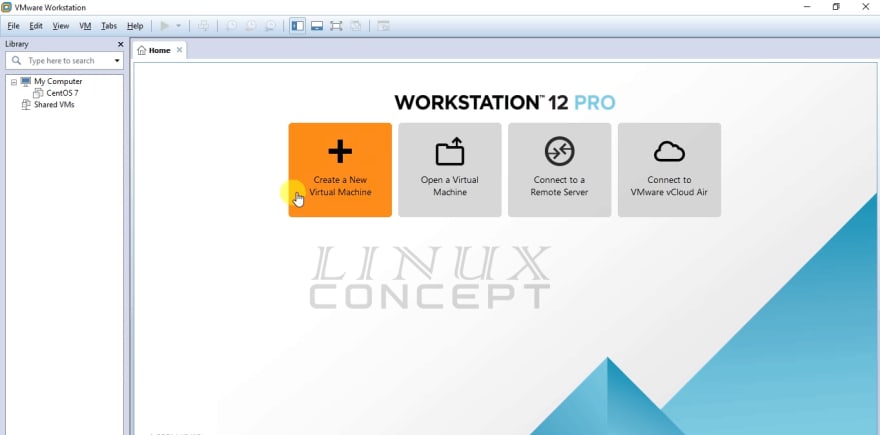
Open VMware workstation application to start the Installation of Ubuntu operating system.
you will get the first screen in workstation like below image, and here click on “Create a New Virtual Machine” button.
There are two option you will get when start preparing
- Typical (recommended)
- Custom (advanced)
I choose here Custom setup, so can show you all option to configure in VMware.
In this window, you can choose hardware compatibility for your virtual machine. As I am using VMware workstation version 12 Pro, so I configured my virtual machine compatibilities according to configured in this version and choose “Workstation 12.0” for Hardware compatibility.
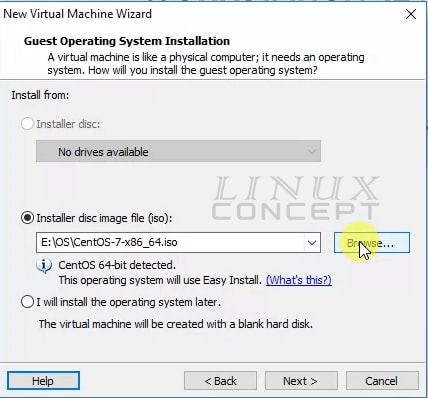
After selection of hardware compatibility, new window will appear for installation media selection, where three options are available:
- Installer disc
- Installer disc image file (iso)
- I will install the operating system later
If you are going to install through operating system CD/DVD disc, you should select “Installer disc”. After selection of this option, you have to select CD/DVD ROM driver.
If you are using an operating system iso file, please click on the “Browse” button and select the image file.
If you are just preparing a virtual machine with the configuration where the operating system will install later, just select “I will install the operating system later” option.
Here, I am going to install through iso file, so I choose “Installer disc image file (iso)” and click on the “Browse” button.
After clicking on “Browser” button a new window will appear, where you need to go to the location of iso file and select the iso file.
Below image showing my all iso file on the location and I am selecting Ubuntu 16.04 operating system’s image file, as I am going to install it.
When you select your operating system disc file it will appear in “installer media selection window” like below image.
Now, click on “Next” button for further configuration.
In this window “Personalize Linux” you can fill the form for username and password, which will be on new installed Ubuntu operating system’s default username and password.
In the next window, you can select the desired name for the virtual machine and location where this virtual machine will store in system storage.
The window will similar like below image.
In this window, we configuring processors for the virtual machine.
The options are to select numbers of processors and numbers of cores per processors and after selection of these, click on the “Next” button for further configuration.
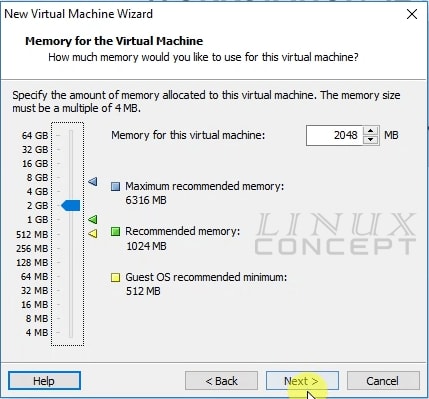
Similarly CPU configuration, in this window we configure RAM for the virtual machine and after selection of RAM quantity click on the “Next” button for further configuration.
The new window appears for virtual machine network configuration, where we get four option to select like below image;
- Use bridged networking
- Use network address translation (NAT)
- Use host-only networking
- Do not use a network connection
If we want to configure our virtual machine to connect directly with the network and get the IP address from the main network device, we should select “Use bridged networking”.
If we want to configure your networking with our host networking and NAT with the host IP address, we should select “Use network address translation(NAT)”.
Choose “Use host-only networking” if we don’t want to configure independent networking on our virtual machine and use network from the host interface.
The last option “Do not use a network connection” is for if we don’t want to use networking in our virtual machine.
Now, I select “Use bridged networking” as I am using my virtual machine network connectivity directly from the network device without the intervention of the host network.
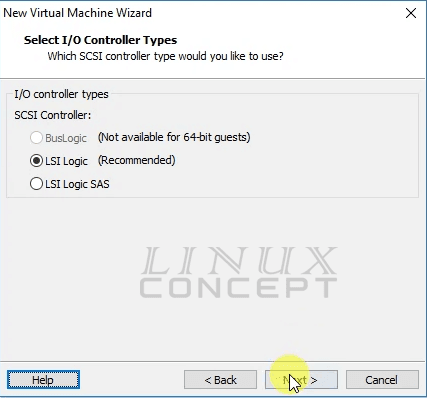
The new window will appear for I/O controller configuration with three option like below image:
- BusLogic
- LSI Logic
- LSI Logic SAS
Bus Logic is not available for the 64-bit arch operating system, and I am using here Ubuntu 16.04 64-bit operating system so it is in disabled mode.
I am not using any SAS device also so not choosing “LSI Logic SAS” option also, so I choose here “LSI Logic” option and click on the “Next” button for further configuration.
Next window is for virtual disk type configuration with options are:
- IDE
- SCSI
- SATA
I suggest choosing the “SCSI” option which is most used by the virtual machine.
In this window, we are configuring virtual disk with below options:
- Create a new virtual disk
- Use an existing virtual disk
- Use a physical disk
Here we will choose “Create a new virtual disk” as we are going to install a new virtual machine.
In this window, we are configuring the size of the virtual disk, for this operating system we configured 20 GB as you can see in below image.
If you select “Allocate all disk space now” option it will take all 20 GB storage from the beginning otherwise it will take only storage which is used by the virtual machine.
This window is used for naming and locating of the virtual disk file.
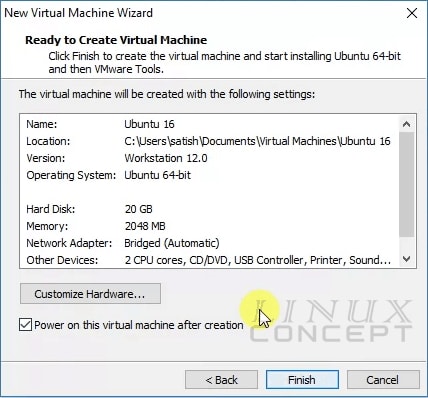
Now, VMware configuration for the new virtual machine is done. this window is summary for all configuration and there is “Customize Hardware…” button which you can use for reconfiguration of any hardware configuration like CPU, RAM etc.
Now Click on “Next” button to finish the virtual machine configuration.
Now, VMware workstation main window will appear with a new tab of new virtual machine “Ubuntu 16”.
Here, click on the “Power on this virtual machine” link to start the virtual machine.
After starting virtual machine you will get below window which is virtual machine booting and VMware logo displaying at booting time.
This new window showing now our new virtual machine booting with Ubuntu installation media and it is ready to install.
In the next screen, the system starts scanning for CD-ROM, which is just checking ISO file or any chosen installation media.
Next screen will appear with “Loading additional component” which is the part of Ubuntu installation.
Now, we will get the new screen for “Installing the system” which indicate ubuntu operating system installation on the virtual machine is started.
The next screen will appear for “Configuring apt”, apt is the application package manager which is used in Ubuntu operating system. The system starts configuring apt package manager, so if any package required for the operating system it can configure easily.
Now, we get a new window for “select and install software”, in this stem all application required by the operating system is installing in the virtual machine.
Now, after installation of the operating system is starts configuring GRUB boot loader for configuring boot device for the operating system.
GRUB boot configuration is the last installation process of Ubuntu 16.04 operating system. After configuring GRUB it finishing the operating system installation and booting the virtual machine.
After a reboot of the virtual machine, we will get the login window on the screen where we can log in with the username and password which we had configured in the beginning of virtual machine configuration.











Top comments (1)
i have a request please use virtualbox if there is any bug using vmware as sometimes my mouse flickered using ubuntu in vmware i switched to vbox and it is fine now