Hello everyone! Welcome back to the 5th part of Let's Build a Node.js REST API Series. We are so close to finishing this API. Let's not waste any more time and begin!
If you are new to this series, please check out the previous articles to follow along:
- Designing and Planning the API
- Routes and Controllers
- Integrating MongoDB Atlas
- Finalizing Controllers
In the previous article, we finally have all our controller functions done and working. Our API can GET, POST and DELETE our tea objects that consists of:
| Properties | Description | Type |
|---|---|---|
| name | the tea name | String |
| image | an image url | String |
| description | the description | String |
| keywords | words associated with the tea | String |
| origin | country where the tea is first made | String |
| brew_time | time to brew in minutes | Number |
| temperature | best temperature in Celsius to drink | Number |
| comments | any comments posted about the tea | Array of String |
However, in the previous article, I set the image property to just "dummy". In this article, we shall work on setting up this correctly.
Step 1: Install multer and import
For images, we don't just supply a text string like "name" but a file, an image file to be exact. And our image property is a String that will be the path of our uploaded image file.
Simply typing "/myImage.png" in our req.body.image will not work because that path does not exist. We need to upload our image with multer, a node.js middleware useful for uploading files.
Install multer by running:
npm install --save multer
Then let's import multer to our controllers/tea.js file:
const multer = require('multer');
Step 2: Create Storage
Still in our controllers/tea.js file, we add the following code to create a storage where our uploaded images will be stored.
We use multer.diskStorage() and include its 2 properties:
- destination: the path where the images will be stored. We shall set it as './uploads'.
- filename: determines the name that would be saved in storage. We can just keep it as its original name.
Here's what it should look like:
const storage = multer.diskStorage({
    destination: function (req, file, cb) {
        cb(null, './uploads');
      },
    filename: function (req, file, cb) {
        cb(null, file.originalname);
    }
});
Remember to create an 'uploads' folder in your root directory so it actually exists for the image to be stored there.
Step 3: Upload Image function
Below our const storage, we can initialize multer with multer() and pass storage in its storage property. Next, we have a .single() method which ensures that multer will accept only one file and store it as req.file.
The code will be:
const uploadImg = multer({storage: storage}).single('image');
In our newTea function, we have to change our image property to req.file.path instead of req.body.image because we want image to be our image file's path, not a string from req.body.image.
const newTea = new Tea({
     name:req.body.name,
     image: req.file.path,  //update this
     description: req.body.description,
     keywords: req.body.keywords,
     origin: req.body.origin,
     brew_time: req.body.brew_time,
     temperature: req.body.temperature,
})
Now we just have to export uploadImg to use in our routes/tea.js and include it as middleware. So include this function in our module.exports at the bottom, along with the rest.
module.exports = {
    getAllTea,
    uploadImg,  //include the new guy
    newTea,
    deleteAllTea,
    getOneTea,
    newComment,
    deleteOneTea
};
Now head over to our routes/tea.js file, find the POST /tea route and add uploadImg before newTea.
router.post('/tea', teaController.uploadImg /*insert this guy*/ , teaController.newTea);
Let's test it!
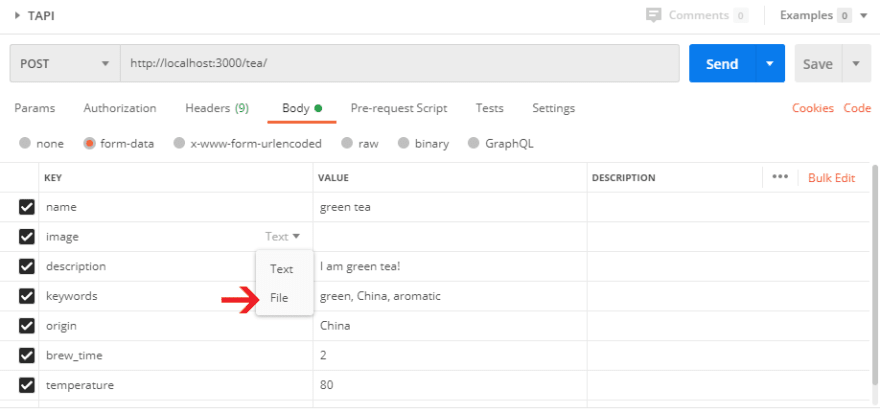
Let's try to POST a new tea with POSTman. Make sure the method is set to POST and the url is correct. Supply some values for each property. For image, set it to 'file' instead of text then upload an image.
POSTman should return our new tea object data with our image property saved as a path to our image.
If we check in our 'uploads' folder, the image that we uploaded should be there. That means it works! We can upload images to our tea object.
What about GET?
It's pointless to be able to POST if you cannot GET the image right?
Let's try to get the image by entering http://localhost:3000/uploads/green.png as the url in POSTman and set the method to GET. You should see this error being returned:
Why is this so?
Our 'uploads' folder cannot be accessed publicly and therefore the server cannot GET our image. To fix this, we have to make our uploads folder a static file.
Go to server.js and add this line of code:
app.use('/uploads', express.static('./uploads'));
Now let's retry that test on POSTman and it should return the image correctly.
Congratulations!
Our API is now fully working and built! All there's left to do is to add some security and deploy it for use! That will be in our next and final part of the series. Thank you for reading and following this series, I hope it has been helpful. Stay tuned for the final part. In the meantime, please ask questions or concerns in the comments and refer to the resources below. Cheers!
Further Reading
Notes: All images used in this API is from freepik.com


Top comments (0)