Hello devs! In this article, I'll be discussing some common ways to authenticate your API as a way to protect your routes from users that shouldn't access them.
Why should I protect my routes?
Certain routes such as your user's profile page or the admin pages should be only accessible to that user or the admin himself respectively. Imagine being able to log into any user account on an app and see their private account data. That's just terrifying!
Therefore, it is necessary to protect routes with the authentication and authorization methods for your Node.js REST APIs. For this article, I will be demonstrating authentication only but I may write about authorization in the future because that topic deserves its own article. Before we get into the authentication methods, I first
Authentication vs Authorization
First, let's clarify some definitions: authentication and authorization. The table below is an easy-to-read overview of the differences between authentication and authorization. Please take your time to read and understand it before moving on.
| Authentication | Authorization |
|---|---|
| Determines whether users are who they claim to be | Determines what users can and cannot access |
| Challenges the user to validate credentials (for example, through passwords, answers to security questions, or facial recognition) | Verifies whether access is allowed through policies and rules |
| Usually done before authorization | Usually done after successful authentication |
| Generally, transmits info through an ID Token | Generally, transmits info through an Access Token |
| Example: Employees in a company are required to authenticate through the network before accessing their company email | Example: After an employee successfully authenticates, the system determines what information the employees are allowed to access |
(Source: auth0.com)
So now that you have a good understanding about authentication and authorization, I shall present 3 common authentication methods for REST APIs.
1. HTTP Basic Authentication
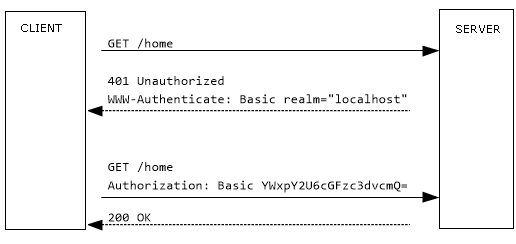
This is the simplest way to authenticate users. The request sends credentials such as username and password in the form of username:password to the header. It is encoded with Base64 and passed in the Authorization header like so:
Authorization: Basic AKsdKfsdljOf1POs
Example Implementation
Here's an example checkAuth middleware function that act as a gatekeeper before letting a user access a route.
const checkAuth = (req, res, next) => {
  //get the authorization header that was sent by the client
  const auth = req.headers["authorization"];

  /*
  auth = "Basic <encoded username:password>"
  get userpass via split and access index 1
  */
  const userpass = auth.split(" ")[1];

  //decode userpass to "username:password"
  const text = Buffer.from(userpass, "base64").toString("ascii");

  //get username and password individually
  const username = text.split(":")[0];
  const password = text.split(":")[1];

  if (username == process.env.USERNAME && password == process.env.PASSWORD)
  {
    //auth successful, access to the route is granted
    return next();
  } else {
    //username and password is wrong, auth unsuccessful
    return res.json("Access Denied.");
  }
};
When should Basic Header Authentication be used?
This authentication method may be the simplest, but it is also the most vulnerable since base64 encoding is easily reversible. HTTPS/TLS must be used with basic authentication. Because it is easy to implement and supported by most browsers, it is best used for server-side only applications. It can also be combined with other security methods to make it more secure.
2. JWT (JSON Web Tokens)
Just like the Basic Header Authentication, JWT also pass a credential in the Authorization header. The difference is that the credential is the form of the token and that it can expire. And, you need to install it with:
npm install jsonwebtoken
Then import it to your server.js and controllers.js with the line:
const jwt = require("jsonwebtoken");
A token is generated using a payload and a secret key that is encoded in Base64. Then it is stored and passed into the Authentication header with the Bearer instead of Basic schema, whenever the user logs in like so:
Authorization: Bearer JWT_TOKEN
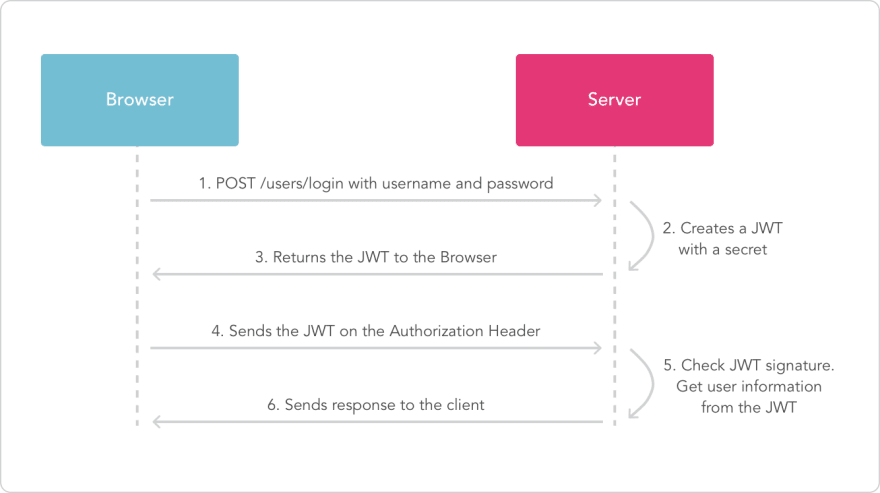
The middleware then verifies the authentication header and signs the user in, if the token and secret are correct of course. Here's a snapshot of the process visually.
Example Implementation
The secret key is stored in the project's .env file while the payload is an object, usually stored in a database like:
{
  "username": "John Doe",
  "password": 12345678
}
To generate a JWT token, here's an example function:
function generateAccessToken(payload) {
  // expires after 1800 seconds (30 minutes)
  return jwt.sign(payload, process.env.SECRET_KEY, { expiresIn: '1800s' });
}
We can call this function when the client supplies a username and password to the request body and sends it to an endpoint like:
app.post('/user/login', (req, res) => {
  const username = req.body.username;
  const password = req.body.password;

  //call the function to generate and then return the token
  const token = generateAccessToken({ username: username, password: password });
  res.json(token);
});
The token is usually stored in cookies or localStorage. After generating the token, we can verify it in the Authorization header whenever the user logs in.
function authenticateToken(req, res, next) {
  //Get the request header that was sent
  const auth = req.headers['authorization'];
  /*
  auth = "Bearer <token>"
  so get the token by split and at index 1
  */
  const token = auth.split(' ')[1];

  // if there isn't any token, send unauthorised status
  if (token == null) return res.sendStatus(401) ;

  //verify the token with the secret key
  jwt.verify(token, process.env.SECRET_KEY, (err: any, user: any) => {

    //if user is not in the database
    if (err) return res.sendStatus(403);
    //else access is granted
    return next();
  })
}
When should JWT Authentication be used?
This authentication method is suited for most app authentication needs. It can be used for mobile, web or server side apps. They work well with Express or apps with MVC architecture.
JWTs are stateless, all the information needed to authenticate a user is within that token. Keep in mind that the token is sent every time a request is made. For enterprise apps, this could impact the data traffic size, as there would be multiple access levels, permissions and other roles to think about when implementing a solution with JWT.
Another important note is that the token has to be explicitly stored somewhere. Don't store it in sessionStorage or localStorage, which are both susceptible to XSRF (Cross-Site Request Forgery) or XSS (Cross-Site Scripting) attacks. That is why it is a good idea to keep the expiry dates on the tokens short and store them server-side instead.
3. OAuth 2.0
The final authentication method we'll be discussing in this article is OAuth 2.0. Rather than a method, it is more of an authorization framework commonly used for apps with 3 parties: you, the users and the third party developers. For example:

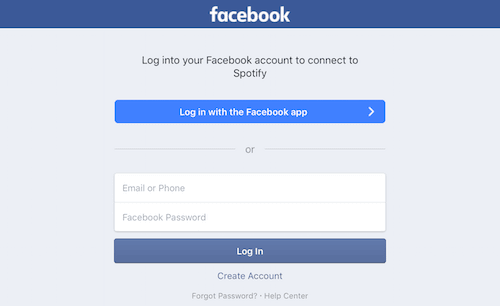
As seen from this screenshot, instead of directly creating a Spotify account and signing in to their app with user credentials, the user is allowing Facebook (a third party) to verify his credentials to authenticate himself to access user exclusive routes in Spotify.
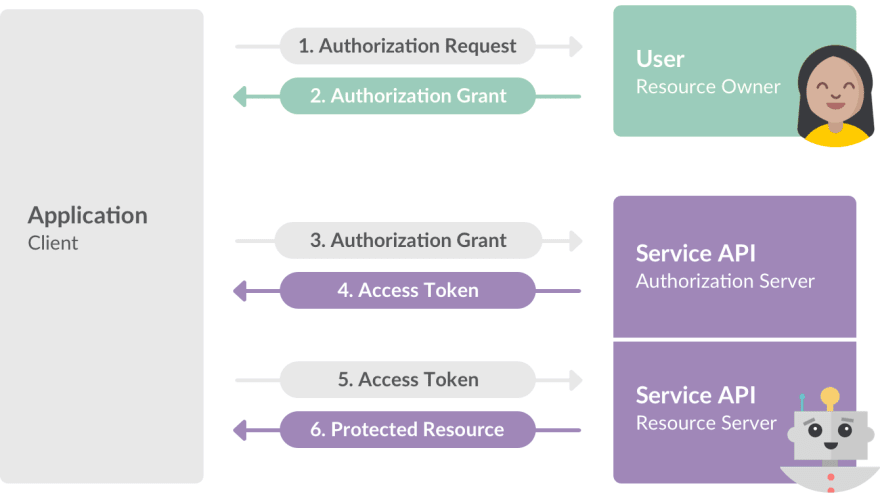
In short, OAuth 2.0 works by delegating authentication to an authorization server (i.e. Facebook, Google, Github, etc.) that hosts the user account. The server then generates a token and sends it to the resource server (i.e. Spotify or an API) to authorize the user to access protected routes.
See the illustration below to get a better picture.
Example Implementation
There are many services that uses this framework such as Firebase Authentication, DigitalOcean, Amazon Cognito and so on. I personally use Firebase because it is easy and intuitive to use.
You can check out how I implemented a Firebase Authentication system in a React app in this article.
When should OAuth 2.0 be used?
Like mentioned earlier, it should be used when an app has 3 parties involved. When implementing OAuth, it is also good to provide your own basic email or username authentication, just in case the user doesn't want to allow external third party services to access their data. You probably see this practice done often like the screenshot below.
Summary
Today, we have discussed the difference between authentication and authorization, and how we can implement some common authentication methods such as Basic Header, JWT Authentication and OAuth 2.0 to our REST APIs or apps.
Thanks so much for taking the time to read this article. I hope it has been insightful for you. Please do give a like or a share if it is! Building is always the best way to learn so I recommend trying to build an app with user authentication to learn a more of each authentication method and get a better understanding on how they work. To learn more, feel free to read the resources below. Till next time, cheers!
See Also
- HTTP Authentication Headers
- About JWT Documentation
- Auth0.com Documentation
- Introduction to OAuth2
- More on OAuth 2.0


Top comments (0)