The second article in the "To Kill a working drone" Series.
All the code for the projects mentioned in the series can be found in my "MamboMiniControllers" Github repo:
 LuckyNkosi
/
MamboMiniControllers
Demos and example code showing different control schemes for flying the MamboParrorMini
To kill a working drone with Web Bluetooth
In the previous article, we looked at the Mambo Parrot drone and its capabilities. The drone can be controlled using Bluetooth Low Energy (BLE) and Wifi. For this experiment, we'll be focusing on BLE.
Gery has a post on the fundamentals of Bluetooth and using the Web Bluetooth API. She covers the topic very well in her article titled "BLE and GATT and other TLAs". I suggest you take a look at that if you need a deeper understanding of Web Bluetooth.

BLE and GATT and other TLAs
Gergana Young ・ Dec 17 '19 ・ 6 min read
Armed with BLE, WBA and other TLAs, we can deduce that in order to fly the drone safely, we need to be able to do the following:
- Connect to the drone
- Takeoff
- Hover
- Land
These are tasks that are likely to be actioned quite frequently so I created a drone connection management script. The script is based on Peter O'Saughnessy's drone.v1.2.js script which is part of his parrot drone project on GitHub.
Our modified drone-connection-management.js script exports a class named ParrotDrone. With drone assigned to an instance of ParrotDrone,
const drone = new ParrotDrone();
The class exposes utility function which we can then access as shown below. :
drone.connect(onDisconnectCallback);
drone.takeOff();
drone.hover();
drone.land();
drone.disconnect();
drone.emergencyCutOff();

//Movement commands
drone.flip();  //One directional flip
drone.moveForwards();
drone.moveBackwards();
drone.moveRight();
drone.moveLeft();
drone.twistLeft();
drone.twistRight();
'Moving' a drone:
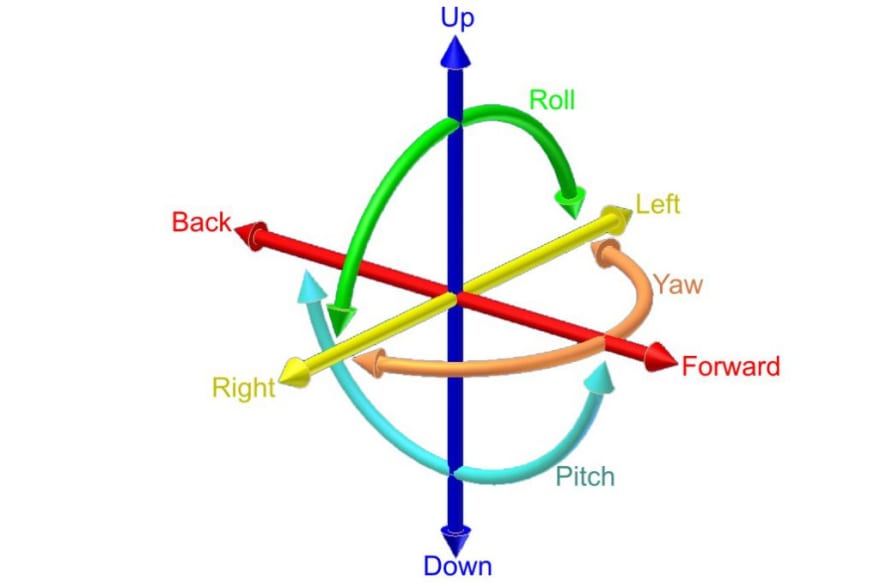
The above commands translate to specific drone movements. 'moving' in any direction, involves a combination of slightly tilting the drone and thereby moving it in said direction. Forwards and backward involves pitching while left and right involve rolling the drone.
The 'twist' commands are simply yawing movements; keeping the drone in place and rotating it about the y-axis. The roll, pitch, and yaw movements are shown in the image below sourced from Emissary Drones.
 .
.
This forms the backbone of our different control schemes. To abstract from the complexity of our drone-connection-management script, we can create a drone-control.js script which simplifies how we work with the drone. The code for this script is:
import { ParrotDrone } from "../lib/drone-connection-management.js";

//#region  Initialisation
// to make working with angles easy
window.TO_RAD = Math.PI / 180;
window.TO_DEG = 1 / TO_RAD;

const drone = new ParrotDrone();
window.drone = drone;
function onDisconnectCallback() {
  console.log("Disconnected called");
  init();
}
function init() {
  //connect:
  drone
    .connect(onDisconnectCallback)
    .then(() => {
      console.log("connected");
    })
    .catch(() => console.log("Connection Error"));
}

function connectToDrone() {
  init();
}
function takeOff() {
  drone.takeOff();
}
function land() {
  drone.land();
}
function disconnectFromDrone() {
  drone.land();
}
function hover() {
  drone.hover();
}
//Global functions so we can simply call them
window.takeOff = takeOff;
window.land = land;
window.connectToDrone = connectToDrone;
window.hover = hover;
window.disconnectFromDrone = disconnectFromDrone;
Using the code
To use this code, we simply have to import the file in order HTML document.Using a relative path with the script saved in a 'lib' folder,we can import it as shown below:
<script type="module" src="../lib/drone-control.js"></script>
The following buttons will then allow you to control the drone:
<div>
  <button type="button" onclick="takeOff()">Take Off</button>
  <button type="button" onclick="connectToDrone()">Connect To Drone</button>
  <button type="button" onclick="disconnectFromDrone()">Disconnect</button>
</div>

<div>
  <button type="button" onclick="hover()">Hover</button>
  <button type="button" onclick="land()">Safe Land</button></div>
All done
At this point, you have everything you need to fly the drone with Web-Bluetooth. The following section is added information on how the drone works and if you use the script in my repo, is not necessary to get you started and you can skip to the conclusion.
Connect to the drone
Connecting to the drone involves a few steps. Firstly, we need to discover (search for) the drone. Then connect to it's GATT services.
Discovering the drone
The drone is a bluetooth periferal. To discover it, we use the Web Bluetooth API's Bluetooth.requestDevice().
The below image is the method definition as found on MDN Docs.

As shown in the MDN Docs, the method takes in an optional options parameter object which has filters and optionalServices arrays as well as the acceptAllDevices boolean which defaults to false.
With droneDevice declared in this scope, we can create a _discover() function to do this. The function looks like this:
  _discover() {
    console.log("Searching for drone...");
    return navigator.bluetooth
      .requestDevice({
        filters: [
          { namePrefix: "Mambo_" }
        ],
        optionalServices: [
          this._getUUID("fa00"),
          this._getUUID("fb00"),
          this._getUUID("fd21"),
          this._getUUID("fd51")
        ]
      })
      .then(device => {
        console.log("Discovered drone", device);
        this.droneDevice = device;
      });
  }
Connect GATT
From Gery's post: "The Bluetooth Generic Attributes (GATT) Profile is the way that Bluetooth devices communicate with each other. It defines a hierarchical data structure for communication between two BLE devices"
Once we've got the droneDevice returned and set by our _discover() function, we can now connect to the drone using it's GATT profile. We can listen for it's disconnection using an eventListener and the code looks as follows:
  _connectGATT() {
    console.log("Connect GATT");

    this.droneDevice.addEventListener(
      "gattserverdisconnected",
      this._handleDisconnect
    );

    return this.droneDevice.gatt.connect().then(server => {
      console.log("GATT server", server);
      this.gattServer = server;
    });
  }
Based on the drone's characteristics, we can get the state of the drone and use the drone's services to interact with it. For this, we need to start notifications for the services. For this, we have the _startNotifications() function which also handles caching. As Peter notes: The services are
Services:
 *  - fa00 - contains 'write without response' this.characteristics starting with fa...
 *  - fb00 - contains 'notify' this.characteristics starting with fb...
 *  - fc00 - contains 'write' characteristic ffc1, not currently used
 *  - fd21 - contains 'read write notify' this.characteristics fd22, fd23, fd24
 *  - fd51 - contains 'read write notify' this.characteristics fd52, fd53, fd54
 *  - fe00 - contains this.characteristics fe01, fe02, not currently used
connect in a nutshell
In a nutshell, we can create a promise chain of the steps required for connection and it looks as follows:
return this._discover()
          .then(() => {
            return this._connectGATT();
          })
          .then(() => {
            return this._startNotifications();
          })
          .then(() => {
            return new Promise(resolve => {
              setTimeout(() => {
                this._handshake().then(resolve);
              }, 100);
            });
          })
          .then(() => {
            console.log("Completed handshake");
            resolve();
          });
      });
Once we've connected successfully to the drone, we can begin sending control commands to the drone. To control the drone, we need to write commands to it's characteristics through it's GATT profile thrugh the characteristic.writeValue(command);.
The rest of the code is available in the repo.
Conclusion
The scripts we have created here, namely the drone-connection-management.js and drone-control.js will form the base for the different control scheme we explore in the rest of the series which includes flying the drone with twitter, bananas, and a leap motion controller.
I hope you enjoyed this article.
Lucky


Top comments (1)