
Introduction
If you are using only Azure, you can work using Bicep, which is a recent IaC tool designed to help in the deployment of resources on Azure. You can use Terraform, Pulumi, Arm Templates or even, Azure CLI / Powershell to manipulate azure. Since there are many introductory posts on Bicep, I will go directly to the point and show how to deploy a potentially usable application on Azure. This work required hours of trial-and-error, googling and troubleshooting. It has been a somewhat painful journey, yet, rewarding journey. I hope you find this valuable for your work.
In this sample, I demonstrate how to structure your scripts to create the resources, store secrets on Azure Key Vault and I will show how to connect those secrets to the Function app. This example also covers a more involved scenario, using Azure RBAC for accessing Azure Key Vault as well as the creation of custom roles to configure the permissions needed.
The source code is available here: Source Code
What we are deploying?
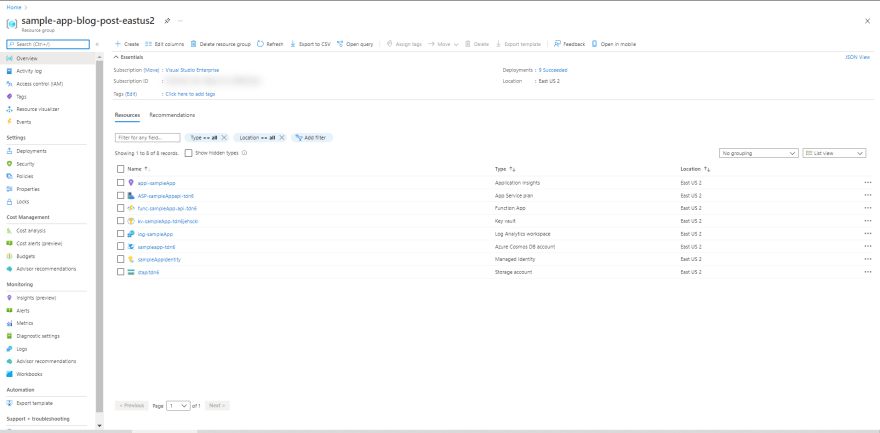
In the image below, we can see the resources that have been created after running this deployment:
We also deploy an RBAC-only Azure Key Vault instance and save some keys inside it:

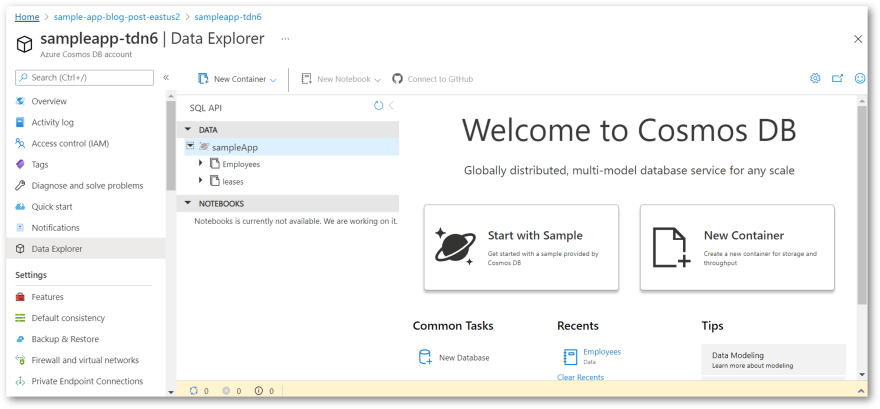
Then, we create a Cosmos DB account in Serverless mode. We configure it with a Database and a Collection. Its access keys are stored on Key Vault during the deployment:
Now we are ready to create the Function app. It depends on some components that we also create - Log Analytics, App Insights, Storage Account and an App Service Plan configured as Consumption Plan. As we can see in the pictures below, the configurations are linked directly to the Azure Key Vault and are exposed as common environment variables.


To make this work we create a User-Assigned Managed Identity and attach it to the Function App. With this enabled, the Function App can access the secrets stored in Key Vault using Azure RBAC. We also give access to the user who is deploying the application to manipulate.


Please note that in this sample we don't configure VNet integration, IP restrictions, security groups. I don't have these requirements for my project. Now let's dive into the details of this script. There is a lot of see here :)
Structure of the script
The script is composed of many scripts that are connected on main.bicep:
@description('Application Name - change it!')
param appName string = 'sampleApp'

param location string = resourceGroup().location
param tenantId string = tenant().tenantId

@description('This is the object id of the user who will do the deployment on Azure. Can be your user id on AAD. Discover it running [az ad signed-in-user show] and get the [objectId] property.')
param deploymentOperatorId string

// a 4-char suffix to add to the various names of azure resources to help them be unique, but still, predictable
var appSuffix = substring(uniqueString(resourceGroup().id),0,4)

// grants access to the operator of this deployment with specific roles like key vault access.
module operatorSetup 'operatorSetup.bicep' = {
  name: 'operatorSetup-deployment'
  params: {
    operatorPrincipalId: deploymentOperatorId
    appName: appName
  }
}

// creates an user-assigned managed identity that will used by different azure resources to access each other.
module msi 'msi.bicep' = {
  name: 'msi-deployment'
  params: {
    location: location
    managedIdentityName: '${appName}Identity'
    operatorRoleDefinitionId: operatorSetup.outputs.roleId
  }
}

// creates a key vault in this resource group
module keyvault 'keyvault.bicep' = {
  name: 'keyvault-deployment'
  params: {
    location: location
    appName: appName
    tenantId: tenantId
  }
}

// creates the cosmos db account and database with some containers configured. Saves connection string in keyvault.
module cosmos 'cosmosDb.bicep' = {
  name: 'cosmos-deployment'
  params:{
    cosmosAccountId: '${appName}-${appSuffix}'
    location: location
    cosmosDbName: appName
    keyVaultName: keyvault.outputs.keyVaultName
  }
}

// creates a Log Analytics + Application Insights instance
module logAnalytics 'logAnalytics.bicep' = {
  name: 'log-analytics-deployment'
  params: {
    appName: appName
  }
}

// creates an azure function, with secrets stored in the key vault
module azureFunctions_api 'functionApp.bicep' = {
  name: 'functions-app-deployment-api'
  params: {
    appName: appName
    appInternalServiceName: 'api'
    appNameSuffix: appSuffix
    appInsightsInstrumentationKey: logAnalytics.outputs.instrumentationKey
    keyVaultName: keyvault.outputs.keyVaultName
    msiRbacId: msi.outputs.id
  }
  dependsOn: [
    keyvault
    logAnalytics
  ]
}
As we can see in the code above, bicep scripts are maintainable and we can generally understand the code at a first glance.
Dealing with permissions
Finding your Azure user details before running the deployment
As we would expect, it's necessary to configure some permissions to create or update resources on your Azure subscription. This is necessary for any IaC tool. After we decide who will run the deployment, we must get its ObjectId in Azure AD and pass it as a parameter to the deployment script. So, before trying to run the script, you must first decide who will be the AAD user (not service principal) to run this deployment. For example, to give yourself access to this deployment, run:
az ad signed-in-user show
You will see many properties. Grab the objectId property. The deployment script will give you adequate permissions to run this deployment.
Working with roles and role assignments - Azure RBAC
The main reason we should consider Azure RBAC is the fine-grained control of permissions we can configure for Azure resources. Also, in the ideal world, with Azure RBAC enabled, we don't need to store keys or secrets across the components of the solution. Azure uses Roles, Role Assignments and Identities to control who can perform specific actions on Azure. Please note that not all the Azure services support RBAC authentication yet at the time of this writing (January 2022). Also, please note that some services have "management platform" permissions and "data" permissions. Commonly, a role can be enabled to only manipulate a service but not see the data stored in it. This is true for Cosmos DB and Azure Key Vault.
In our example, we create an Azure Function that connects to Azure Key Vault without the need to configure the Key Vault-specific role management system as we used to do before. The Key Vault with RBAC enabled delegates authorization to Azure itself. No need for custom code, Connection Strings handling or manipulation of secrets stored somewhere. To allow a service to communicate with others, we must configure who can do what beforehand. This process is not trivial and usually requires trial and error as well as reading the documentation for each role defined for the service we want. Every service will have different permissions available to be used. After we discover the roles needed, we assign them to a Managed Identity. The managed identity is a badge that we manually add to the service (in this sample, the Function App). This badge will contain the role assignments we want - for example, view a secret value. The caller service doesn't have to be changed - just present this badge to the destination service. So, any Azure service that runs under this Managed Identity will have the power to view a secret value. In our example, we want the Azure Functions to have access to the contents of the secrets.
So we have to:
- Create a role definition (what we can or can't do);
- Create a managed identity (the "badge" itself);
- Create a role assignment - give this badge to the service that will call other Azure services.
There are two different kinds of Managed Identities:
- User-Assigned Managed Identity: is a Service Principal (an Azure AD identity representing services/custom apps) that can be created before independently of the existence of other services and can be later attached to the services we create. This is ideal in our scenario because we can create the identity, configure it and assign it to the services we want. In our sample, we create an identity and pass it as a parameter to the Function App during its creation. Also, we have the option to do the assignment manually, using Azure CLI. Another important aspect is that the relationship is many-to-many between MSIs and Services. One service can consume multiple user-assigned identities; a given user-assigned identity can be attached to multiple services.
- System-Assigned Managed Identity: We also have the option to create an Azure service with a Service Principal that is tied to the lifecycle of the service. For example, we can create a System-Assigned Managed Identity for the Function App and give it the same role assignments during the creation of the service, or later, via deployment script or Azure CLI commands. In general, it's more interesting to use User-Assigned identities because it can be managed as a first-class citizen of our deployment and it appears on the resource group - it's not hidden inside AAD. Also, as you might expect, there is a one-to-one relationship between the system-assigned managed identity and its underlying service.
Creating a suitable role definition that works with Azure Key Vault
The permissions on Azure Key Vault in my opinion are very complicated to set up at the time of this writing. It can be very tricky to discover what is the correct role or why the access to Key Vault is not working. We might also be misguided by many posts saying that the RBAC roles can take some time to propagate and think that it would be potentially a matter of time to have everything working.
To allow the MSI or even the the deployment operator/developer to perform operations on Key Vault, the script defines a new role called "Operator role for the {app name}" with the following definition:
resource roledefinition_deploymentOperator 'Microsoft.Authorization/roleDefinitions@2018-07-01' = {
  name: guid('deployment-operator', appName)
  properties: {
    roleName: 'Operator role for app ${appName}'
    description: 'This role orchestrates this deployment and allows the communication between the components in this solution.'
    assignableScopes: [
      resourceGroup().id
    ]
    permissions: [
      {
        actions: [
          'Microsoft.Authorization/*/read'
          'Microsoft.Insights/alertRules/*'
          'Microsoft.Resources/deployments/*'
          'Microsoft.Resources/subscriptions/resourceGroups/read'
          'Microsoft.Support/*'
          'Microsoft.KeyVault/checkNameAvailability/read'
          'Microsoft.KeyVault/deletedVaults/read'
          'Microsoft.KeyVault/locations/*/read'
          'Microsoft.KeyVault/vaults/*'
          'Microsoft.KeyVault/operations/read'
        ]
        dataActions:[
          'Microsoft.KeyVault/vaults/*'
        ]
        notActions: []
        notDataActions: []
      }
    ]
  }
}
Since I couldn't find any combination of roles that allows the app to read keys and secrets at the same time, I took the path of creating a custom role definition here. This role definition is fairly permissive on Azure Key Vault, but of course, you can make it more restrictive to suit your needs. This Custom Role is defined on the Resource Group scope. This is important because this custom role can be used to control not only Key Vault but all the other services we would want. All the resources created on a resource group inherit from higher scopes' permissions. We can define permissions at the resource group level, subscription or management group level as well as on the resource level itself. As said above, we do the role assignment at the Resource Group scope only and we avoid setting permissions on specific objects. To be clear, we don't assign permissions on the Key Vault itself - we let it inherit permissions defined at the resource group level.

In this sample, the use of Azure Key Vault keys is not really needed. We could potentially go ahead and assign an existing Built-In role like Key Vault Secrets Officer Built-In Role to work only with secrets. Anyway, I decided to create a custom role because it can make things very flexible and all the permissions defined are very clear. In the future, if keys are needed, we won't have more surprises.

The documentation containing all the available Built-In roles is here: Available RBAC Roles for Key Vault. To reference any of these roles, find the JSON definition of the role right below the description and get the name property of the role, that is a Guid. For example, the role id for Key Vault Secrets Officer is b86a8fe4-44ce-4948-aee5-eccb2c155cd7. You would pass this value directly as a parameter of the deployment script.
Role Assignments on Bicep script
The code to assign the role definition above to a service principal is like this:
// operatorSetup.bicep, called by main.bicep

@description('principalId of the user that will be given the permissions needed to operate this deployment.')
param operatorPrincipalId string

@description('Application name, used to compose the name of the role definitions.')
param appName string
var roleAssignmentName = guid(resourceGroup().id, roledefinition_deploymentOperator.id, operatorPrincipalId, appName)

// assigns the role definition above to the user who will perform the deployment.
resource keyvault_roleAssignment_deploymentOperator 'Microsoft.Authorization/roleAssignments@2020-08-01-preview' = {
  name: roleAssignmentName
  scope: resourceGroup()
  properties: {
    roleDefinitionId: roledefinition_deploymentOperator.id // remember that this the user who is doing the deployment!
    principalId: operatorPrincipalId
  }
}

output roleId string = roledefinition_deploymentOperator.id
output roleName string = roledefinition_deploymentOperator.name // just for troubleshooting if you need it
output roleType string = roledefinition_deploymentOperator.type // just for troubleshooting if you need it
The result can be seen visually here:

It creates the assignment at the resource group level as well. We output the role definition id back to main.bicep so it can reuse this id and assign the operator role to the MSI we create. I am using the same role definition for the operator and the managed identity for simplicity. Please note that we can troubleshoot bicep deployments by creating output variables. Each output variable from external bicep files should be should also be "outputted" again in main.bicep as well so the results can be printed on the command line. Please also note that each file can be deployed independently, as long as you pass the correct parameters. When the deployment succeeds, the results are also available in the command line, as well as a very descriptive log on the command line. You can also see the results of the deployment on Azure.
Please note again that I assign, for simplicity, the same role for the deployment operator (in this case, it's me) and the MSI. This is useful for troubleshooting the deployment. For example, Key Vault does not directly allow you to see the keys without specific permission for doing so. Even if Key Vault Administrator or Contributor roles are selected, we won't be able to see the keys, just manipulate the service itself. It is really necessary to give specific permissions to see the contents of a key. This restrictive style of permissions used in Key Vault can cause a lot of surprises during the deployment and further configuration of the solution. This will usually mean that you can have deployment issues because when you forget to configure explicit permission to create or read the keys. The errors are misleading. Even worse: if you don't configure properly the permissions to read secrets, your function app won't even be able to start. In our sample, I also store the storage secrets inside Key Vault. Azure Functions needs a valid storage connection to start. Issues of this kind can be a nightmare and take a lot of time to fix. So please: do take special attention to the permissions you set for users and identities when dealing with RBAC-enabled Key Vaults.
Create a deployment and run on an existing resource group
In this sample, I first create manually a resource group on Azure to host the deployed items. With the resource group created, you go ahead and run this command:
az deployment group create --resource-group sample-app-blog-post-eastus2 --template-file .\src\main.bicep --parameters deploymentOperatorId=aaaabbbb-ccdd-ee11-2233-444455667788
The command needs the ObjectId of the user who will do the deployment and will also need the resource group name. In this case, I am using sample-app-blog-post-eastus2 as an example.
Please note that when you first execute the deployment, the process will take 10 minutes or more because it creates the Cosmos DB Account, which is usually not so fast. Since this deployment uses predictable names for resources, it can be run multiple times. In general, it will update or create the resources defined on each bicep file. In my experience, the subsequent runs take less time since it does not recreate everything. Also, please note that you can pass the --parameters multiple times. Change the variable appName to fit your needs inside main.bicep.


Creating a Key Vault instance
The creation of an Azure Key Vault with RBAC enable is much simpler. No need to set custom permissions or so here.
// keyvault.bicep, called by main.bicep
param appName string

@maxLength(24)
param vaultName string = '${'kv-'}${appName}-${substring(uniqueString(resourceGroup().id), 0, 23 - (length(appName) + 3))}' // must be globally unique
param location string = resourceGroup().location
param sku string = 'Standard'
param tenantId string // replace with your tenantId

param enabledForDeployment bool = true
param enabledForTemplateDeployment bool = true
param enabledForDiskEncryption bool = true
param enableRbacAuthorization bool = true
param softDeleteRetentionInDays int = 90

param networkAcls object = {
  ipRules: []
  virtualNetworkRules: []
}

resource keyvault 'Microsoft.KeyVault/vaults@2021-06-01-preview' = {
  name: vaultName
  location: location
  properties: {
    tenantId: tenantId
    sku: {
      family: 'A'
      name: sku
    }

    enabledForDeployment: enabledForDeployment
    enabledForDiskEncryption: enabledForDiskEncryption
    enabledForTemplateDeployment: enabledForTemplateDeployment
    softDeleteRetentionInDays: softDeleteRetentionInDays
    enableRbacAuthorization: enableRbacAuthorization
    networkAcls: networkAcls
    // note: no need for access policies here!
  }
}

output keyVaultName string = keyvault.name
output keyVaultId string = keyvault.id
We need to output the reference of KeyVault to the deployments that will need to use this recently created instance of Key Vault. Please note that this instance is usable immediately and you don't need to wait to store keys and secrets. If you have issues, probably you should tune the permissions for the user/identity that will use this Key Vault.
Tip: Activate Application Insights on Key Vault to facilitate the investigation of access issues. This is crucial.
Creating a Cosmos DB account, storing secrets and configuring containers
It's very cool that we can deploy the account and configure the containers as well in the same execution. We don't need to further manipulate CosmosDB with scripts in this initial deployment.
The whole script with the Cosmos DB deployment is here:
@maxLength(30)
param cosmosAccountId string
param location string
param cosmosDbName string
param keyVaultName string

param tags object = {
  'deploymentGroup': 'cosmosdb'
}

resource cosmosAccount 'Microsoft.DocumentDB/databaseAccounts@2021-10-15' = {
  name: toLower(cosmosAccountId)
  location: location
  kind: 'GlobalDocumentDB'
  properties: {
    publicNetworkAccess: 'Enabled'
    enableFreeTier: false
    databaseAccountOfferType: 'Standard'
    consistencyPolicy: {
      defaultConsistencyLevel: 'Session'
      maxIntervalInSeconds: 5
      maxStalenessPrefix: 100
    }
    locations: [
      {
        locationName: location
        failoverPriority: 0
        isZoneRedundant: false
      }
    ]
    capabilities: [
      {
        name: 'EnableServerless'
      }
    ]
  }
}

resource cosmosDb_database 'Microsoft.DocumentDB/databaseAccounts/sqlDatabases@2021-06-15' = {
  name: '${cosmosAccount.name}/${cosmosDbName}'
  tags: tags
  properties: {
    resource: {
      id: cosmosDbName
    }
  }
}

resource container_leases 'Microsoft.DocumentDB/databaseAccounts/sqlDatabases/containers@2021-06-15' = {
  name: '${cosmosDb_database.name}/leases'
  tags: tags
  dependsOn: [
    cosmosAccount
  ]
  properties: {
    resource: {
      id: 'leases'
      partitionKey: {
        paths: [
          '/id'
        ]
      }
    }
  }
}

resource container_employees 'Microsoft.DocumentDB/databaseAccounts/sqlDatabases/containers@2021-06-15' = {
  name: '${cosmosDb_database.name}/Employees'
  tags: tags
  dependsOn: [
    cosmosAccount
  ]
  properties: {
    resource: {
      id: 'Employees'
      partitionKey: {
        paths: [
          '/EmployeeId'
        ]
      }
      uniqueKeyPolicy: {
        uniqueKeys: [
          {
            paths: [
              '/EmployeeId'
            ]
          }
        ]
      }
    }
  }
}

module setCosmosConnectionString 'setSecret.bicep' = {
  name: 'setCosmosConnectionString'
  params: {
    keyVaultName: keyVaultName
    secretName: 'CosmosDbConnectionString'
    secretValue: cosmosAccount.listConnectionStrings().connectionStrings[0].connectionString
  }
}

output cosmosAccountId string = cosmosAccountId
The code for setSecret.bicep is:
param keyVaultName string
param secretName string
param secretValue string

resource secret 'Microsoft.KeyVault/vaults/secrets@2021-06-01-preview' = {
  name: '${keyVaultName}/${secretName}'
  properties: {
    value: secretValue
  }
}
In this case, we are creating a Cosmos DB Account using the Serverless mode. I tried to use the cheapest settings here, but it will depend on the workload your project needs. Of course, you can opt-in for the free tier if you have space in your subscription - they allow only one account with the free tier enabled.
It would be difficult to figure out how to build this script from scratch. It is. To discover the settings, I googled many samples and have gone through trial-and-error. There are many samples for this specific for Cosmos, but in general, you should first create want you want manually and try to induce the parameters of the deployment. The Azure Portal allows you to export the deployment template before and after the deployment. You can also go to the upper right corner of the resource you want to script and click JSON view to see how a given resource is defined. You will notice with some experience that many items are the defaults and don't need to be scripted on your bicep deployment script.
For Cosmos we do the following process:
- Create the account
- Create a new database
- Create the
leasescontainer (useful for Azure Functions + Change Feed) - Create the
Employeescontainer, with an adequate partition key and a unique index. - Save the connection string on Key Vault as a secret, using the Key Vault name passed in as a parameter. Please note that we also use a special function to retrieve the connection string on the fly - don't need to see the value of the connection string.
What about RBAC for Cosmos DB?
RBAC is also available and is the recommended way to work with Cosmos as we can see on this document: Setup RBAC - Cosmos DB.
I have decided to not use this yet because, to be succinct, Azure Functions does not support yet RBAC-enabled Cosmos DB bindings for Consumption Plans. If we use an RBAC-enabled Cosmos DB account, we would need to write code and manage a static instance of a Cosmos DB client. Since, in my humble opinion, the whole point of using Azure Functions + Cosmos is the brilliant integration via bindings and triggers, I decided to avoid this way until this is available for all plans. The details, at the time of this writing, are here: Cosmos DB Extensions 4x and Higher.
Please also note that Durable Functions won't support RBAC enabled connections for now. See information here: Identity-based connections for Azure Functions
Of course, your requirements will be different and using RBAC for Cosmos can be a viable option for your needs. It's available and works well.
Creating the Function App
The creation of the web app designed to work as an Azure Functions app is quite complex. It's simplified on the portal, but on the script, it is somewhat complex. I have also googled this a lot, tried many combinations and finally have a good combination of settings that will just work for most of the common needs.
Log Analytics Workspace + Application Insights
I delegate the construction of these resources to its file since this rarely changes once it succeeds.
// logAnalytics.bicep, called by main.bicep

param appName string
param location string = resourceGroup().location
var logAnalyticsWorkspaceName = 'log-${appName}'
var appInsightsName = 'appi-${appName}'

// Log Analytics workspace is required for new Application Insights deployments
resource logAnalyticsWorkspace 'Microsoft.OperationalInsights/workspaces@2021-06-01' = {
  location: location
  name: logAnalyticsWorkspaceName
  properties: {
    retentionInDays: 30
    features: {
      enableLogAccessUsingOnlyResourcePermissions: true
    }
    sku: {
      name: 'PerGB2018'
    }
    publicNetworkAccessForIngestion: 'Enabled'
    publicNetworkAccessForQuery: 'Enabled'
  }
}

// App Insights resource
resource appInsights 'Microsoft.Insights/components@2020-02-02' = {
  name: appInsightsName
  location: location
  kind: 'web'
  properties: {
    Application_Type: 'web'
    WorkspaceResourceId: logAnalyticsWorkspace.id
    publicNetworkAccessForIngestion: 'Enabled'
    publicNetworkAccessForQuery: 'Enabled'
  }
}

output instrumentationKey string = appInsights.properties.InstrumentationKey
We return the instrumentation key, necessary to connect the Function App to Application insights. I also tried to use the cheapest settings. But keep in mind that the amount of data can significantly increase the costs of the solution! Be careful.
Defining the Function App deployment
The script to deploy the Function app is as follows:
// functionApp.bicep, called by main.bicep

// note: https://docs.microsoft.com/en-us/azure/cloud-adoption-framework/ready/azure-best-practices/resource-abbreviations
param location string = resourceGroup().location
param functionRuntime string = 'dotnet'

@description('A name for this whole project, used to help name individual resources')
param appName string

@description('The name of the role or service of this function. Example: Api CommandHandler, EventHandler')
param appInternalServiceName string

@description('Id of a existing keyvault that will be used to store and retrieve keys in this deployment')
param keyVaultName string

@description('User-assigned managed identity that will be attached to this function and will have power to connect to different resources.')
param msiRbacId string

@description('Application insights instrumentation key.')
param appInsightsInstrumentationKey string
param deploymentDate string = utcNow()
param appNameSuffix string

var functionAppName = 'func-${appName}-${appInternalServiceName}-${appNameSuffix}'
var appServiceName = 'ASP-${appName}${appInternalServiceName}-${appNameSuffix}'

// remove dashes for storage account name
var storageAccountName =  toLower(format('st{0}', replace('${appInternalServiceName}-${appNameSuffix}', '-', '')))

var appTags = {
  AppID: '${appName}-${appInternalServiceName}'
  AppName: '${appName}-${appInternalServiceName}'
}

// Storage Account - I am using 1 storage account for each function. It would be potentially shared across many function apps.
resource storageAccount 'Microsoft.Storage/storageAccounts@2019-06-01' = {
  name: storageAccountName
  location: location
  sku: {
    name: 'Standard_LRS'
  }
  kind: 'StorageV2'
  properties: {
    supportsHttpsTrafficOnly: true
    minimumTlsVersion: 'TLS1_2'
    encryption: {
      services: {
        file: {
          keyType: 'Account'
          enabled: true
        }
        blob: {
          keyType: 'Account'
          enabled: true
        }
      }
      keySource: 'Microsoft.Storage'
    }
    accessTier: 'Hot'
  }
  tags: appTags
}

// Blob Services for Storage Account
resource blobServices 'Microsoft.Storage/storageAccounts/blobServices@2019-06-01' = {
  parent: storageAccount

  name: 'default'
  properties: {
    cors: {
      corsRules: []
    }
    deleteRetentionPolicy: {
      enabled: true
      days: 7
    }
  }
}

resource keyVault 'Microsoft.KeyVault/vaults@2019-09-01' existing = {
  name: keyVaultName
  scope: resourceGroup()
}

module setStorageAccountSecret 'setSecret.bicep' = {
  name: 'stgSecret-${appInternalServiceName}-${deploymentDate}'
  params: {
    keyVaultName: keyVault.name
    secretName: '${storageAccount.name}-${appInternalServiceName}-ConnectionString'
    secretValue: 'DefaultEndpointsProtocol=https;AccountName=${storageAccount.name};EndpointSuffix=${environment().suffixes.storage};AccountKey=${storageAccount.listKeys().keys[0].value}'
  }
}

// App Service
resource appService 'Microsoft.Web/serverfarms@2020-12-01' = {
  name: appServiceName
  location: location
  kind: 'functionapp'
  sku: {
    name: 'Y1'
    tier: 'Dynamic'
    size: 'Y1'
    family: 'Y'
    capacity: 0
  }
  properties: {
    maximumElasticWorkerCount: 1
    targetWorkerCount: 0
    targetWorkerSizeId: 0
  }
  tags: appTags
}

// Function App
resource functionApp 'Microsoft.Web/sites@2020-12-01' = {
  name: functionAppName
  location: location
  identity: {
    type: 'SystemAssigned, UserAssigned'
    userAssignedIdentities: {
      '${msiRbacId}': {}
    }
  }
  kind: 'functionapp'
  properties: {
    keyVaultReferenceIdentity: msiRbacId
    enabled: true
    hostNameSslStates: [
      {
        name: '${functionAppName}.azurewebsites.net'
        sslState: 'Disabled'
        hostType: 'Standard'
      }
      {
        name: '${functionAppName}.scm.azurewebsites.net'
        sslState: 'Disabled'
        hostType: 'Standard'
      }
    ]
    serverFarmId: appService.id
    siteConfig: {
      appSettings: [
        {
          name: 'AzureWebJobsStorage'
          value: '@Microsoft.KeyVault(VaultName=${keyVault.name};SecretName=${storageAccount.name}-${appInternalServiceName}-ConnectionString)'
        }
        {
          name: 'WEBSITE_CONTENTAZUREFILECONNECTIONSTRING'
          value: '@Microsoft.KeyVault(VaultName=${keyVault.name};SecretName=${storageAccount.name}-${appInternalServiceName}-ConnectionString)'
        }
        {
          name: 'APPINSIGHTS_INSTRUMENTATIONKEY'
          value: appInsightsInstrumentationKey
        }
        {
          name: 'APPLICATIONINSIGHTS_CONNECTION_STRING'
          value: 'InstrumentationKey=${appInsightsInstrumentationKey}'
        }
        {
          name: 'FUNCTIONS_WORKER_RUNTIME'
          value: functionRuntime
        }
        {
          name: 'FUNCTIONS_EXTENSION_VERSION'
          value: '~3'
        }
        {
          name: 'CosmosDbConnectionString'
          value: '@Microsoft.KeyVault(VaultName=${keyVault.name};SecretName=CosmosDbConnectionString)'
        }
      ]
      use32BitWorkerProcess: true
    }
    scmSiteAlsoStopped: false
    clientAffinityEnabled: false
    clientCertEnabled: false
    hostNamesDisabled: false
    dailyMemoryTimeQuota: 0
    httpsOnly: false
    redundancyMode: 'None'

  }
  tags: appTags
}
What we do:
- Create the storage account, needed by Azure Functions runtime. I am creating one storage for each function. Of course, you can use existing storage, share it with many functions.
- Enable blob services for the account - seems to be required.
- Get a reference of an existing key vault instance and expose it to the script. Note that we require an existing instance of Key Vault. I decided to do this to show an example of how we can reference existing resources on scripts.
- Save the storage account connection string on the key vault
- Create an App Service designed to be used on a Consumption plan (Y1 Dynamic). The App Service is like a server where the functions will run.
- We define the Function App, using the Managed Service Identity (MSI) that we defined before. We use some defaults and we configure the settings using a special syntax for this.
There are many settings that you can investigate and try yourself. In the next picture, on the JSON View tab, you can see how complex the function can be:

JSON View is clicked. Many settings don't need to be set, but some of them can help to troubleshoot failed vs successful deployments. Almost all resources will have a JSON definition - go to Overview tab and find it in the upper-right corner.
The script is finished. Just run and it will work.
Function App Identity configuration
The script above defines the identity for the function like this:
identity: {
    type: 'SystemAssigned, UserAssigned'
    userAssignedIdentities: {
      '${msiRbacId}': {}
    }
  }
There are two properties: type and userAssignedIdentities.
I have specifically tried all the combinations possible for the type parameter. It is required to enable the SystemAssigned identity if we only want to use the UserAssigned identity. I lost hours of hard troubleshooting simply trying to understand why the app doesn't start when only the UserAssigned identity is used. I tried to find deployment/permission issues using the Diagnose and solve problems wizard and never found a solution. The only way I was able to discover the issue was to enable Application Insights for the Key Vault and see the errors regarding the access. Then I had to get the objectId printed in the log and had to look for any identity with that id. It turns out that for some reason, the User Assigned Id was not able to reach the Key Vault and no error was thrown. Allowing the System Assigned Id enabled the function app to reach the Key Vault and finally, throw the exact exception describing the missing permissions when the Function App tried to access the secrets. I know this can be very confusing to explain in words, but it seems that we need to enable both types of identities to touch the Key Vault. I will try to simulate some problems and troubleshooting steps in a further post.
The property userAssignedIdentities is badly documented and it was very hard to find the correct syntax to configure this. I also spent many hours on this. The value of the MSI object id is passed as a parameter here. This MSI will carry the permissions we configured above and will try to interact with Key Vault. I hope you don't find issues with this. If so, again, please enable monitoring for your Key Vault instance and find issues on the logs.
Syntax to reference Key Vault settings inside Function App Configs
It's very cool to have the ability to call the Key Vault directly from the configuration of the Function app. This is especially nice because there are no code changes to load secrets and expose them to the app - everything is done on your behalf.
The syntax is:
'@Microsoft.KeyVault(VaultName=kv-some-keyVault;SecretName=CosmosDbConnectionString)'
More details are described here: Key Vault references in configuration.
Application Insights' Instrumentation Key
We usually don't need to consider the Instrumentation Key as a secret. Many DevOps teams save this key on Key Vault just for convenience. In our case, I copied the value into the configuration settings directly.
Useful commands
Purge an Azure Key Vault instance after your delete it. Probably you will need if you retry this deployment many times:
az keyvault purge -n kv-sampleApp-1234 --no-wait
Get the current logged-in information:
az ad signed-in-user show
Grab a list of current role definitions:
az role definition list > roleDefs.out
Grab a list of current role assignments and output to a file:
az role assignment list > roleAssignments.out
Delete role assignment by hand
az role assignment delete --id "/subscriptions/xxxxxxxxx-xxxx-xxxx-xxxx-xxxxxxxxxxxx/providers/Microsoft.Authorization/roleAssignments/<object id of the identity>"
Final hints
- Go to the
Deploymentsmenu on the resource group and open each of the deployments that failed to see the real reason for a given failure. The errors on the VSCode are sometimes very misleading or hard to read because it tries to concatenate many error messages. - Application insights is your friend when dealing with Key Vault issues. To enable it, you have to go to
Monitoring > Diagnostic Settings > + Add diagnostic setting. Ask to flowAudit EventsandAzurePolicyEvaluationDetailsto the Log Analytics workspace defined in this deployment. - When a function does not start, it's very hard to troubleshoot because the application is not available. No Kudo. No console. No logs in Application Insights. No Diagnose and Solve Problems option will work. It's crucial to be sure that function identity is working.
- The development team might need the same or similar permissions to run the solution on their local machines.
Conclusion
I tried to show how we would structure a realistic deployment script using Bicep. I believe that for Azure-only scenarios this is the way to go. The script code is composable, easy to read and maintainable. There are also native functions that help in many aspects.
To structure a full application to be deployed, an important amount of time, trial-and-error, patience and troubleshooting skills is necessary. I recommend that you consider splitting all the deployments into smaller scripts and try to deploy each one individually to isolate deployment issues.
This is the beginning of the journey. With a working script in hands, it's important to make this work on the deployment pipeline and add code to this solution. I will cover this in the future as well.
Thanks for reading!
Mário
Written with StackEdit.


Top comments (0)