You probably know that with my friends Gera and Javier we are working on a Bell tower (called Carrillon) automation using Raspberry Pi, Python and VASmalltalk.
Liquid error: internal
Last week, Gera was in his way to Buenos Aires airport to take a plane to Las Vegas. Via chat, he told me he forgot his Pi: he wanted to work on our project during his free time on the trip. Any normal person would have just order another one on Amazon or wait until home.
But it was Gera. So he asked me “Could you give me SSH access to your Pi?”. Sure, I have 3 or 4 Raspberries around and with my Eero router it’s quite easy to do port forwarding. I also had No-IP hostname and the client app refreshing the IP on my Mac. So… it was pretty easy for me to give him all those tools: external IP, SSH access and my running Pi.
In this post, I am writing down everything he figured out (and shared with me) to remotely access Raspberry Pi GPIOs. It’s very important to note that “remote” doesn’t mean “Las Vegas”. It’s even very useful to access your Raspberry Pi GPIOs from your Linux development machine.
Finally, as a prerequisite of this post, I recommend you reading first a previous one that explains the basis of pigpio and VASmalltalk.
Liquid error: internal
Setting up the Raspberry Pi for remote GPIO
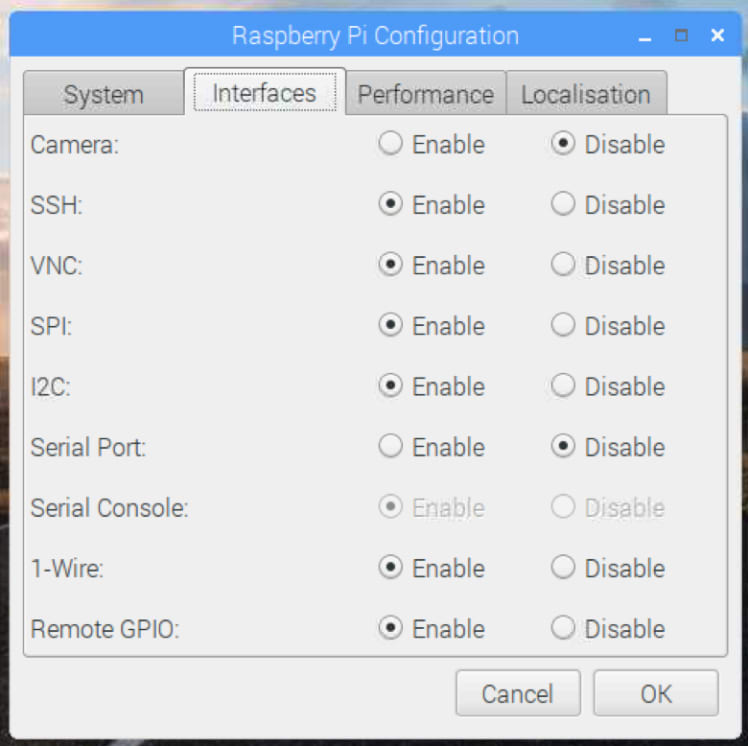
The first thing is to tell Raspbian that you allow remote GPIO. You can do this from command line with sudo raspi-config or with the user interface as shown below (look at the bottom):
The last thing is that you must explicitly start the pigpiod daemon on a given port. For example, sudo pigpiod 8888. If you want to avoid this you would need to change that and start the daemon on startup with something like sudo systemctl enable pigpiod. For this post, we started it by hand as showm above.
Setting up your Linux client machine
The client machine must also have (like the Pi does) the pigpio library installed. Depending on which Linux distro you are, it could be a simple sudo apt-get install pigpiod kind of command. If the package is not there, then you can compile from source as explained here. You can run sudo pigpiod -v to verify the library was correctly installed.
Now, on the abt.ini file used by VASmalltalk, under the section [PlatformLibrary Name Mappings] you must add these lines:
RaspberryGpio=libpigpio.so
RaspberryGpioDaemon=libpigpiod_if2.so
RaspberryGpioUltrasonicDaemon=libpigpioultrasonic.so
Be sure those are correct and “findable” by the OS.
Connecting the client Linux to the remote Pi
To connect from the Linux machine to the Pi machine, you basically need to know it’s IP and have a connection to it. If both are in the same internal network (and there is no firewall or something in the middle blocking that port), then you can probably do the following in Smalltalk:
RaspberryGpioDaemonInterface defaultIP: 'XXX.XXX.XXX.XXX' andPort: '8888'.
Where XXX.XXX.XXX.XXX is the internal IP of your Pi.
If you want to connect from outside your local network and you want to avoid opening the 8888 port, you can do a SSH tunnel:
ssh -v -t -YC -p NNNN pi@'YYY.YYY.YYY.YYYY' -L 8888:127.0.0.1:8888
Or:
ssh -v -t -YC -p NNNN pi@'your.hostname.dns.whatever' -L 8888:127.0.0.1:8888
To confirm the tunnel is working, you can run nc -v 0 8888 on your client Linux. You should see a success message and then see some debugging info in the SSH console where you opened the tunnel.
Once the tunnel has been stablished you can now connect to the Pi from Smalltalk like this:
RaspberryGpioDaemonInterface defaultIP: '127.0.0.1' andPort: '8888'.
See it live
Below is a video showing how all this worked for real between Gera and me:
Liquid error: internal
Full Smalltalk example
Below is a whole example of connecting a client to a remote Raspberry Pi and accessing the GPIO pins of a IO expander I2C MCP23017 (we will talk about this on a future post) using SSH tunnel:
| d bit0 bit1 bit2 bit3 |
RaspberryGpioDaemonInterface defaultIP: '127.0.0.1' andPort: '8888'.
pigpio := RaspberryGpioDaemonInterface raspberryGpioStart.
device := pigpio createI2cDevice: I2CDeviceGPIOMCP23017 slaveAddress: 16r20.

device allOutputs.

bit0 := GPIOPort on: device bit: 0.
bit1 := GPIOPort on: device bit: 1.
bit2 := GPIOPort on: device bit: 2.
bit3 := GPIOPort on: device bit: 3.

d := Delay forMilliseconds: 450.
[true] whileTrue: [
   bit0 pulseForMilliseconds: 500.
   d wait.
   bit1 pulseForMilliseconds: 500.
   d wait.
   bit2 pulseForMilliseconds: 500.
   d wait.
   bit3 pulseForMilliseconds: 500.
   d wait.
   bit2 pulseForMilliseconds: 500.
   d wait.
   bit1 pulseForMilliseconds: 500.
   d wait.
].
Conclusion
Being able to directly manipulate the GPIOs of your Raspberry Pi from a development machine or from anywhere in the world, is a tremendously useful feature. Thanks Gera for showing me how to do it!


Top comments (0)