Have you ever wanted to convert a string written in either PascalCase or camelCase to a hyphenated kebab-case? Of course you have; we all have. I get asked how to do this maybe 42 times per day, so here's how you do it.
A Regular Expression
In JavaScript:
"MyParagraphElement".replace(/([a-z0-9])([A-Z])/g, "$1-$2").toLowerCase()

// my-paragraph-element
How about in PHP?
<?php

$input = 'MyParagraphElement';
$output = strtolower(preg_replace('/([a-z0-9])([A-Z])/', '$1-$2', $input));

echo $output;
What about C#?
using System;
using System.Text.RegularExpressions;

public class Program
{
    public static void Main()
    {
        string input = "MyParagraphElement";
        string output = Regex.Replace(input, @"([a-z0-9])([A-Z])", "$1-$2").ToLower();

        Console.WriteLine(output);
    }
}
How does it work?
The regular expression looks for a lowercase alphanumeric character [a-z0-9] followed by an uppercase alpha character [A-Z], both in a capture group (xyz). We use $1 and $2 because we want to retain the characters, but put something in between them.
If you were to replace it with $1.$2, you'd end up with a result like: my.paragraph.element
When would you use this?
This could be used for automatically inferring class names like converting MyParagraph to my-paragraph which is handy for autoloading ShadowDOM elements (or similar in PHP).
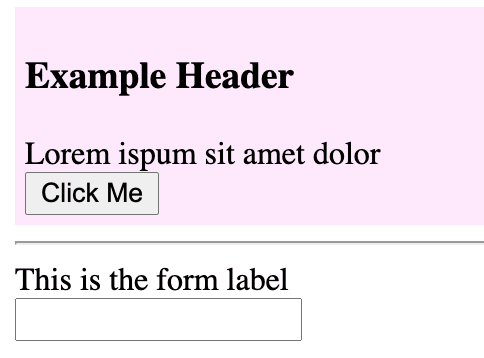
Example: https://jsfiddle.net/tbkhczd7/1/
Let's look at two files: index.html and a main.js.
In the HTML below, you can see that we have two custom tags being utilized named my-paragraph and labeled-input.
They are defined using HTML's template tag. Read more on MDN to better understand their capabilities and how to use if you're unfamiliar.
These templates are one half of what defines our ShadowDOM elements. They provide the structure, allow customization, and utilize scoped <style> tags for visual representation.
<main>
    <my-paragraph>
        Lorem ispum sit amet dolor
    </my-paragraph>

    <hr />

    <labeled-input>
        This is the form label
    </labeled-input>
</main>

<!-- Template for the MyParagraphElement class -->
<template id="my-paragraph">
    <style>
        section {
            background-color: #fde7fc;
            padding: 5px;
        }
    </style>

    <section>
        <h3>Example Header</h3>
        <div>
            <slot>Ambulance is on its way</slot>
        </div>
        <button>
            Click Me
        </button>
    </section>
</template>

<!-- Template for the LabeledInputElement class -->
<template id="labeled-input">
    <label>
        <div><slot></slot></div>
        <input type="text" />
    </label>
</template>
The other half required is JavaScript to define and initialize the elements. There's a fair amount of code here, but the gist is:
- Extend HTMLElement to abstract common functionality
- Derive specific classes from the aforementioned
- Associate our classes to our templates
Note that you could extend any element you want, not just HTMLElement; if you wanted to beef up a button, you could do something like this:
class MyButton extends HTMLButtonElement { ... }
Below, you'll see in the static attach(...) method, we use our PascalCase converter mentioned earlier in this article.
Read through the code and we'll catch up down below.
/**
 * Base class for our shadow elements
 */
class CustomHtmlElement extends HTMLElement
{
    /**
     * Optional template element. If one is not supplied, we
     * will try to infer one based on the classname.
     *
     * @param HTMLElement template
     * @return void
     */
    static attach(template) {
        if (!template) {
            // Convert MyParagraphElement to my-paragraph
            const tagName = this.name
                .replace(/([a-z0-9])([A-Z])/g, '$1-$2')
                .toLowerCase()
                .replace(/-?element/, '');

            template = document.querySelector(`#${tagName}`);
        }

        // Save template reference
        this.template = template;

        // Create shadow object
        customElements.define(this.template.id, this);
    }

    /**
     * @return void
     */
    constructor() {
        super();

        // Clone element from our template
        this.templateNode = this.constructor.template.content.cloneNode(true);

        // Make shadow
        this.attachShadow({ mode: 'open' }).appendChild(this.templateNode);

        // Attach events call
        this.attachEvents();
    }

    /**
     * @return void
     */
    attachEvents() {
        // Not implemented
    }

    /**
     * @return void
     */
    detachEvents() {
        // Not implemented
    }
}

/**
 * Custom element class extends our root class
 *
 * @extends CustomHtmlElement
 */
class MyParagraphElement extends CustomHtmlElement {
    /**
     * Attach events to the DOM
     *
     * @return void
     */
    attachEvents() {
        this.shadowRoot
            .querySelector('button')
            .addEventListener('click', this.Handle_OnClickButton);
    }

    /**
     * Respond to click events
     *
     * @param MouseEvent e
     * @return void
     */
    Handle_OnClickButton(e) {
        alert('This button has been clicked');
    }
}

/**
 * Basic labeled input
 *
 * @extends CustomHtmlElement
 */
class LabeledInputElement extends CustomHtmlElement {
    // Not implemented
}


// -------------------------------------------------------------------------

// ⬇︎ We could explicitly pass in an element
// const element = document.querySelector('#my-paragraph');
// MyParagraphElement.attach(element);

// ⬇︎ Or we could derive it from the class name automatically
// MyParagraphElement.attach();

// ⬇︎ Or we can try to infer it inversely based on our templates
Array.from(document.getElementsByTagName('template')).forEach(element => {
    // Convert "my-paragraph" to "MyParagraphElement"
    const className = element.id
        .replace(/^([a-z])/, m => m.toUpperCase())
        .replace(/-([a-z])/g, m => m.toUpperCase())
        .replace('-', '')
        + 'Element';

    const reference = eval(className);

    reference.attach();
});
The functionality provided within LabeledInputElement and MyParagraphElement are just demonstrative to illustrate how they have the ability to scope events/logic.
In our static attach(template) { ... } method, you can see there's a null check against template at which point it attempts to convert our class name into what the expected HTML tag would be. There's additional logic you could add here to ensure the element exists, but for the sake of example we're assuming that our coupled templates should exist.
At the bottom, the uncommented example iterates through all available <template> tags and reverses kebab-case to PascalCase in an attempt to find the defined class. Again, you should add logic here to ensure what you're looking for actually exists, but this is a demo.
By using our two string conversions, we're able to easily create and autoload custom ShadowDOM elements just by using basic definitions; two steps:
- Create a
<template>with a uniquekebab-caseidentifier - Create a class with a similar
PascalCaseidentifier
Now you can cleanly create classes + templates and autoload them without the hassle of maintaining coupled definitions.


Top comments (0)