Istio Authorization Policies
I recently had to debug Istio authorization policies and I learned what a pain it can be understand how and when policies are applied to protect service on your mesh. This post is my attempt to explain the important bits of how to set this up.
With that said, checkout the Istio official docs for more detail.
The Tools
Istio
Istio is one of the leading service mesh implementations out there. It's used by a lot of companies to manage the growing overhead of having services running on Kubernetes. This is especially true when dealing with microservice architectures, which yield dozens (if not hundreds) services which need to talk to each other securely and reliably.
Using a service mesh, like Istio, handles a lot of this complexity for you. For example app developers do not need implement the following features and can instead use what's configurable in the mesh:
- mTLS between services (encrypted both ways)
- telemetry (common network metrics exposed for Prometheus)
- rate limiting & fault tolerance
- authentication (proving who you are)
- authorization (can you do that?)
There is more the service mesh can do for your, but we're going to focus on the last two in this post.
The JWT
(pronounced 'jot')
Authentication is proving who are you. Using Istio, you can request clients calling services on the mesh prove who they are using JWTs (Javascript Web Token). This functionality is configured with a RequestAuthenication CRD (Custom Resource Definition). Once this functionality is configured you can use AuthorizationPolicies CRDs to enforce RBAC based on provided JWTs.
But to that, you need to understand what the JWT is, and how it's used in conjunction with Istio to enforce RBAC for services.
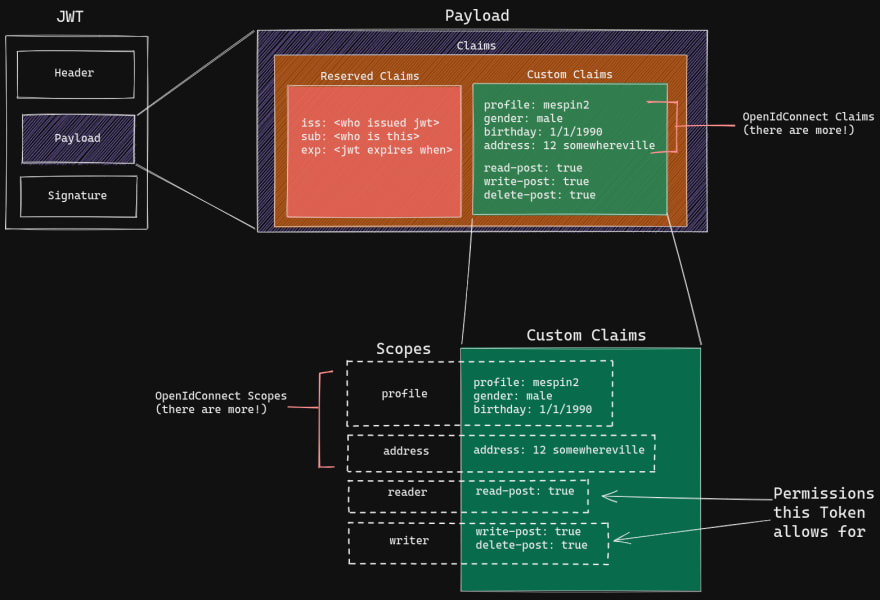
Above: Anatomy of a JWT
The JWT is the standard token used in OpenIDConnect (OIDC) spec, and widely used as result. It has three pieces to it, the header, payload, and signature. We are focused on the payload. Within the JSON payload one can put data (note: keys in the payload are called claims). That said, there are certain keys (claims) that are reserved by the JWT spec. Non-reserved claims are called custom claims, of which the OIDC spec defines a handful of. These claims are often grouped into scopes. Where a scopes can be thought of as groupings of related permissions. Again, unsurprisingly the OIDC specifies certain scopes.
Now why does this matter?
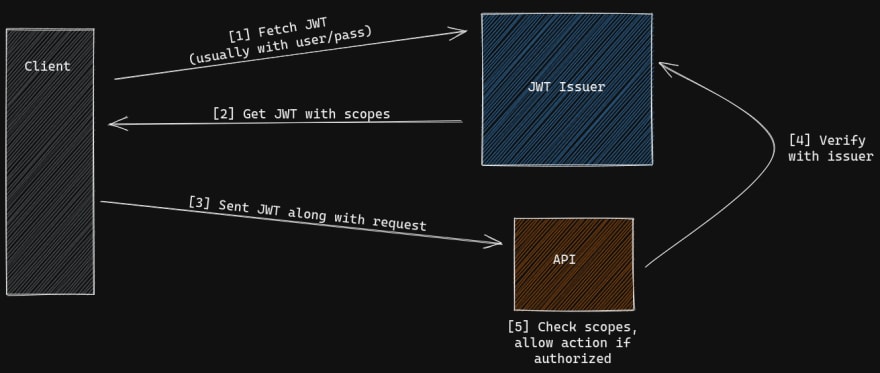
Because, having a JWT can act as proof of who you are, and claims within the JWT capture what you are allowed to do. Clients usually obtain a JWT by requesting one from a JWT issuer along with some credentials to prove identity (user/pass/2FA). The JWT is then usually provided by the client to the app in the Authorization: Bearer <token> request header. There's a whole slew of tooling around doing this "handshake", from both client and server-side (Istio included). The neat thing about using a service mesh is that Istio can handle this interaction transparently to services. You only need configure the RequestAuthenication and AuthorizationPolicy objects.
Above: JWT 'handshake'
The RequestAuthentication Object
In the RequestAuthentication object you can specify which workloads require a JWT from which trusted issuers. Note you need to provide jwksUri so that Istio knows where to grab the certs used in the validation of the tokens (aka the JSON Web Key Set). Your issuer will have an endpoint for this (sometimes linked from the well-known endpoint ).
Example Request Authentication
In this example, we want our service httpbin in the foo namespace to require a valid JWT issues from google.
apiVersion: security.istio.io/v1beta1
kind: RequestAuthentication
metadata:
  name: foo-req-auth
  namespace: foo
spec:
  selector:
    matchLabels:
      app: httpbin
  jwtRules:
  - issuer: "https://accounts.google.com" # Whose JWTs do you trust?
    jwksUri: "https://www.googleapis.com/oauth2/v3/certs" # Certs to verify JWTs
This alone does not however enforce that others cannot hit your endpoint publicly. You need to this this in with Authorization Policies.
The AuthorizationPolicy Object
Now here is the meat of what you will be configuring when using Istio enforce RBAC for your services. I won't go in depth here (there is a lot you can do) but I will briefly touch on the .
- There are 3 kind of authorization policies:
- allow policies
- deny policies
- custom policies
- There is an ordering in how access is determined with these three policies
- These policies have
rules, which define if certain criteria is met, what level of access is allowed.
Example Authorization Policy
In this example, we allow access to our service httpbin in namespace foo from any JWT (regardless of the principle) to use the GET method.
apiVersion: "security.istio.io/v1beta1"
kind: "AuthorizationPolicy"
metadata:
  name: "allow-reads"
  namespace: foo
spec:
  selector:
    matchLabels:
      app: httpbin
  rules:
  - from:
    - source:
        principals: ["*"]
    to:
    - operation:
        methods: ["GET"]
Example tying together claims with Authorization Policies
🚧 I will fill out this section soon. I working on more examples and diagrams to tie these concepts together!
I highly recommend reading Istio By Example for more info!
Access Flow with Auth Policies
There is some logic behind how authorization is determined given defined AuthorizationPolicies. Below is the flow as taken directly from the Istio documentation.
1 - If there are any CUSTOM policies that match the request, evaluate and deny the request if the evaluation result is deny.
2 - If there are any DENY policies that match the request, deny the request.
3 - If there are no ALLOW policies for the workload, allow the request.
4 - If any of the ALLOW policies match the request, allow the request.
5 - Deny the request.
source
That said, as a visual learner, I need something tangible to keep this model in my head. So I think model the auth flow a person in a cooperate lobby trying to get enter an office.
In this analogy:
- the Custom auth policies can be thought of C-level execs
- They can decided many things, including if your allowed in or not!
- the Deny policies can be thought of a office security
- They are on the look out for features, if you catch their eye they will kick out
- the Allow policies can thought of as employees of the office your are visiting
- They can swipe you into the office if they happen to be expecting you

Above: You enter the lobby and you notice the custom policies. If they are expecting (match) you, they will decide if you should be allowed in the office or not. They make the first call in regards to access.
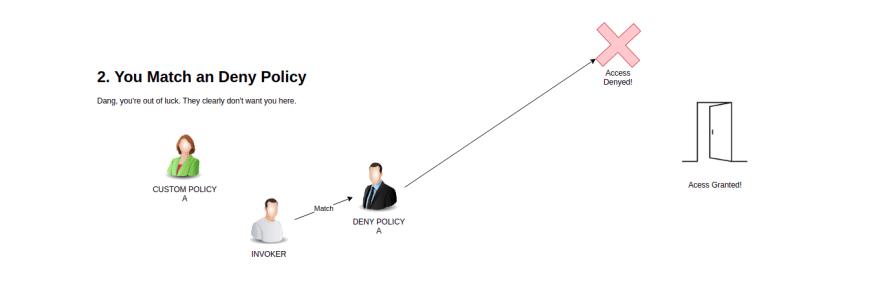
Above: Here, the execs are not expecting you, you're barely noticed by them. But if you catch the eye (match) one of the deny policies, they will escort you out. So try not to look suspicious!
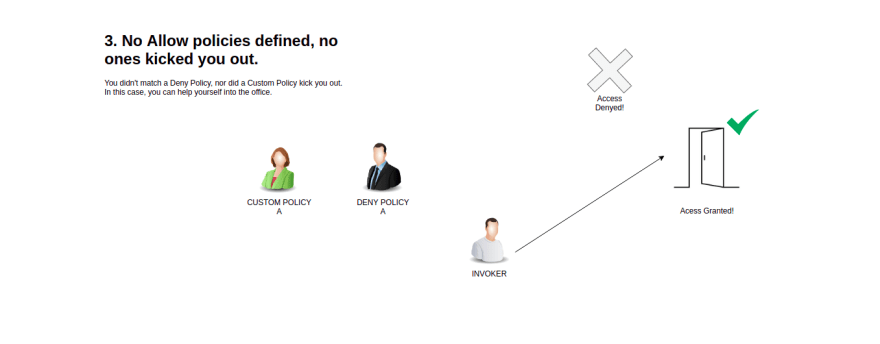
Above: In this case, no one wants you out and there are no Allow policies defined. It's assumed you are allowed to enter the office
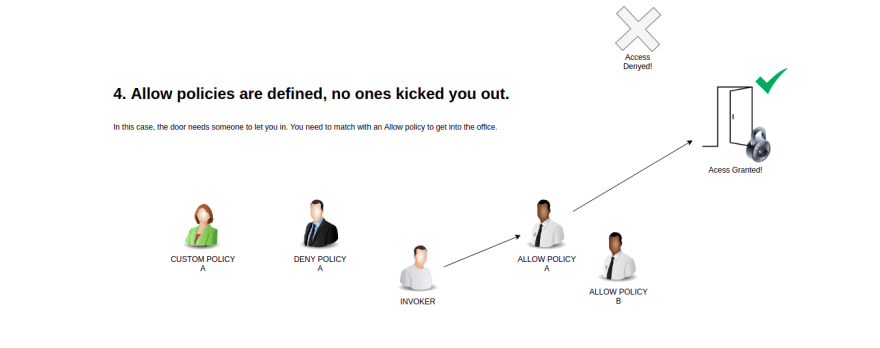
Above: But, if any Allow policies are defined, you're going to need to have one of them expecting you (match) to allow you into the office.
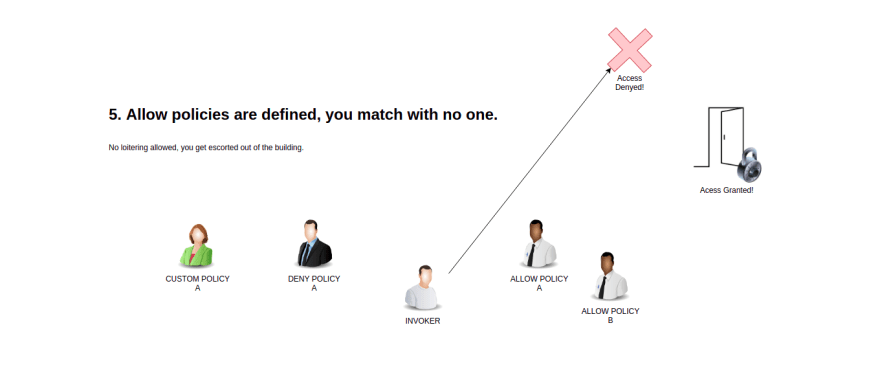
Above: If no one is expecting you, but no one kicks you out explicitly, you are not allowed linger in the lobby. You will be kicked out.
In Summary
Using Istio you are just a few configuration files away from handling auth for your services. While the configuration of these files might be a little obtuse, thinking about how they fit and how they get applied shouldn't have to be!
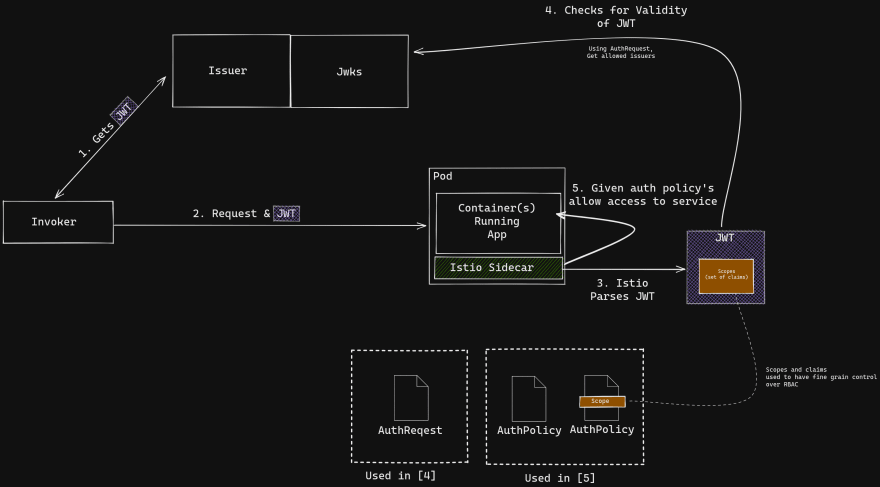
Above: The main actors in this play and the steps that happen. Note in step 5, that we apply the flow discussed earlier in this post.




Top comments (1)
Great infortmation share with us!! spell to make him call me