
Introduction
Web3, NFTs, and smart contracts are growing in popularity. In fact, a recent analysis of public code repositories has shown that over 18,000 developers are regularly contributing to open source crypto and Web3 projects on a monthly basis. Some of the keys to this growth are blockchains like NEAR and developer platforms like Infura.
In this article, we’ll look at the NEAR blockchain, its benefits, and how to build on NEAR using Infura. Then we’ll use the NEAR Rust SDK to mint an NFT in three steps and then interact with that NFT from Infura. You’ll need a NEAR account, an Infura account, and some Rust skills and tools to get up and running quickly.
What is NEAR?
NEAR is a blockchain with an active developer community of thousands of builders, backed by a foundation that provides stability for DeFi, NFT, and DAO-related projects. NEAR focuses on providing low transaction fees and fast transaction throughput, as well as the most cutting edge sharding mechanisms in Web3 known as Nightshade.
NEAR has many other benefits, including human-readable account names, a focus on carbon-neutrality, and the use of general-purpose languages for writing contracts. Compared to Ethereum, NEAR is significantly faster and has a more progressive user experience. They aren’t seeking to replace the Web3 giant, however. With their Aurora layer and easy bridging between multiple blockchains, NEAR aims to improve interoperability in the ecosystem.
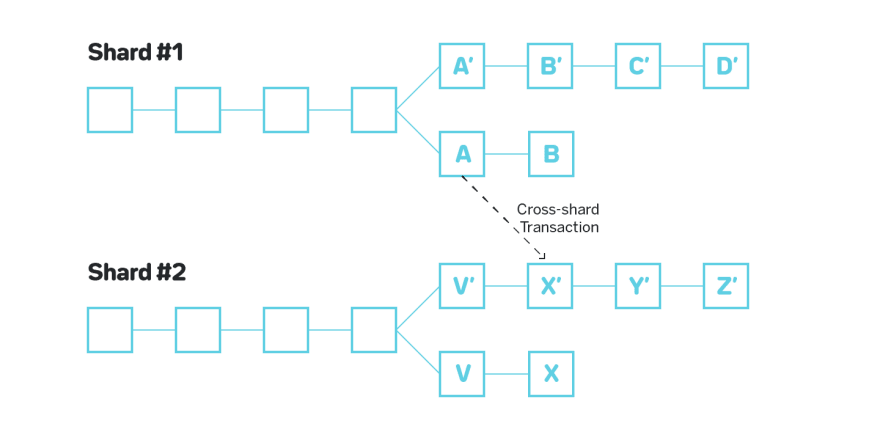
A basic shard design. Splits the blockchain into multiple ‘shards’ while allowing cross-shard communication.
What is Infura?
Infura allows developers to build smart contracts using an intuitive JSON-RPC API for interacting with multiple blockchains. While Infura was the first-ever API solution built for Ethereum, the platform also provides support for the decentralized storage network, IPFS, layer two chains Polygon, Arbitrum, and Optimism, and now NEAR as part of their plans to expand across multi-chains and protocols to advance Web3. Infura makes it easier for beginners and veterans alike to get started with blockchain development.
Since Infura serves as the connection point to the blockchain, there’s no need to spin up and run your own node to access the above blockchains. This significantly reduces startup time since you don’t need to spend hours syncing your nodes with multi-networks. Infura is an Infrastructure-as-a-Service (IaaS), so they provide everything a developer needs to build on blockchains and scale.
Step 1: Minting an NFT
At this point, it might sound intimidating to dive right into this technology. To make your job easy, we’ll follow NEAR’s guide to minting an NFT, plugging in Infura to make this process even smoother.
1a: Create a NEAR account
The first thing you will need to do is create your NEAR account. Since we’re doing this for learning purposes, you can create your wallet on NEAR’s testnet, providing your account with some NEAR tokens to build with for free. Once you’re ready to take your solution into production, you’ll need real NEAR tokens on the NEAR mainnet, but for now, we’ll use test tokens. Creating an account is pretty straightforward, and this documentation will walk you through creating a testnet account.
Notice the human-readable account address you generated? This address is much easier to keep track of and share compared to other blockchains. Additionally, if you set up your account using email, you will receive an account recovery link, something most other chains don’t even offer.
Once you have your testnet account and have logged in, go to the Collectibles tab, which lists all of your NFTs.

Since I’m working from a new account, I don’t have any listed right now. So let’s see how easy it is to get our very first NFT minted with NEAR, the InterPlanetary File System (IPFS), and Infura.
1b: Create an Infura account and upload to IPFS
Our next step is to create an Infura account (give your email address and a password) and create an IPFS project in that account. Be sure to select IPFS as the product when creating the project instead of Ethereum. Infura will require credit card information to get this going, but as long as you don’t use over 5GB of space or bandwidth on IPFS, you won’t be charged.
Once you have an Infura account, find something to turn into an NFT. Make sure you pick something you’re okay with being public. I chose a simple smiley face I grabbed from Wikipedia that is licensed CC-3.0 Attribution-Share Alike, but you can use whatever you want.
Infura offers a useful tool for uploading files onto IPFS. If you have a Golang build chain on your computer, you can build it locally or install a pre-built binary from the Github repo. Whichever way you install the ipfs-upload-client, you’re one command away from putting your file for NFT greatness on the IPFS.
ipfs-upload-client --id <project_id> --secret <project_secret> </path/to/data>
Obviously, you need to use your actual project id and secret, as well as the location of your file on your machine. However, as long as you run this command somewhere that has the ipfs-upload-client in the path, you should be able to see your file’s content identifier (CID) pinned in your Infura Dashboard Explorer.

Alternatively, you can upload your image to IPFS using a cURL command:
curl -X POST -F file=@myfile -u "PROJECT_ID:PROJECT_SECRET" "https://ipfs.infura.io:5001/api/v0/add"
You can view your file on dweb.link by taking the CID and putting it at the end of the URL https://dweb.link/ipfs. You’ll need to do that for the next step so you have the case-insensitive CID anyway, so go ahead and verify. Once you have your CID, let’s move to the next step.

1c: Build an example NFT contract
NEAR provides an excellent example repository for getting started with NFTs that follows the NEAR Enhancement Proposal standard. Clone that repo and poke around in it. The real meat of this example is in the nft/src/lib.rs file, but feel free to look around more. If you have the repository cloned with the proper Rust toolchain installed, as described in the README, then simply run the build.sh file in the root of the repository to get going.
Once you’ve built your smart contract locally, you can deploy it to NEAR and mint your first token using the near-cli. If you’ve never installed the NEAR CLI before, do so with npm and then run these steps from the directory where you built your contract:
$ near login

$ export ID=YOUR_NEAR_TESTNET_ID # replace this with your actual ID

$ near deploy --wasmFile res/non_fungible_token.wasm --accountId $ID

$ near call $ID new_default_meta '{"owner_id": "'$ID'"}' --accountId $ID

$ near call $ID nft_mint '{"token_id": "0", "receiver_id": "'$ID'", "token_metadata": { "title": "Example NEAR non-fungible token", "description": "Smile", "media": "https://bafybeifehwew2sq7m7ofwuzg65mft3hgy7y7ml53r2q46cbcfhl4yqpsiy.ipfs.dweb.link/", "copies": 1}}' --accountId $ID --deposit 0.1 # make sure to use your CID
If everything went well, you should have your NFT showing in the collectibles area of your NEAR wallet.

While this is admittedly more than trivial, it’s pretty amazing how much quicker and cheaper you can mint an NFT, compared to most blockchains. Minting an NFT is just the start, however. Let’s see how we can use Infura to interact with it.
Step 2: Inspecting blockchain details from Infura
Infura has robust support for multiple different blockchains and IPFS projects to provide a smooth JSON-RPC API you can build against and observe the transaction activity of your application. For now, we’ll focus on checking the gas price to transfer your NFT to another address. It’s just a single API call away.
curl -X POST \
-H "Content-Type: application/json" \
--data '{"jsonrpc": "2.0", "id": 1, "method": "gas_price", "params": [null]}' \
"https://near-testnet.infura.io/v3/<YOUR-PROJECT-ID>"
You should get a response that looks something like this:
{"jsonrpc":"2.0","result":{"gas_price":"100000000"},"id":1}
As long as you add NEAR to your Infura RPC endpoint URL, you will be able to interact with the API using any of the other JSON-RPC methods supported by Infura. Additionally, Infura will allow you to monitor interactions through your project dashboard. You’ll also be able to configure a greater degree of security than is possible with just raw JSON-RPC calls to the NEAR API.

Step 3: Keep minting!
In this article you learned about NEAR, a faster, cheaper, and eco-friendly layer one blockchain. You also learned how Infura, as a node providing service, allows you to interact with NEAR using their RPC endpoint URL.
Hopefully the tutorial has shown you some of what’s possible and you’re more confident in your ability to use Web3 tools to build your innovations. Give NEAR and Infura a try for your next Web3 project. They can really help make your work a lot smoother.


Top comments (0)