It's been a few months since my last post, and am excited to begin posting again!
Following my completion of EffectiveDonate, a nonprofit discovery website I developed for my capstone project, it was time to publicly deploy it. I've had experience deploying other projects I built at the Flatiron School to Heroku (a cloud platform service), so I decided to go with Heroku again for EffectiveDonate. However there were a few additional features of Heroku I needed to use for the first time since I was working with API data that I needed to refresh regularly, requiring me to schedule a job to run daily. Let me tell you how I did it!
What Are Heroku Add-ons?
According to Heroku, add-ons are components that support your application, such as data storage, monitoring, analytics, data processing, and more. Add-ons are managed either by third-parties or by Heroku itself. The purpose of add-ons is to allow developers to focus on the maintenance of their own code and to outsource the services supporting production to the add-ons.
You can install add-ons either through the CLI or the Heroku Dashboard.
Heroku Scheduler
My EffectiveDonate site uses project data from the GlobalGiving API, and I have a method on my Rails backend to fetch new projects. However, these projects are dynamic - they are active only until their funding goal hasn't been reached, and then they stop taking donations. New projects are also started daily. Additionally, project funding amounts are constantly changing. As a result, I need to fetch project data daily regularly from the API to prevent stale data from reaching my application.
I researched several ways of automating query jobs, both with npm packages and Ruby gems, but I finally came across Heroku Scheduler, which turned out to be much more straightforward than those other methods.
Heroku Scheduler is a free add-on that allows you to automatically run jobs at scheduled intervals (daily, hourly, etc).
To install Heroku Scheduler, simply run heroku addons:create scheduler:standard
Creating a scheduled task
In Rails, the convention is to create a rake task file in the lib/tasks/ directory.
Below are the tasks that I have written in my scheduler.rake file:
desc "This task is called by the Heroku scheduler add-on"
task :fetch_projects => :environment do
  puts "Deleting Tables..."
  Project.delete_all
  UserStarredProject.delete_all
  puts "done."
  puts "Fetching Projects..."
  Project.fetch(nextProject: false)
  puts "done."
end

task :fetch_countries => :environment do
  puts "Deleting Countries..."
  Country.delete_all
  puts "Fetching Countries... "
  Country.create_all
  puts "done."
end
As you can see, the fetch_projects task is the one that I will be adding to Heroku Scheduler to run regularly. It completes the actions of deleting the existing Projects and fetches new Projects from the GlobalGiving API.
After making sure the task is working locally and pushing it to Heroku, I can test that it is also functioning correctly on Heroku by running heroku run rake fetch_projects. If it's working right then it will work on Heroku Scheduler!
Scheduling Jobs
To get your rake task up on Heroku Scheduler, either open Scheduler in your app dashboard or the following command: heroku addons:open scheduler.
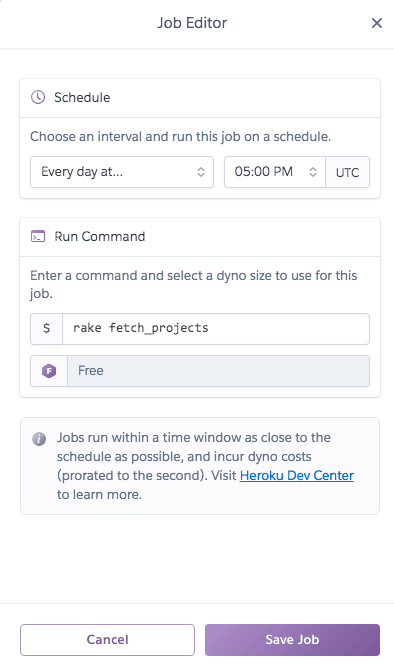
On the Scheduler dashboard, you can add and edit jobs. Jobs can be scheduled to run daily, hourly, or every 10 minutes. Next, you enter the task that the scheduler should run. In my case it was rake fetch_projects. Then just hit "Save Job", and it will start running when the next scheduled time is reached!
Below is what my scheduled job looks like:

Too much data!!
After I scheduled my fetch_projects job, everything seemed to be going fine and the databases began to populate. However, I checked my email, and saw a message with the shocking subject: "[warning] Database disruption imminent, row limit exceeded for hobby-dev database on Heroku app". That didn't sound good! I did some digging, and sure enough, I had over 45,000 rows in my app's Postgres database, while the limit for Heroku's Hobby-dev plan is 10,000 rows. I could either 1) upgrade to a higher database plan or 2) reduce the number of rows in my database.
Since I still need to build some more features in EffectiveDonate before I can start sharing it broadly, I decided to go with option 2 for now, and eventually I can always upgrade my database plan. This required a slight refactor in my database structure to avoid a join table that was adding multiple rows for each of the thousands of Project objects that I was creating.
Another useful tip I learned to prevent a scheduled job from continuing to run was a special CLI command. You can view all processes that are currently running on your Heroku app with heroku ps. If your scheduled task is running, you will be able to see its associated process id. Then you can stop it using heroku ps:stop <process id from heroku ps>, for example heroku ps:stop run.8359. This is an invaluable tool to use if you see that your database is fast approaching the 10,000 row limit, then you can stop the rake task's runaway train!
Conclusion
As you can see, the Heroku Scheduler add-on is an extremely powerful tool that can automate API fetches, or any other task that needs to be run regularly in your app. I love the Scheduler's easy-to-use interface and how nicely it plays with Rails' rake tasks. Now that I have my row count consistently under 10,000, my scheduled job has been running smoothly and there haven't been any more alarming emails reaching my inbox :)
Additional resources used in this blog:
https://stackoverflow.com/questions/7743039/killing-abandoned-process-on-heroku


Top comments (0)