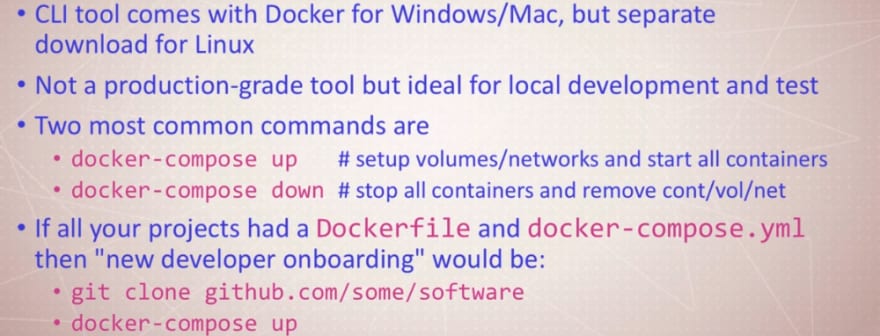
Till now we have used CLI to run containers, now we can run multiple containers with just a file . This file is .yaml file basically.
In the Part 13, we used
docker container run -p 80:4000 -v $(pwd):/site bretfisher/jekyll-serve
in .yaml file, we will use:
services:
  jekyll:
    image: bretfisher/jekyll-serve
    volumes:
      - .:/site
    ports:
      - '80:4000'
jekyll is the container name . we have set the image to bretfisher/jekyll-serve. For volume , we used .:/sitewhich means $(pwd):/site . Here "." means the current directory which $(pwd) also refers too. We have set ports to 80:4000.
You can compare the command and the .yaml file and see the difference.
Also, you can see another example of .yaml file
services:

  wordpress:
    image: wordpress
    ports:
      - 8080:80
    environment:
      WORDPRESS_DB_HOST: mysql
      WORDPRESS_DB_NAME: wordpress
      WORDPRESS_DB_USER: example
      WORDPRESS_DB_PASSWORD: examplePW
    volumes:
      - ./wordpress-data:/var/www/html

  mysql:
    # we sue mariadb here for arm support
    # mariadb is a fork of MySQL that's often faster and better multi-platform
    image: mariadb
    environment:
      MYSQL_ROOT_PASSWORD: examplerootPW
      MYSQL_DATABASE: wordpress
      MYSQL_USER: example
      MYSQL_PASSWORD: examplePW
    volumes:
      - mysql-data:/var/lib/mysql

volumes:
  mysql-data:
Here 2 services used and 1 volumes used . You can see ENvironment variables here
environment:

      WORDPRESS_DB_HOST: mysql

      WORDPRESS_DB_NAME: wordpress

      WORDPRESS_DB_USER: example

      WORDPRESS_DB_PASSWORD: examplePW
You can also see that, we have used volume
volumes:

      - ./wordpress-data:/var/www/html
where . means current directory and wordpress-data: is to set the volume name . Also the rest part (/var/www/html) is to set the volume path.
Also for the other container, we used
` environment:
MYSQL_ROOT_PASSWORD: examplerootPW
MYSQL_DATABASE: wordpress
MYSQL_USER: example
MYSQL_PASSWORD: examplePW
volumes:
- mysql-data:/var/lib/mysql
volumes:
mysql-data:`
Here we also set this environmental variables and also volumes.
Compose CLI
Let's use it and learn.
Let's use this compose-sample-2 folder from this repo
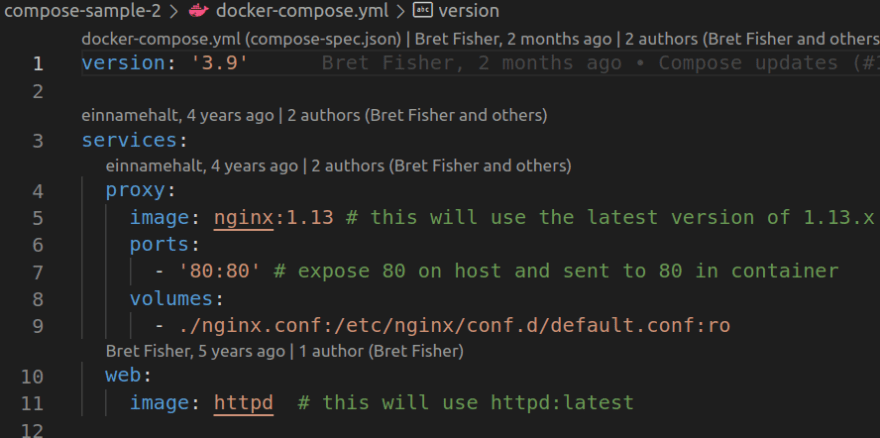
lets get into the docker-compose.yml file
Look that we have nginx.config file and in our .yaml file, we used this as volume
volumes:
      - ./nginx.conf:/etc/nginx/conf.d/default.conf:ro
./nginx.conf: means the local file called nginx.conf and we have sent all files from "/etc/nginx/conf.d/default.conf:ro" this to "./nginx.conf".
Also, we are using 2 containers here and used images "nginx:1.13" and "httpd".
Now from CLI, if we compose this .yaml file, automatially the containers will run
docker-compose up
In the terminal, we can see
Look carefully! web_1 & proxy_1 is mentioned. Remember, we did set the container names as web & proxy
If you reload the localhost, automatically, the proxy_1 & web_1 will be added.
Note: in the localhost, we actually have apache server (httpd) not the nginx server.
The traffic is actually goring from nginx server (proxy) to apache(httpd) and apache is responding with its default index.html. So, everytime you refresh, you will see this
![]()
web_1 & proxy_1 to be added in the logs.
EVerytime, it will hit the proxy first and then the back end web server apache (httpd) .
Let's stop it using Ctrl+C
We can run it again using
docker-compose up -d

containers will run in the back ground and thus no logs will be there. YOu can check the localhost

To see the logs use the command
docker-compose logs
Let's see the containers which are running
docker-compose ps
docker-compose top
To see all of the services running inside them.
Finally, to stop & clean the containers , use
docker-compose down


Top comments (0)